The Christmas Tree Earrings pattern is a delightful crochet project perfect for anyone who loves handmade holiday accessories. Right from the first stitches, this design brings together creativity, charm, and the joy of crafting something festive with your own hands. If you enjoy working on quick and decorative pieces, this tutorial will guide you through an engaging and beginner-friendly experience that highlights the beauty of small crochet ornaments.
Creating your own Christmas Tree Earrings is a lovely way to express your holiday spirit while also showcasing your crochet talents. These earrings are lightweight, customizable, and can be made using just a few scraps of yarn. Whether you prefer simple green trees or want to add beads, glitter, or extra textures, this pattern allows you full freedom to personalize your final results.
This article explores the materials you need, the steps involved, helpful tips, and the benefits of making your own handmade earrings. As you read, you’ll find everything structured clearly so even beginners can follow along with confidence. Let’s dive into the world of festive crafting and discover how to bring your Christmas Tree Earrings to life.
1. Understanding the Christmas Tree Earrings Pattern
The Christmas Tree Earrings pattern is designed to be small, lightweight, and easy to work with. Unlike large seasonal projects, this one can be completed in just a short amount of time, making it perfect for quick gifts or last-minute holiday touches. You can create a pair in under an hour once you become familiar with the steps.
DISCOVER MORE FREE PATTERNS HERE!
The size of the tree typically depends on the yarn weight and hook size you choose. Most crafters prefer lightweight yarn so the earrings won’t feel heavy when worn. Cotton yarn works beautifully because it keeps its shape well and gives the earrings a clean and defined appearance.
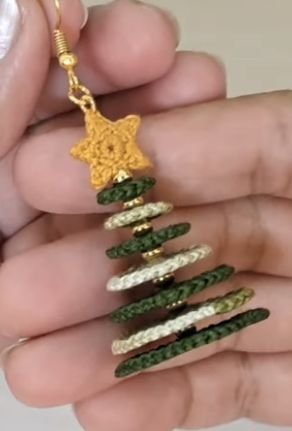
One of the strengths of this pattern is its flexibility. You can choose classic green for a traditional look, or experiment with metallic threads, multicolored yarn, or even sparkly fibers for extra shine. Adding beads as ornaments or using embroidery thread for tiny decorations can also elevate the final design.
Stitch definition plays an important role in this project. Because the trees are small, each stitch becomes part of the visible pattern, so using consistent tension ensures that both earrings match in shape and size. Even beginners can achieve great results with just a little attention to detail.
Once you become comfortable with the basic triangle shape that forms the tree, you can start modifying the pattern to create your own variations. Taller trees, shorter ones, or designs with textured stitches are all possible. The Christmas Tree Earrings pattern offers an amazing opportunity to explore creativity through simple crochet.
2. Materials and Preparations
To create the Christmas Tree Earrings, you’ll need just a handful of inexpensive and easy-to-find materials. The most important item is your yarn choice. Cotton yarn in green is the most common option, but as mentioned before, you’re free to experiment. Choose colors that best match your style or the theme you want for your holiday accessories.
Pair the yarn with a hook size that keeps your stitches tight enough to help the tree hold its shape. Most crafters choose a small hook, usually between 2.0 mm and 3.0 mm. A tighter gauge ensures your earrings remain firm and don’t curl or sag.
Another essential item is the earring hooks. You can find these at craft stores or online in different metals such as stainless steel, silver-plated, and hypoallergenic options. Use jump rings to connect your crochet tree to the metal hook securely. Jewelry pliers can help you open and close the rings neatly.
Optional materials can include beads, mini sequins, embroidery floss, or small decorative stars. These additions allow you to decorate your trees like miniature Christmas ornaments. Be sure to attach decorations securely so they stay in place when the earrings are worn.
Before starting your project, it’s helpful to prepare your workspace. Keep your tools organized and set aside a little container for small items like hooks and rings. Because the pieces are tiny, working with good lighting makes a big difference in your comfort and accuracy.
3. Step-by-Step Guide to Making the Earrings
To start your Christmas Tree Earrings, begin by forming a small triangle that will become your tree. Typically, this is done using basic stitches such as chains, single crochets, and increases. Start with a foundation chain and build upward, shaping the tree as you go.
Work row by row, increasing slightly at the sides to create the triangle silhouette. Keeping your tension even is important here to make sure both trees in your pair match well. Don’t worry if your first attempt isn’t perfect—small projects are great for practice because they use little yarn.
Once the triangle is completed, you can add a small rectangle at the bottom for the stump. This gives your earrings a more realistic holiday tree look. Some crocheters choose to skip the stump to keep the shape simple, but including it helps define the design.
After finishing the crochet work, weave in all loose ends carefully. Because the project is small, even a tiny knot or strand can show, so take your time making everything neat. A tapestry needle will help you tuck ends securely between stitches.
With your trees ready, the next step is attaching them to the earring hardware. Use a jump ring to connect the top of each tree to an earring hook. Make sure the connection is tight and the earring hangs straight. If needed, adjust the ring with pliers for proper alignment.
Now comes the fun part—decorating! Add beads for ornaments, tiny French knots for texture, or a small star bead on top of the tree. These details transform your earrings from simple crochet into charming holiday accessories that attract attention.
4. Tips, Variations, and Creative Ideas
The Christmas Tree Earrings pattern is wonderfully customizable. You can easily change the size by adjusting the yarn weight or hook size. Thinner yarn makes dainty earrings, while thicker yarn creates larger statement pieces. Always test a few rows first to see which combination suits your preference.
Color variations also open endless possibilities. A deep forest green creates a classic look, while lighter greens, sparkly gold, or even white yarns produce modern and unique versions of the tree. You can also combine two yarns at once for a textured, colorful effect.
If you enjoy adding a personal touch, consider decorating each pair differently. Some crafters use small beads as ornaments, others use metallic thread to mimic garlands, and some attach small bells that jingle when you move. Let your creativity guide you.
For a more advanced version, try using textured stitches like bobbles or picots to mimic tree branches. These techniques add dimension and make your earrings stand out even more. Just remember to balance texture with light weight so the earrings remain comfortable to wear.
Another idea is to create matching accessories. A necklace pendant, a tiny pin, or even a Christmas tree keychain using the same design helps you create an adorable themed set. These pieces also make great handmade gifts during the holiday season.
Lastly, consider making multiple pairs to sell or give away. Small crochet items like these have high appeal because they’re affordable, charming, and seasonal. With a bit of practice, you can make several pairs quickly and enjoy the process of spreading handmade holiday joy.
FAQ – Christmas Tree Earrings Pattern
1. Are Christmas Tree Earrings suitable for beginners?
Yes, this pattern is very beginner-friendly. It uses simple stitches and works up quickly, making it a great project for new crocheters.
2. How long does it take to complete one pair?
Most people finish a pair in 30 minutes to an hour, depending on skill level and decorations added.
3. What yarn works best for this pattern?
Cotton yarn is ideal because it holds its shape well, but any lightweight yarn can be used.
4. Can I make the earrings larger or smaller?
Absolutely. Adjusting the hook size or yarn weight will instantly change the size of your trees.
5. How do I attach the crochet pieces to the earring hooks?
Use a jump ring and jewelry pliers to secure the top of the tree to the hook. Make sure it hangs straight.
6. Can I decorate the trees?
Yes! Add beads, sequins, tiny bows, or small stars to customize your earrings.
7. Are these earrings heavy to wear?
No, they are very lightweight, especially when made with cotton or fine yarn.
8. Can I sell the finished earrings?
In most cases, yes, you can sell handmade items created from the pattern. Check the designer’s terms if using someone else’s instructions.
Conclusion
The Christmas Tree Earrings pattern is a delightful crochet project that adds festive charm to your holiday wardrobe. Throughout this article, you learned about the materials needed, step-by-step instructions, creative variations, and expert tips to help you craft beautiful and unique holiday accessories.
PATTERN VIDEO:
This project is quick, enjoyable, and perfect for gifting or selling during the Christmas season. If you try this pattern, feel free to leave a sincere opinion and share suggestions—your feedback helps inspire even more creative crochet tutorials!