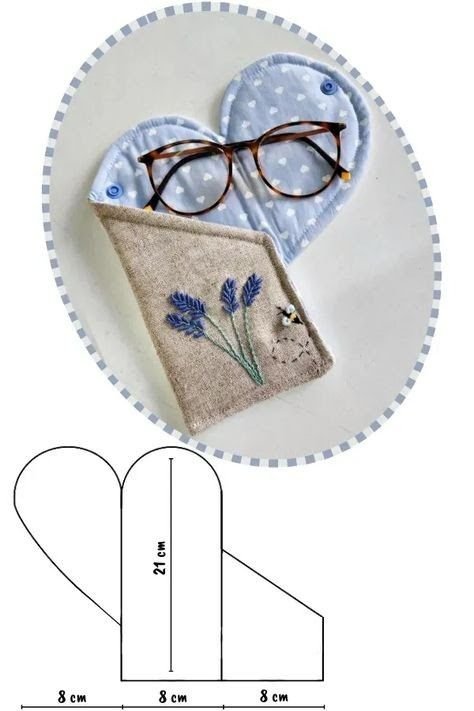
The Eyeglass Case for Beginners – Tutorial is the perfect project for anyone who wants to dive into the world of sewing with confidence and creativity. Right from the start, this simple yet charming pattern gives you the opportunity to practice essential sewing skills while creating something practical and beautiful. Whether you are brand new to sewing or looking for a quick handmade gift, this project is a wonderful way to grow your skills and enjoy the process. Throughout this article, we will explore everything you need to know to complete this easy sewing pattern with success.
The Eyeglass Case for Beginners – Tutorial focuses on making a protective and stylish case that keeps your glasses safe from scratches. Quilters and sewists love this type of project because it mixes creativity, functionality, and the satisfaction of completing something in just a short time. With only a few materials and a bit of patience, you can finish a piece that looks beautifully handmade while also being incredibly useful. Plus, this pattern allows for customization, so every crafter can add their own personality through fabric choices and finishing touches.
Before diving into the steps, this article will break down the essential techniques, materials, and best practices needed to complete your eyeglass case successfully. You will also find helpful tips designed to make the process smoother and more enjoyable, especially if you are still building your confidence. The goal of this Eyeglass Case for Beginners – Tutorial is to guide you through each part of the project in a clear and friendly way. Now, let’s explore everything you need to know to create this delightful quilted accessory.
1. Materials Needed for the Eyeglass Case
To begin the Eyeglass Case for Beginners – Tutorial, gathering the right materials is the first important step. Choosing high-quality supplies will make your project more durable and enjoyable to sew. You will need small fabric pieces, making this pattern ideal for scraps or leftover quilt fabrics. Cotton fabrics are highly recommended because they are easy to handle and offer great structure for beginners.
SEE OTHER FACE PATTERNS HERE!
One of the most essential materials for this project is batting. Batting adds softness and protection, ensuring your eyeglasses stay safe from bumps and scratches inside the case. Lightweight batting is usually enough, especially since this is a beginner-friendly pattern and should be simple to sew. If you prefer a more padded finish, you can opt for a slightly thicker batting, but remember that this might require a bit more control while sewing.
You will also need basic sewing notions such as scissors, pins, clips, a ruler, and a marking pen. All these tools help you keep your fabric steady and your measurements precise. Precision is important even for small projects, and these tools help beginners develop good sewing habits from the start. A simple sewing machine stitch is all you need for construction, making this tutorial accessible to everyone.
Thread is another key element. It is best to match your thread color with your fabric or choose a neutral shade for a seamless finish. Strong cotton or polyester thread works well for this project. If you enjoy adding decorative stitches, you can use a contrasting thread to give your eyeglass case a unique touch.
Finally, consider adding a closure to your project. Many beginners prefer a simple button, snap, or even a piece of elastic. Closures are optional, but they add extra security and a polished final look. With all your materials prepared, you will be ready to follow the steps of the Eyeglass Case for Beginners – Tutorial with ease and enthusiasm.
2. Cutting and Preparing Your Fabrics
The next part of this Eyeglass Case for Beginners – Tutorial focuses on cutting and preparing your fabric pieces. Taking your time with this step ensures your project comes together neatly. Begin by measuring your glasses to determine the size you want for your finished case. Although the tutorial typically includes standard sizes, adjusting your measurements ensures a perfect fit.
Once your measurements are ready, cut two pieces of outer fabric, two pieces of lining fabric, and one piece of batting. Keeping your cuts straight and even is essential, especially for beginners. Using a rotary cutter and cutting mat can make this process much easier. If you do not have these tools, sharp scissors will work as long as you cut carefully.
After cutting your fabrics, it is time to layer them. Place the outer fabric right side down, the batting on top, and the lining fabric right side up. This creates a sandwich that will form the structure of your eyeglass case. Securing the layers with pins or clips helps prevent shifting while you sew and makes the project much more manageable.
At this stage, many crafters choose to add quilting lines. Simple straight-line quilting works beautifully and is perfect for beginners. Quilting not only adds texture but also helps the fabric layers stay together for long-lasting durability. You can quilt diagonal lines, vertical lines, or a grid pattern depending on your preference.
Once your quilting is complete, trim any uneven edges. This ensures your pieces are neat and ready for construction. Cleaning up your edges makes the assembly process more precise and enjoyable. With your fabric pieces cut, layered, and quilted, you are now ready to move to the next steps of the Eyeglass Case for Beginners – Tutorial.
3. Sewing the Eyeglass Case
Now that your pieces are prepared, this portion of the Eyeglass Case for Beginners – Tutorial guides you through assembling the project. Begin by placing your quilted panel right side down and folding it in half, aligning the edges carefully. This fold forms the basic shape of your eyeglass case. Pin or clip the sides to keep everything in place.
Using a straight stitch, sew along the two sides of the case, leaving the top side open. Beginners often find it helpful to sew slowly, keeping the seam allowance consistent. A seam allowance of about 1/4 inch works well for this project and keeps the case structured without excess bulk. Once sewn, trim the corners slightly to reduce bulk when turning the case right side out.
After sewing the main seams, gently turn your case right side out. Use a turning tool, pencil, or chopstick to push out the corners and smooth the seams. This part of the process brings your project to life as you begin to see the final shape. Shape the opening with your fingers and prepare it for finishing.
At this stage, you can add a topstitch around the opening. Topstitching not only gives your case a polished appearance but also strengthens the opening area, making your eyeglass case more durable. Beginners often appreciate this step because it improves sewing accuracy and adds a professional touch.
If you decided to include a closure, now is the time to attach it. You may sew on a button, add a snap, or secure a decorative ribbon. Closures are optional, but they enhance functionality and style. Once this step is complete, your project is nearly finished.
By now, your case should resemble a fully functional accessory. This simple construction method makes the Eyeglass Case for Beginners – Tutorial ideal for new sewists and experienced crafters who enjoy quick projects. The next section will guide you through finishing touches and personalization.
4. Adding Final Details and Personal Touches
The final part of this Eyeglass Case for Beginners – Tutorial helps you customize your creation. Personal touches take your handmade project from simple to extraordinary. One of the easiest ways to add personality is by choosing contrasting fabrics for the lining. Bright, colorful linings make your case fun and unique.
You can also embellish the outside of your eyeglass case with buttons, appliqué, or embroidery. These techniques give beginners the perfect opportunity to explore new skills in a low-pressure project. Even a simple decorative stitch along the edges can elevate the design and express your personal style.
Another idea is to add a small loop or tab to your case. This allows you to attach it to a bag, keychain, or backpack. It is a practical addition for people who want easy access to their glasses. Loops also add a bit of visual interest and variation.
Some crafters enjoy creating themed cases using fabric collections that match holidays or seasons. You can make a floral case for spring, a bright design for summer, or a cozy flannel case for winter. Because this project is quick, it is easy to create multiple cases for different occasions.
If you are making this eyeglass case as a gift, consider adding a name label or small tag for personalization. Handmade gifts feel even more special when they include personal details. This pattern is thoughtful, practical, and appreciated by anyone who wears glasses.
By the end of this tutorial, you will have a finished accessory that blends creativity, practicality, and style. The Eyeglass Case for Beginners – Tutorial is a delightful project that opens the door to many other sewing adventures.
FAQ – Eyeglass Case for Beginners
1. Can beginners really make this eyeglass case easily?
Yes! This project was designed specifically for beginners, using simple techniques and minimal materials.
2. Do I need a sewing machine to complete this tutorial?
A sewing machine is recommended, but you can also sew the case by hand if you prefer.
3. What type of fabric works best for this pattern?
Cotton quilting fabric is ideal because it is easy to handle and durable.
4. Is batting necessary for the eyeglass case?
Yes, batting provides padding to protect your glasses from scratches and bumps.
5. Can I wash the finished eyeglass case?
Absolutely. Wash it gently, preferably by hand, to maintain its shape.
6. How long does it take to complete the project?
Most beginners finish this tutorial in less than an hour.
Conclusion
The Eyeglass Case for Beginners – Tutorial is a fantastic way to start sewing with confidence while creating something beautiful and functional. In this article, you learned how to choose materials, prepare your fabrics, assemble your case, and add personal touches that make your project unique.
Whether you are making it for yourself or as a thoughtful handmade gift, this pattern is a wonderful introduction to sewing. I hope you feel inspired to continue exploring new creations. Please leave your honest opinion and suggestions—I would love to hear about your experience!