The Crocheted Peacock – Tutorial is a stunning crochet project that celebrates beauty, elegance, and intricate handmade detail. Inspired by the graceful peacock, this pattern is perfect for crocheters who enjoy creating decorative pieces with strong visual impact. The Crocheted Peacock – Tutorial allows you to transform yarn into a work of art that reflects color, texture, and creativity.
This crochet pattern has gained popularity because it combines artistic expression with achievable techniques. The Crocheted Peacock – Tutorial can be adapted for home décor, gifts, or display pieces, making it a versatile and rewarding project. Whether you are an intermediate crocheter or an ambitious beginner, this tutorial offers an engaging and satisfying experience.
In this article, you will learn about the structure of the peacock design, yarn and material choices, construction techniques, and creative ways to display your finished piece. The Crocheted Peacock – Tutorial is ideal for those who want to explore detailed crochet while enjoying a visually captivating result.
1. Understanding the Crocheted Peacock – Tutorial
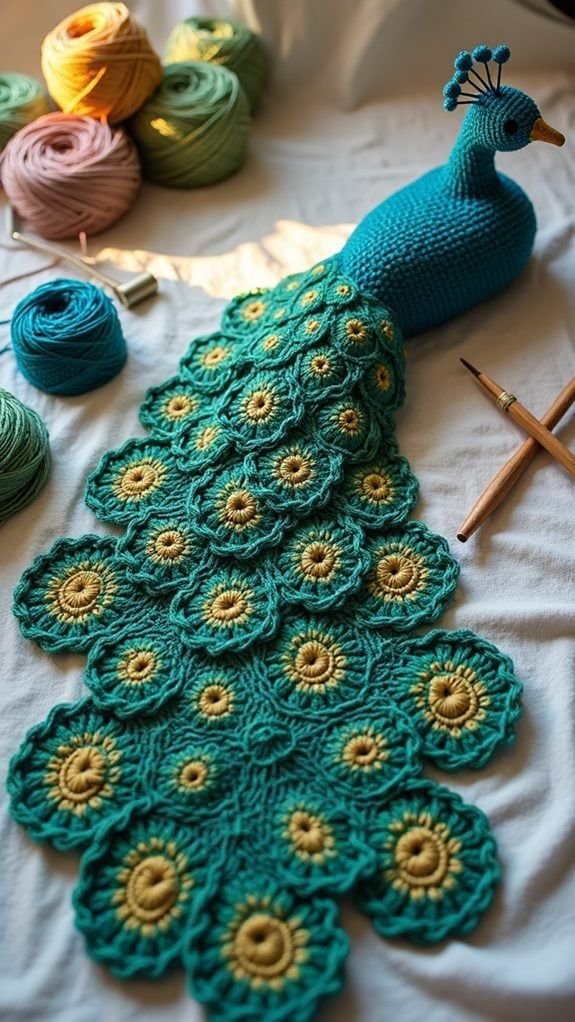
The Crocheted Peacock – Tutorial focuses on recreating the iconic silhouette of a peacock, often highlighting its body, head, and especially its decorative tail. The tail is usually the centerpiece, featuring fan-like shapes or layered motifs.
DISCOVER MORE FREE PATTERNS HERE!
This pattern often combines multiple crochet sections that are later assembled. The Crocheted Peacock – Tutorial encourages attention to symmetry and balance to achieve a realistic and elegant look.
Peacock designs symbolize beauty, pride, and creativity, which adds meaning to projects made using the Crocheted Peacock – Tutorial.
Despite its detailed appearance, the pattern is built using familiar stitches. This makes the Crocheted Peacock – Tutorial approachable for crocheters willing to follow instructions carefully.
The tutorial typically allows flexibility in size, making it possible to create small decorative peacocks or larger statement pieces.
Understanding the overall structure helps ensure that the Crocheted Peacock – Tutorial comes together smoothly and maintains its graceful form.
2. Yarn and Material Choices for Crocheted Peacock – Tutorial
Yarn selection is essential for bringing the Crocheted Peacock – Tutorial to life. Smooth yarns with good stitch definition are ideal for showcasing detailed tail patterns.
Cotton and acrylic yarns are popular choices because they hold shape well and are available in vibrant colors. These qualities enhance the elegance of the Crocheted Peacock – Tutorial.
Color choice plays a major role. Traditional peacock colors include blues, greens, and hints of gold, but the Crocheted Peacock – Tutorial also invites creative interpretations.
Using multiple shades adds depth and dimension to the tail feathers, making the finished piece more visually striking.
The hook size should match the yarn weight while maintaining firm stitches to support the structure of the peacock.
Optional materials such as safety eyes, embroidery thread, or wire for shaping can add extra detail to the Crocheted Peacock – Tutorial.
3. Construction Techniques in Crocheted Peacock – Tutorial
The Crocheted Peacock – Tutorial usually begins with the body, worked in the round to create a smooth and sturdy base.
The head and neck are often crocheted separately or shaped through gradual increases and decreases. This step defines the peacock’s posture.
The tail is the most detailed part of the Crocheted Peacock – Tutorial. It may involve shell stitches, fans, or layered motifs to mimic feather patterns.
Careful counting and consistent tension are important, especially when working on the tail design.
Assembly is a crucial stage. Attaching the tail securely ensures balance and stability in the finished peacock.
Finishing touches such as embroidery or shaping help give personality and refinement to the Crocheted Peacock – Tutorial.
4. Display Ideas and Creative Uses for Crocheted Peacock – Tutorial
The Crocheted Peacock – Tutorial is often used as a decorative item for shelves, tables, or craft rooms.
It can also serve as a centerpiece for themed décor, especially in bohemian or nature-inspired spaces.
Many crocheters create peacocks as gifts, appreciating the uniqueness and artistry of the finished piece.
With slight adjustments, the pattern can be adapted into wall hangings, appliqués, or framed crochet art.
The Crocheted Peacock – Tutorial is also popular for showcasing advanced crochet skills at fairs or exhibitions.
No matter how it is displayed, the finished peacock stands out as a symbol of creativity and craftsmanship.
FAQ – Crocheted Peacock – Tutorial
Is the Crocheted Peacock pattern beginner-friendly?
It is best suited for intermediate crocheters, but confident beginners can attempt it with patience.
What yarn works best for this project?
Smooth yarns with good stitch definition, such as cotton or acrylic, work best.
Can I customize the colors?
Yes, color customization is encouraged and adds personality to the design.
Does the peacock need stuffing?
Yes, light stuffing is usually used for the body to maintain shape.
Can this pattern be used for décor?
Absolutely. It is ideal for decorative and display purposes.
Is assembly required?
Yes, most versions involve assembling multiple crocheted parts.
Conclusion
The Crocheted Peacock – Tutorial is a breathtaking crochet project that combines artistic design with thoughtful construction. Its detailed tail, elegant shape, and rich symbolism make it a rewarding pattern for crocheters who enjoy decorative pieces.
By learning about the structure, materials, techniques, and display ideas, you can confidently create your own Crocheted Peacock – Tutorial project. This pattern is a beautiful way to showcase creativity and craftsmanship through crochet.
PATTERN VIDEO:
If you enjoyed this article, leave an honest opinion and share your suggestions. Your feedback is always welcome and helps inspire future crochet tutorials and creative projects.