Knitted Wing Cowl – TUTORIAL is a beautiful and inspiring knitting project that combines elegance, comfort, and texture into one timeless accessory. This pattern has become increasingly popular among knitting enthusiasts because it offers a sophisticated look while remaining accessible to crafters who want to improve their skills. Whether you are knitting for personal use or planning to share your work online, this tutorial provides everything you need to succeed.
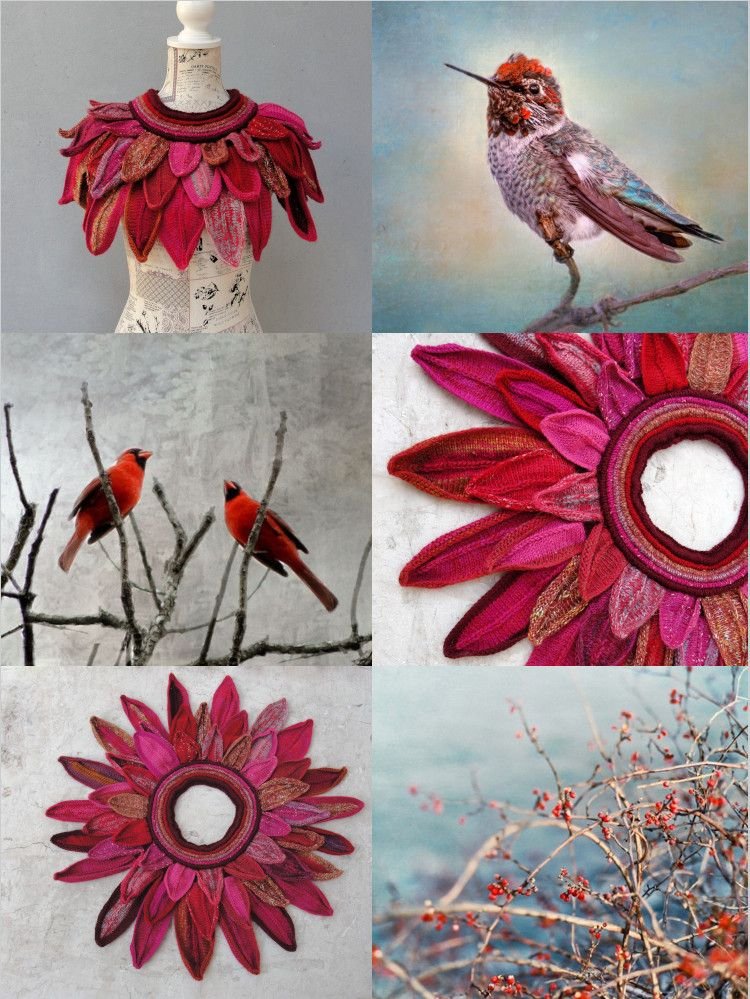
The Knitted Wing Cowl – TUTORIAL is especially admired for its flowing, wing-like stitch pattern that creates depth and visual movement. The design mimics soft feathers or gentle waves, giving the finished cowl a luxurious and handmade appearance. This makes it an excellent project for anyone who enjoys creating wearable art with yarn and needles.
In this tutorial, you will learn not only how to knit the cowl but also how to understand the structure behind the pattern. By following this guide, you’ll gain confidence, improve your knitting technique, and create a stylish accessory that works beautifully in colder seasons. Throughout the article, we will explore materials, techniques, styling ideas, and helpful tips to ensure your project turns out just right.
1. Understanding the Knitted Wing Cowl Design
The Knitted Wing Cowl – TUTORIAL is centered around a textured stitch pattern that resembles wings spreading across the fabric. This unique design is achieved through carefully arranged knit and purl combinations that form raised sections and flowing lines.
DISCOVER MORE FREE PATTERNS HERE!
One of the most appealing aspects of this design is how it balances simplicity and complexity. While the finished cowl looks intricate, the pattern itself relies on repeatable steps that become intuitive as you progress.
This makes the Knitted Wing Cowl suitable for confident beginners who want a challenge and intermediate knitters looking for a relaxing yet engaging project. The repetition helps knitters memorize the pattern, reducing the need to constantly refer back to instructions.
The wing effect also adds elasticity and structure to the cowl, helping it sit comfortably around the neck. This ensures that the accessory is not only stylish but also practical for everyday wear.
Another advantage of this design is its versatility. The pattern adapts well to different yarn weights, allowing knitters to customize the thickness and warmth of the cowl according to personal preference.
Overall, understanding the construction of the Knitted Wing Cowl – TUTORIAL helps knitters appreciate how texture, stitch placement, and repetition work together to create a stunning final piece.
2. Materials and Yarn Selection for Best Results
Choosing the right materials is essential when following the Knitted Wing Cowl – TUTORIAL, as the yarn greatly affects the final look and feel of the project. A yarn with good stitch definition is highly recommended to showcase the wing-like texture.
Merino wool, wool blends, or soft acrylic yarns are popular choices for this type of cowl. These fibers provide warmth, flexibility, and comfort while allowing the stitches to stand out clearly.
When selecting yarn weight, most knitters prefer DK or worsted weight yarn for this pattern. These weights provide enough structure to highlight the design while remaining lightweight enough for comfortable wear.
Needle size also plays a role in the finished texture. Slightly larger needles can enhance drape and softness, while smaller needles create a denser, warmer fabric. Always consider making a gauge swatch before starting.
Color choice is another important factor. Solid or semi-solid colors work best for the Knitted Wing Cowl, as they allow the stitch pattern to shine without visual interruption.
By carefully selecting yarn and tools, knitters can ensure that their Knitted Wing Cowl – TUTORIAL results in a polished, professional-looking accessory that reflects their personal style.
3. Step-by-Step Knitting Techniques Explained
The Knitted Wing Cowl – TUTORIAL typically begins with casting on stitches in the round. Working in the round eliminates seams, creating a smooth and continuous fabric that enhances comfort and appearance.
Once the foundation is set, the pattern introduces repeating stitch sequences that form the wing motif. These repeats are easy to follow and become rhythmic after a few rounds.
Understanding stitch placement is key to maintaining consistency throughout the project. Paying attention to where increases or textured stitches occur helps preserve the symmetry of the design.
Using stitch markers can be extremely helpful, especially for beginners. They help track pattern repeats and prevent mistakes that could disrupt the wing effect.
As the cowl grows, knitters will notice the texture becoming more pronounced. This stage is particularly rewarding, as the design truly comes to life with each round.
Finishing techniques, such as binding off loosely, ensure that the cowl maintains flexibility and comfort. A neat finish enhances the overall look of the Knitted Wing Cowl – TUTORIAL.
4. Styling, Care, and Creative Uses
The Knitted Wing Cowl – TUTORIAL results in an accessory that is both functional and fashionable. It can be styled in multiple ways, making it a versatile addition to any wardrobe.
Worn snugly around the neck, the cowl provides warmth during cold weather. When worn loosely, it creates a relaxed and modern look that pairs well with casual outfits.
This cowl also makes an excellent handmade gift. Its elegant design appeals to a wide range of ages and personal styles, making it a thoughtful and practical present.
Caring for your knitted cowl is essential to preserve its beauty. Hand washing in cold water and laying flat to dry is recommended, especially when using natural fibers.
The Knitted Wing Cowl can also be customized by adjusting length, width, or color combinations. This flexibility allows knitters to create unique variations from the same tutorial.
Whether for personal use, gifting, or selling handmade items, the Knitted Wing Cowl – TUTORIAL offers endless creative possibilities.
FAQ – Knitted Wing Cowl – TUTORIAL
Is the Knitted Wing Cowl suitable for beginners?
Yes, confident beginners who are familiar with basic knit and purl stitches can successfully complete this project with patience and practice.
What yarn works best for the Knitted Wing Cowl?
Yarns with good stitch definition, such as merino wool or wool blends, work best to highlight the wing texture.
Can I knit this cowl flat instead of in the round?
While it is possible, knitting in the round is recommended for a seamless and more polished finish.
How long does it take to complete the Knitted Wing Cowl?
Most knitters can finish the project within a few days, depending on experience and available time.
Can I adjust the size of the cowl?
Yes, the pattern can be easily modified by adding or removing stitch repeats or adjusting the length.
Is this pattern suitable for selling finished items?
In most cases, selling finished items is allowed, but always check the specific pattern’s licensing terms.
Conclusion
The Knitted Wing Cowl – TUTORIAL is a rewarding knitting project that combines texture, elegance, and practicality. Throughout this article, we explored the design structure, material selection, essential knitting techniques, and styling ideas that help bring this beautiful cowl to life. By following this tutorial, knitters can improve their skills while creating a timeless accessory that offers both warmth and visual appeal.
If you enjoyed this tutorial or have tried the Knitted Wing Cowl, feel free to leave your honest opinion and share any suggestions or creative variations you’ve discovered. Your feedback helps inspire and support the crafting community. 🧶✨