Pleated Hat with Brim – TUTORIAL is a charming and practical quilting project that combines structure, elegance, and everyday functionality. This quilted hat design has gained popularity among quilters who enjoy creating wearable items that are both stylish and useful. With its pleated construction and defined brim, this pattern offers a professional finish while remaining accessible to dedicated beginners and experienced quilters alike.
The Pleated Hat with Brim – TUTORIAL stands out because it transforms traditional quilting techniques into a wearable accessory. The pleats add texture and visual interest, while the brim provides sun protection and shape. This balance between beauty and utility makes the pattern highly desirable for handmade wardrobes, gifts, or craft fairs.
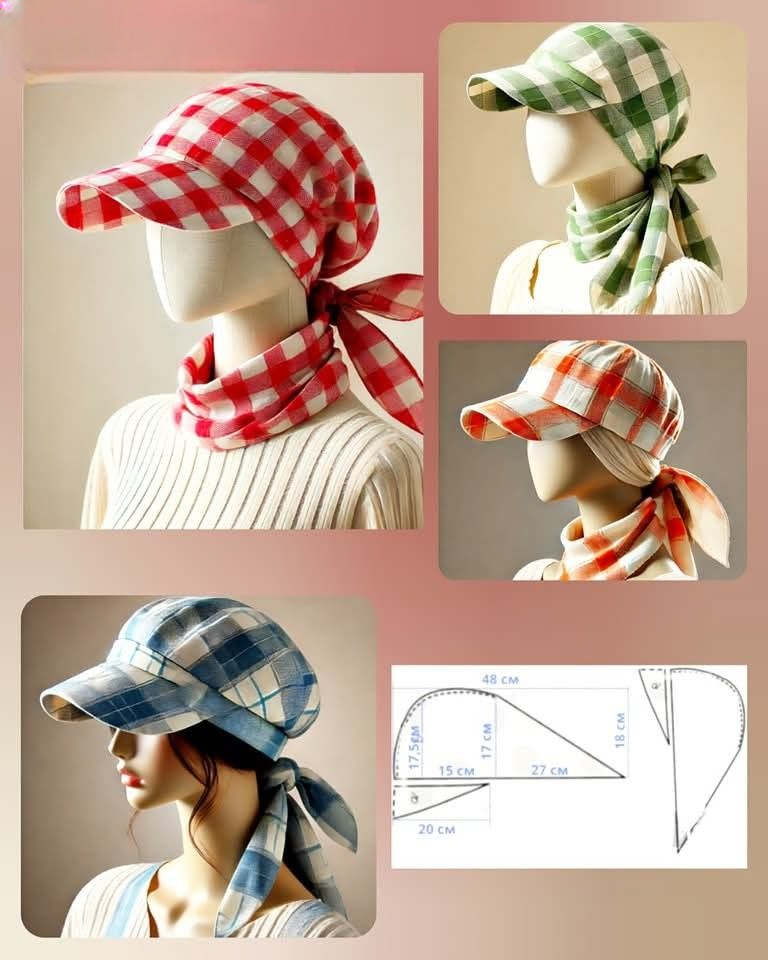
In this tutorial, you will learn how the pleated structure works, which materials are best suited for the project, and how to assemble the hat step by step. By the end of this guide, you’ll have a deeper understanding of quilted accessories and the confidence to create a polished Pleated Hat with Brim that reflects your creativity and skill.
1. Understanding the Pleated Hat with Brim Design
The Pleated Hat with Brim – TUTORIAL is built around a clever use of fabric pleats that create volume and shape without excessive bulk. These pleats are evenly spaced and carefully stitched to ensure consistency throughout the hat.
DISCOVER MORE FREE PATTERNS HERE!
Pleats serve both an aesthetic and structural purpose. Visually, they give the hat a refined, tailored appearance. Structurally, they allow the fabric to expand and conform comfortably to the head.
The brim is another defining feature of the Pleated Hat with Brim. It adds stability to the overall design while enhancing wearability. A well-constructed brim frames the face and offers light sun protection.
This design is especially appealing to quilters who want to explore three-dimensional fabric construction. Unlike flat quilt blocks, this hat introduces shaping techniques that broaden quilting skills.
Despite its sophisticated look, the pattern relies on simple straight stitching and careful pressing. This makes the Pleated Hat with Brim – TUTORIAL approachable for quilters who are comfortable with basic machine sewing.
Understanding the design concept is the first step toward creating a hat that looks professionally made and feels comfortable to wear.
2. Fabric Choices and Essential Materials
Selecting the right materials is crucial for success with the Pleated Hat with Brim – TUTORIAL. Fabric choice directly affects the structure, comfort, and durability of the finished hat.
Cotton quilting fabric is the most common option due to its ease of handling and wide availability. Medium-weight cotton provides enough body to hold pleats while remaining breathable.
Interfacing or batting plays a key role in this pattern. A lightweight to medium-weight interfacing helps maintain the shape of the pleats and reinforces the brim without making the hat stiff.
For the lining, soft cotton or cotton blends are recommended. A comfortable lining enhances wearability and gives the hat a clean, finished interior.
Thread color should complement the fabric while remaining subtle. Neutral or matching threads keep the focus on the pleated texture rather than visible stitching.
Using quality materials ensures that your Pleated Hat with Brim – TUTORIAL results in a durable and visually appealing quilted accessory.
3. Step-by-Step Construction Techniques
The Pleated Hat with Brim – TUTORIAL begins with precise fabric cutting. Accurate measurements are essential to ensure that the pleats align correctly and the hat fits as intended.
Once the pieces are cut, the pleats are formed by folding the fabric at regular intervals. Pressing each pleat carefully helps maintain crisp lines and consistent spacing.
After securing the pleats with stitching, the main body of the hat is assembled. This stage transforms flat fabric into a shaped, three-dimensional form.
The brim is typically constructed separately, reinforced with interfacing or batting, and then attached to the hat body. Careful alignment at this stage ensures a smooth transition between crown and brim.
Topstitching around the brim adds strength and enhances the professional look of the hat. This detail also helps keep the layers securely in place.
Finally, the lining is inserted and the hat is finished with clean seams and careful pressing. These finishing touches elevate the Pleated Hat with Brim – TUTORIAL from a simple project to a refined handmade piece.
4. Styling Options, Uses, and Customization
One of the strengths of the Pleated Hat with Brim – TUTORIAL is its versatility. This quilted hat can be styled for casual outings, outdoor activities, or even as a statement accessory.
Fabric selection plays a major role in styling. Floral prints create a soft, feminine look, while solids or geometric patterns offer a modern aesthetic.
The brim size can also be adjusted to suit different preferences. A wider brim provides more sun protection, while a narrower brim offers a sleek, minimalist appearance.
This hat makes a thoughtful handmade gift, especially when customized with colors or patterns suited to the recipient’s taste.
The Pleated Hat with Brim is also an excellent item for selling handmade goods. Its unique construction and practical design appeal to customers looking for something special.
With minor modifications, this tutorial can inspire endless variations, making it a valuable pattern for creative quilters.
FAQ – Pleated Hat with Brim – TUTORIAL
Is the Pleated Hat with Brim suitable for beginners?
Yes, quilters with basic sewing skills and experience using a sewing machine can successfully complete this project.
What fabric works best for this quilted hat?
Medium-weight cotton quilting fabric is ideal for holding pleats and providing comfort.
Do I need special tools to make this hat?
No special tools are required beyond standard quilting supplies such as a sewing machine, rotary cutter, and ruler.
Can I resize the Pleated Hat with Brim?
Yes, the pattern can be adjusted to fit different head sizes by modifying the circumference measurements.
Is interfacing necessary?
Interfacing is highly recommended to give structure to the pleats and support the brim.
Can this pattern be used for selling finished hats?
In most cases, selling finished items is allowed, but always check the original pattern’s usage terms.
Conclusion
The Pleated Hat with Brim – TUTORIAL is a wonderful quilting project that blends craftsmanship, creativity, and functionality. In this article, we explored the design structure, material selection, construction techniques, and customization options that make this quilted hat both beautiful and practical. By following this tutorial, quilters can expand their skills while creating a wearable accessory that showcases precision and personal style.
PATTERN VIDEO:
If you enjoyed learning about the Pleated Hat with Brim or have already tried this pattern, leave a sincere opinion and share your suggestions or creative ideas. Your feedback is always welcome and helps strengthen the quilting community. 🧵✨