Bunny Mug Rug Tutorial projects are a charming way to combine creativity, practicality, and seasonal décor in one small but delightful quilting piece. A Bunny Mug Rug Tutorial is perfect for quilters who love quick projects that still deliver a big visual impact, whether for Easter decorations, handmade gifts, or simply adding a cozy touch to a coffee corner. This type of tutorial is especially popular because it allows you to use fabric scraps while practicing precise piecing and quilting techniques.
One of the best things about a Bunny Mug Rug Tutorial is how accessible it is for all skill levels. Beginners can follow the steps to learn basic quilting construction, while experienced quilters enjoy the freedom to personalize colors, fabrics, and embellishments. Because mug rugs are small, they are fast to finish, which makes them incredibly satisfying projects with instant results.
In this article, you’ll learn everything you need to know about creating a successful Bunny Mug Rug Tutorial, from choosing the right materials to finishing techniques and creative variations. By the end, you’ll feel confident making your own bunny-themed mug rug and adapting the design to suit your personal style or gifting needs.
1. Understanding the Bunny Mug Rug Concept
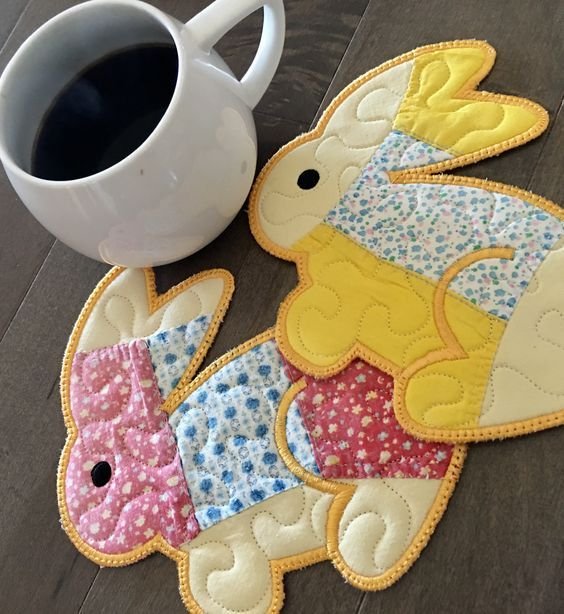
A Bunny Mug Rug Tutorial focuses on creating a small quilted mat designed to hold a mug and a snack, usually measuring slightly larger than a traditional coaster. The bunny motif adds a playful and seasonal element, making it especially popular during spring and Easter, though many crafters enjoy it year-round.
DISCOVER MORE FREE PATTERNS HERE!
The bunny design can be achieved in several ways, including appliqué, pieced shapes, embroidery, or even quilting lines that form bunny ears or silhouettes. One of the reasons the Bunny Mug Rug Tutorial is so appealing is its versatility, allowing you to choose the method that best matches your skill level and aesthetic preferences.
These mug rugs are also excellent scrap-busting projects. Small pieces of fabric that might otherwise go unused can be transformed into something functional and adorable. This makes the Bunny Mug Rug Tutorial both economical and environmentally friendly.
Another important aspect of the Bunny Mug Rug Tutorial is scale. Because the project is small, precision matters, but mistakes are easier to fix. This makes it an ideal learning project for improving cutting accuracy, seam consistency, and quilting control.
Mug rugs are often quilted more densely than larger quilts, which gives you the opportunity to experiment with different quilting patterns. In a Bunny Mug Rug Tutorial, the quilting itself can enhance the bunny theme through decorative stitching.
Finally, the concept behind a Bunny Mug Rug Tutorial is about joy and comfort. It’s a small handmade item that brings warmth to everyday routines, turning a simple cup of coffee or tea into a special moment.
2. Materials and Preparation for the Bunny Mug Rug Tutorial
Before starting your Bunny Mug Rug Tutorial, gathering the right materials is essential for a smooth and enjoyable process. The basic supplies include cotton fabric for the top, batting for the middle, and backing fabric. Cotton is preferred because it’s easy to work with and holds up well to quilting.
Fabric selection plays a big role in the final look of your Bunny Mug Rug Tutorial. Light, pastel colors are often chosen for a classic bunny theme, but bold or modern fabrics can create a unique and unexpected result. Printed fabrics with florals, polka dots, or subtle textures work especially well.
Batting choice is another important consideration. Thin cotton or cotton-blend batting is ideal for mug rugs because it provides structure without too much bulk. This ensures your Bunny Mug Rug Tutorial lies flat and fits comfortably under a mug.
You’ll also need basic quilting tools such as a rotary cutter, cutting mat, ruler, pins or clips, and a sewing machine. For appliqué-based bunny designs, fusible web or stabilizer may be required. Preparing these tools in advance saves time and keeps your workflow efficient.
Cutting accuracy is crucial in a Bunny Mug Rug Tutorial. Because the project is small, even slight inaccuracies can affect the final shape. Taking the time to measure and cut carefully will result in cleaner edges and a more professional finish.
Finally, preparing your workspace helps set the tone for a successful project. A clean, organized area allows you to focus on creativity and precision, which are key elements of a well-executed Bunny Mug Rug Tutorial.
3. Step-by-Step Construction of the Bunny Mug Rug
The construction process in a Bunny Mug Rug Tutorial usually begins with assembling the quilt top. This may involve piecing background fabrics, attaching bunny shapes, or arranging decorative elements. Taking time to lay out your design before sewing helps ensure balance and visual appeal.
Once the top is assembled, the quilt sandwich is created by layering the backing fabric, batting, and quilt top. This step is essential in the Bunny Mug Rug Tutorial, as proper alignment prevents shifting during quilting. Basting with pins or spray adhesive keeps everything secure.
Quilting is where your Bunny Mug Rug Tutorial truly comes to life. Simple straight-line quilting works well for beginners, while free-motion quilting allows for creative designs like loops, flowers, or bunny-inspired motifs. The quilting not only secures the layers but also adds texture and personality.
After quilting, trimming the edges is a critical step. Squaring up the mug rug ensures straight sides and sharp corners. In a Bunny Mug Rug Tutorial, this step contributes significantly to the overall polished appearance of the finished piece.
Binding is the final construction stage. You can choose traditional double-fold binding or a simple envelope-style finish. Binding frames the design and gives your Bunny Mug Rug Tutorial durability for everyday use.
Once finished, give your mug rug a final press. Pressing enhances the quilting texture and ensures your Bunny Mug Rug Tutorial looks crisp and ready to use or gift.
4. Creative Variations and Styling Ideas
One of the joys of a Bunny Mug Rug Tutorial is how easily it can be customized. Changing fabric colors, bunny shapes, or quilting styles allows you to create multiple unique designs from the same basic concept.
Seasonal variations are especially popular. While pastel colors suit spring, deeper tones or neutral palettes can make a Bunny Mug Rug Tutorial appropriate for year-round décor. Adding small details like bows, embroidered eyes, or textured fabrics can further personalize each piece.
You can also experiment with size and shape. Some crafters prefer rounded corners, while others enjoy scalloped edges or asymmetrical designs. These variations keep the Bunny Mug Rug Tutorial fresh and exciting.
Another creative idea is to make matching sets. Coordinating bunny mug rugs with table runners or placemats creates a cohesive look for seasonal entertaining. This approach expands the usefulness of the Bunny Mug Rug Tutorial beyond a single item.
Gift-giving is another area where this tutorial shines. Handmade mug rugs paired with a mug and tea or coffee make thoughtful gifts. A Bunny Mug Rug Tutorial is especially appreciated during holidays, baby showers, or as a simple handmade surprise.
Finally, displaying your finished pieces adds to the joy of the project. Whether used daily or displayed as part of seasonal décor, a completed Bunny Mug Rug Tutorial brings warmth and charm to any space.
FAQ – Bunny Mug Rug Tutorial
What is a bunny mug rug used for?
A bunny mug rug is used to hold a mug and small snack while protecting surfaces from heat and spills.
Is a Bunny Mug Rug Tutorial suitable for beginners?
Yes, it’s an excellent beginner project due to its small size and straightforward construction.
What fabrics work best for a bunny mug rug?
Cotton fabrics are ideal because they are easy to sew, durable, and quilt well.
Can I wash a bunny mug rug?
Yes, most bunny mug rugs are machine washable when made with cotton fabric and batting.
How long does it take to complete a Bunny Mug Rug Tutorial?
Most projects can be completed in one afternoon, making them great quick makes.
Can I sell items made from a Bunny Mug Rug Tutorial?
That depends on the specific pattern’s usage rights. Always check the designer’s terms before selling.
Conclusion
This article explored the complete process of creating a Bunny Mug Rug Tutorial, from understanding the concept and gathering materials to construction techniques and creative variations. You learned how this small project can be both beginner-friendly and endlessly customizable, making it a favorite among quilters of all levels.
A Bunny Mug Rug Tutorial is more than just a quilting project—it’s a way to add handmade charm to everyday life, practice essential quilting skills, and create meaningful gifts. Whether you follow a traditional design or add your own creative twist, the result is always something special.
If you enjoyed this tutorial, feel free to share your honest opinion and any suggestions you have. Your feedback helps inspire new ideas and future projects, and it’s always wonderful to hear how others bring these patterns to life.