Cloth Elephants – TUTORIAL projects are a wonderful way to combine quilting, sewing, and soft toy making into one meaningful handmade creation. A Cloth Elephants – TUTORIAL allows quilters to step beyond flat projects and explore dimensional sewing while still using familiar quilting techniques. These charming fabric elephants are loved by children and adults alike and are often made as gifts, keepsakes, or nursery décor.
One of the reasons the Cloth Elephants – TUTORIAL is so popular is its emotional appeal. Handmade cloth animals carry a sense of warmth and care that store-bought toys simply can’t replicate. Whether created from new fabrics or meaningful scraps, each elephant becomes a unique piece with its own story.
In this article, you will learn everything you need to know about working through a Cloth Elephants – TUTORIAL, including materials, construction methods, design variations, and finishing details. By the end, you’ll feel confident creating your own cloth elephants and adapting the tutorial to suit your quilting style and creative vision.
1. Understanding the Cloth Elephants Tutorial Concept
A Cloth Elephants – TUTORIAL focuses on creating a three-dimensional elephant using fabric, batting or stuffing, and careful sewing techniques. Unlike traditional quilts, this project transforms flat fabric pieces into a sculpted, soft form, offering quilters a refreshing and rewarding challenge.
DISCOVER MORE FREE PATTERNS HERE!
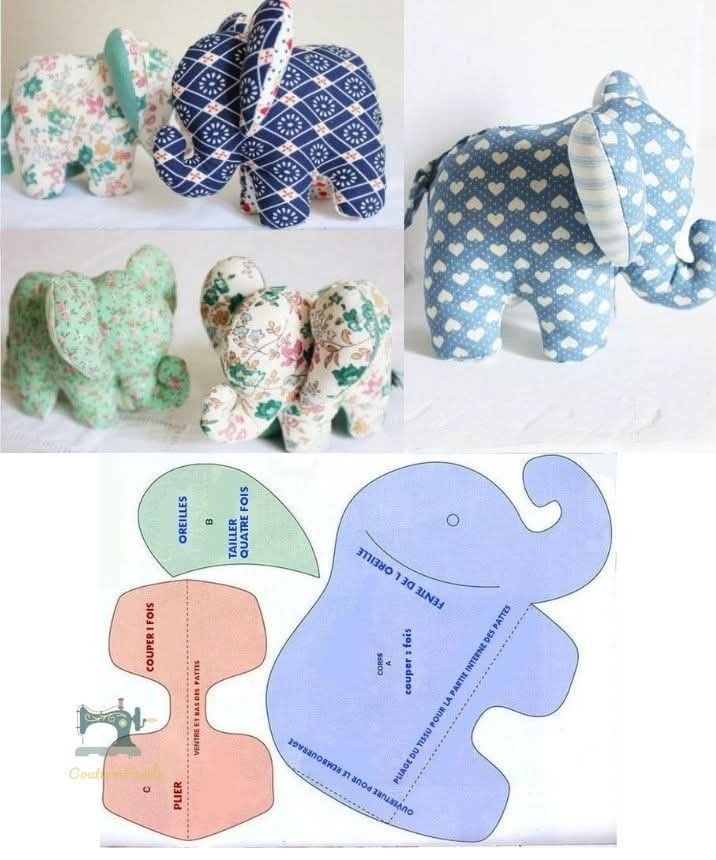
The elephant shape is typically made from several pattern pieces, including the body, ears, legs, and trunk. In a Cloth Elephants – TUTORIAL, these pieces are stitched together in stages, allowing the maker to build structure gradually while maintaining accuracy.
One of the defining features of a Cloth Elephants – TUTORIAL is its versatility. The same base pattern can be adapted to create realistic elephants, whimsical designs, or simplified shapes suitable for beginners. This flexibility makes it appealing to quilters of all experience levels.
Cloth elephants are often associated with comfort, memory, and symbolism. In many cultures, elephants represent strength, protection, and good luck. Creating one through a Cloth Elephants – TUTORIAL adds emotional depth to the project, especially when made as a gift.
Because these projects are smaller than quilts, they allow quilters to experiment with details such as embroidery, decorative stitching, and fabric texture. A Cloth Elephants – TUTORIAL provides a perfect opportunity to practice precision and creativity on a manageable scale.
Finally, the concept behind a Cloth Elephants – TUTORIAL is about storytelling through fabric. Every choice—from color to stitching—contributes to a finished piece that feels personal and handmade.
2. Materials and Preparation for Cloth Elephants
Preparing the right materials is a crucial step in any Cloth Elephants – TUTORIAL. Most projects use quilting cotton, linen, or soft canvas fabrics, all of which provide structure while remaining gentle to the touch. Fabric selection directly affects the elephant’s final appearance and durability.
Many quilters enjoy using scraps or leftover fabric from previous quilt projects. This not only makes the Cloth Elephants – TUTORIAL economical but also gives new life to treasured fabrics. Coordinating prints or mixing solids and patterns adds visual interest.
Stuffing is another key component. Polyester fiberfill is commonly used because it’s lightweight, washable, and easy to shape. In a Cloth Elephants – TUTORIAL, proper stuffing technique helps define the elephant’s form without making it too stiff.
Basic sewing tools are essential, including a sewing machine, sharp scissors, pins or clips, and hand-sewing needles. A turning tool or blunt stick is especially helpful for shaping small areas like the trunk and legs in a Cloth Elephants – TUTORIAL.
Pattern preparation is also important. Carefully cutting each piece according to the pattern ensures accurate assembly. Because elephants have curved seams, precision cutting makes the Cloth Elephants – TUTORIAL much easier to sew.
Before sewing, organizing your pieces and reviewing the steps helps avoid confusion. A well-prepared workspace supports a smooth and enjoyable Cloth Elephants – TUTORIAL experience.
3. Step-by-Step Construction of Cloth Elephants
Construction in a Cloth Elephants – TUTORIAL usually begins with sewing the smaller components, such as ears and legs. Completing these parts first allows you to focus on detail work before assembling the main body.
The body pieces are typically sewn together in stages, forming the elephant’s shape gradually. In a Cloth Elephants – TUTORIAL, slow and steady stitching around curves is essential for smooth seams and a professional finish.
Once the main body is assembled, the elephant is turned right side out. This step requires patience, especially when working with narrow areas like the trunk. Taking care during this stage ensures the Cloth Elephants – TUTORIAL retains its intended shape.
Stuffing comes next and is one of the most important steps. Adding small amounts of filling at a time allows you to shape the elephant evenly. In a Cloth Elephants – TUTORIAL, proper stuffing gives the toy balance so it can sit or stand correctly.
After stuffing, openings are closed using hand stitching. Invisible stitches such as ladder stitch are commonly used to maintain a clean look. This final sewing step completes the structure of the Cloth Elephants – TUTORIAL.
Optional embellishments like embroidered eyes, decorative stitching, or bows can be added at this stage. These finishing touches personalize your cloth elephant and bring the Cloth Elephants – TUTORIAL to life.
4. Creative Variations and Finishing Ideas
One of the most enjoyable aspects of a Cloth Elephants – TUTORIAL is the opportunity for customization. Changing fabric colors, patterns, or textures can completely transform the look of the elephant.
Some quilters prefer minimalist designs using solid fabrics, while others enjoy playful prints for a child-friendly feel. A Cloth Elephants – TUTORIAL adapts beautifully to both styles, making it suitable for many purposes.
Size variations are another creative option. By resizing the pattern, you can create a small keepsake elephant or a larger statement piece. This flexibility makes the Cloth Elephants – TUTORIAL ideal for gift-giving.
Personalization adds emotional value. Adding initials, dates, or meaningful embroidery turns a cloth elephant into a cherished memory. Many makers use a Cloth Elephants – TUTORIAL for baby gifts or milestone celebrations.
You can also explore themed elephants, such as holiday versions or color palettes that match nursery décor. These variations keep the Cloth Elephants – TUTORIAL fresh and inspiring.
Finally, presenting your finished elephant thoughtfully enhances its impact. Whether displayed on a shelf or wrapped as a gift, the completed Cloth Elephants – TUTORIAL reflects the care and creativity put into its making.
FAQ – Cloth Elephants – TUTORIAL
What skill level is required for a Cloth Elephants – TUTORIAL?
Most tutorials are suitable for confident beginners to intermediate sewists, especially those familiar with basic machine sewing.
What fabric is best for cloth elephants?
Quilting cotton, linen, or soft canvas are ideal because they hold shape well and are easy to sew.
Are cloth elephants safe for children?
When made securely without small detachable parts, cloth elephants can be safe for children, but supervision is always recommended.
How long does it take to complete a Cloth Elephants – TUTORIAL?
Most projects can be completed in a few hours to a full day, depending on detail level.
Can I wash a cloth elephant?
Yes, most cloth elephants are washable, especially when made with cotton fabrics and polyester stuffing.
Can items made from a Cloth Elephants – TUTORIAL be sold?
This depends on the pattern’s licensing terms. Always check the designer’s usage guidelines.
Conclusion
This article covered the full process of creating Cloth Elephants – TUTORIAL projects, from understanding the concept and preparing materials to construction steps and creative variations. You learned how quilting skills translate beautifully into soft toy making and how fabric choices and details shape the final result.
A Cloth Elephants – TUTORIAL offers more than a finished item—it provides a meaningful creative experience and a handmade piece filled with care. Whether made for yourself or as a gift, each cloth elephant becomes a lasting symbol of craftsmanship.
PATTERN VIDEO:
If you found this tutorial helpful, feel free to leave your honest opinion and share any suggestions. Your feedback is always welcome and helps inspire future projects and ideas.