Tulip Quilt – Tutorial is a beloved theme among quilters who enjoy floral designs, fresh colors, and timeless quilt patterns. The tulip motif brings a sense of spring, renewal, and elegance to quilting projects, making it a favorite choice for both traditional and modern quilts. Whether you are a beginner or an experienced quilter, learning how to create a tulip quilt can be a rewarding and inspiring experience.
One of the reasons the Tulip Quilt – Tutorial is so popular is its versatility. Tulip quilt blocks can be arranged in countless layouts, from classic repeating patterns to creative, contemporary compositions. This flexibility allows quilters to personalize their projects while still following a clear and structured tutorial.
In addition to its visual appeal, a tulip quilt carries emotional value. Floral quilts often symbolize growth, warmth, and care, making them perfect for gifts, seasonal décor, or cherished keepsakes. A well-crafted tulip quilt is not only beautiful but also meaningful, reflecting the time and creativity invested in every stitch.
1. Understanding the Basics of Tulip Quilt – Tutorial
A Tulip Quilt – Tutorial begins with understanding the basic structure of tulip quilt blocks. Most tulip designs are created using geometric shapes that form the flower, stem, and sometimes leaves. These shapes are carefully pieced together to create a recognizable tulip silhouette.
DISCOVER MORE FREE PATTERNS HERE!
Accurate cutting is essential in any Tulip Quilt – Tutorial. Clean, precise cuts ensure that the pieces fit together smoothly, resulting in sharp points and well-aligned seams. This step lays the foundation for a polished and professional-looking quilt block.
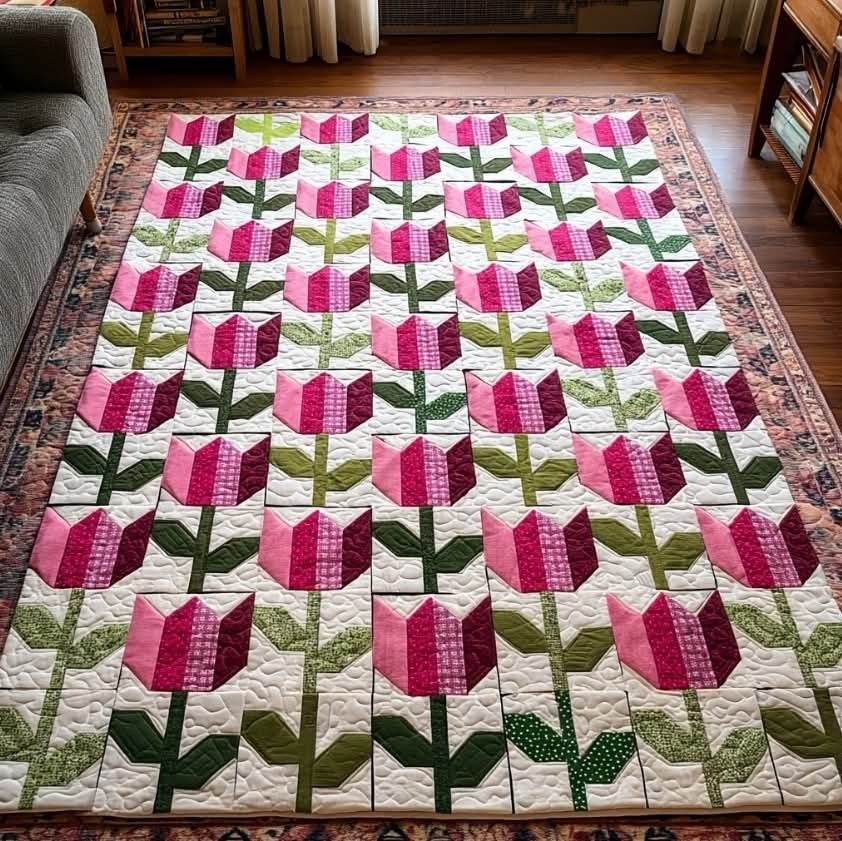
Color placement plays a major role in tulip quilts. Traditionally, tulips are made in vibrant reds, pinks, yellows, or purples, paired with green stems and leaves. However, modern Tulip Quilt – Tutorial designs often experiment with unexpected color palettes for a fresh and creative look.
Seam allowance consistency is another key concept. Maintaining a consistent seam allowance helps blocks finish at the correct size and makes assembling the quilt top much easier. This attention to detail is emphasized throughout any quality tulip quilt tutorial.
Understanding block orientation is also important. Tulip blocks may be rotated or mirrored to create movement and visual interest across the quilt. Learning how to plan block placement enhances the overall design.
Finally, pressing techniques are crucial. Proper pressing helps seams lie flat and reduces bulk, improving both the appearance and durability of the finished quilt.
2. Materials and Tools for Tulip Quilt – Tutorial
Every successful Tulip Quilt – Tutorial relies on the right materials and tools. High-quality fabric is essential, as it affects both the look and longevity of the quilt. Quilting cotton is the most common choice due to its durability and ease of handling.
Fabric selection usually includes background fabric, flower fabric, and stem or leaf fabric. Choosing fabrics with good contrast helps the tulip design stand out clearly against the background.
Cutting tools are fundamental. A rotary cutter, cutting mat, and quilting ruler allow for precise measurements and clean edges. These tools are indispensable in any Tulip Quilt – Tutorial.
A reliable sewing machine with a straight stitch setting is ideal for piecing quilt blocks. While tulip quilts can be sewn by hand, machine sewing speeds up the process and ensures consistent stitches.
Thread choice is also important. Neutral-colored cotton thread blends well with most fabrics and provides strong, durable seams that hold up over time.
Optional tools include pins or clips for holding pieces together, and an iron for pressing seams. These small details contribute significantly to the overall success of the quilt.
3. Step-by-Step Process in Tulip Quilt – Tutorial
A structured Tulip Quilt – Tutorial typically begins with cutting all fabric pieces according to the pattern. This step ensures efficiency and accuracy throughout the quilting process.
Next, the tulip flower pieces are assembled. This usually involves sewing angled or curved pieces together to form the petals. Careful alignment is crucial to maintain the tulip shape.
Once the flower is complete, the stem and leaves are added. These elements provide balance and help ground the floral design within the block. Precision at this stage enhances the realism of the tulip motif.
After assembling individual blocks, the tutorial guides you through trimming and squaring them. Uniform block size is essential for assembling the quilt top without distortion.
The quilt top is then assembled by sewing blocks into rows and joining the rows together. This stage allows you to see the full tulip pattern come to life.
The final steps include layering the quilt top, batting, and backing, followed by quilting and binding. These finishing touches complete the quilt and prepare it for use or display.
4. Creative Uses and Customization in Tulip Quilt – Tutorial
One of the most exciting aspects of a Tulip Quilt – Tutorial is customization. Tulip quilts can be adapted to suit different styles, seasons, and purposes, making them endlessly versatile.
Tulip quilt blocks can be used in full-size quilts, wall hangings, table runners, or pillow covers. Even a small number of blocks can create a striking decorative piece.
Layout variations allow for creative expression. Blocks can be arranged in straight rows, diagonal patterns, or alternating orientations to create dynamic designs.
Fabric choices significantly influence the final look. Solid fabrics offer a clean, modern aesthetic, while floral or patterned fabrics add texture and charm.
Seasonal themes are easy to incorporate into tulip quilts. Bright, cheerful colors work well for spring and summer, while muted tones create a more sophisticated, year-round quilt.
Personal touches, such as embroidery or label stitching, add sentimental value. These details make each tulip quilt a unique and cherished creation.
FAQ – Tulip Quilt – Tutorial
Is the Tulip Quilt – Tutorial suitable for beginners?
Yes, many tulip quilt tutorials are beginner-friendly and focus on basic piecing techniques with clear instructions.
What size quilt can I make with tulip blocks?
Tulip blocks can be used for quilts of any size, from small wall hangings to large bed quilts, depending on the number of blocks.
Do I need special tools for a tulip quilt?
Basic quilting tools are sufficient. A rotary cutter, ruler, sewing machine, and iron are typically all you need.
Can I hand quilt a tulip quilt?
Yes, tulip quilts can be hand quilted or machine quilted, depending on your preference and skill level.
How do I choose colors for a tulip quilt?
Start with colors you love. Traditional tulip colors work well, but modern palettes can create unique and eye-catching designs.
Are tulip quilts good for gifts?
Absolutely. Tulip quilts are thoughtful, symbolic gifts that are perfect for many occasions.
Conclusion
This Tulip Quilt – Tutorial explored the essentials of creating a beautiful tulip quilt, from understanding block construction and selecting materials to assembling and customizing your project. Tulip quilts combine visual charm with creative flexibility, making them ideal for quilters of all levels.
By following these steps and adding your personal style, you can create a quilt that is both meaningful and timeless. Share your honest opinion about this tutorial and feel free to leave suggestions or ideas—you might inspire the next beautiful quilt.