Coffee Cup Carrier Quilt – Tutorial is a delightful and functional quilting project that blends everyday utility with handcrafted charm. Unlike traditional quilts that stay at home, a coffee cup carrier is designed to travel with you, keeping your favorite beverage secure while adding a personal touch. This easy-to-carry quilted piece is perfect for busy mornings, coffee dates, outdoor picnics, and thoughtful gifts for friends and family. A Coffee Cup Carrier Quilt – Tutorial not only brings warmth to your hands but also showcases your quilting skills in a practical way.
The appeal of a Coffee Cup Carrier Quilt – Tutorial lies in its versatility. You can customize sizes to fit mugs, travel cups, or espresso glasses. Quilters of all levels enjoy this project because it builds confidence with precision piecing and creative fabric choices, while still being quick to complete compared to larger quilts. Whether you’re a beginner or an experienced quilter, this tutorial makes the process clear and rewarding.
In this article, you’ll explore how the Coffee Cup Carrier Quilt – Tutorial works, the materials best suited for it, step-by-step construction techniques, and imaginative customization ideas. By the end, you’ll be equipped to make beauty and practicality work together in your own coffee cup carrier quilt.
1. Understanding the Coffee Cup Carrier Quilt – Tutorial Concept
The Coffee Cup Carrier Quilt – Tutorial begins with the idea of creating a quilted carrier that securely holds a coffee cup while protecting hands from heat and providing easy portability. It’s essentially a small, quilted sleeve equipped with handles or straps.
DISCOVER MORE FREE PATTERNS HERE!
Design plays an important role in this quilt tutorial. The carrier must be sturdy enough to support a cup’s weight while soft and comfortable to hold, which is why quilting layers are essential. A well-constructed Coffee Cup Carrier Quilt – Tutorial uses a combination of fabric, batting, and thoughtful piecing.
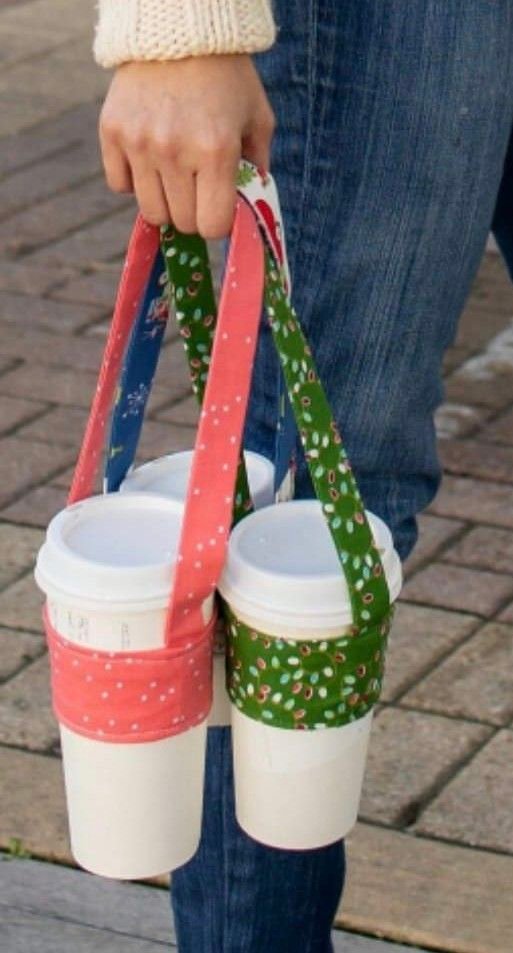
The pattern typically features a main body piece wrapped around the cup and a handle or strap attached securely for comfortable carrying. Quilters may also include pockets for small accessories like sugar packets or stirrers.
Size is customizable. A standard coffee cup carrier may fit most travel mugs, but the Coffee Cup Carrier Quilt – Tutorial often includes tips on adjusting dimensions to fit larger tumblers or smaller espresso cups.
Because this project is smaller than a traditional quilt, it becomes a great opportunity to learn precision piecing and seam alignment without tackling a huge quilt top.
Finally, the Coffee Cup Carrier Quilt – Tutorial emphasizes both function and style, teaching quilters to balance practical design with fabric coordination and quilting choices.
2. Materials and Preparation for Coffee Cup Carrier Quilt – Tutorial
Selecting the right materials is crucial in a Coffee Cup Carrier Quilt – Tutorial. Quilting cotton is the most common choice due to its durability, ease of use, and wonderful range of prints and colors. It holds quilting stitches well and provides a clean finish.
Batting is also essential. A medium-weight batting adds structure to the carrier without becoming too bulky. It helps insulate the carrier while allowing it to fold smoothly when not in use.
The backing fabric should complement the main print. Choosing a coordinating fabric adds visual depth and balance to your Coffee Cup Carrier Quilt – Tutorial.
Thread choice matters too. Use quilting or all-purpose thread in a neutral or matching shade to allow your fabric designs to shine without distraction.
You’ll also need basic quilting tools such as a rotary cutter, cutting mat, quilting ruler, pins or clips, and a sewing machine. These tools help ensure precision in cutting and piecing, which is vital to a successful Coffee Cup Carrier Quilt – Tutorial.
Finally, preparing a clean and comfortable workspace enhances your quilting experience and supports a smooth workflow throughout the project.
3. Step-by-Step Construction of Coffee Cup Carrier Quilt – Tutorial
The first step in the Coffee Cup Carrier Quilt – Tutorial is cutting fabric pieces based on the pattern’s specifications. Accurate cutting ensures that seams align properly and the carrier fits together smoothly.
Next, you’ll quilt the main body panels. This involves layering the top fabric, batting, and backing, then stitching through all layers to secure them. Straight-line quilting or decorative stitches both work well, depending on your preference.
Once the panels are quilted, the carrier sides are assembled. This means joining the quilted pieces and creating the rectangular or cylindrical shape that will wrap around the cup.
Handles or straps are attached at this point. These should be sewn securely, with reinforced stitching to ensure they can support the weight of the cup when carried.
The edges of the carrier are finished neatly. This may involve binding or top-stitching, which contributes to a clean, polished look and prevents fraying over time.
Lastly, try your carrier with an actual mug to check the fit. Minor adjustments can be made at this stage to ensure comfort and usability.
4. Creative Customization and Styling Ideas
The Coffee Cup Carrier Quilt – Tutorial thrives on creativity. Fabric choices alone make a big impact: playful prints for seasonal themes, florals for a feminine touch, or bold geometrics for a modern look.
You can add personalization with embroidered initials, decorative buttons, or applique motifs that reflect the recipient’s personality if gifting this item to someone special.
Some quilters enhance practicality with small pockets on the outside, perfect for holding tea bags, sugar packets, or even small notes. These thoughtful additions make the Coffee Cup Carrier Quilt – Tutorial even more versatile.
Color coordination between the carrier and cup you usually use creates a cohesive aesthetic. Coordinated colors and tones help your creation feel intentional and polished.
You can also experiment with quilted texture. Adding quilted designs such as loops, wavy lines, or geometric shapes makes the carrier more interesting and helps define the quilting layers.
Finally, consider matching sets. Create a coordinated placemat or coaster set along with the carrier to elevate the project and add another handmade touch to your coffee routine.
FAQ – Coffee Cup Carrier Quilt – Tutorial
Is the Coffee Cup Carrier Quilt – Tutorial suitable for beginners?
Yes, most tutorials are approachable for confident beginners who understand basic quilting techniques.
What size should the carrier be?
Size depends on your cup or mug. Most patterns include adjustable dimensions to fit different cup sizes.
Do I need a special sewing machine for this project?
No, a standard sewing machine suitable for quilting is sufficient.
Can I wash the quilted carrier?
Yes, most quilted carriers are washable. Use gentle settings to preserve fabric and batting.
What batting works best?
A medium-weight batting offers good structure without bulk.
Can I gift coffee cup carriers?
Absolutely. They make thoughtful handmade gifts for coffee lovers, friends, and family.
Conclusion
The Coffee Cup Carrier Quilt – Tutorial offers a delightful blend of creativity, practicality, and personal expression. Throughout this article, you learned the concept behind the pattern, material selection, step-by-step construction, and creative customization ideas that make this project both useful and beautiful.
This tutorial encourages quilters of all levels to explore functional quilting projects that enhance everyday life. If you enjoyed this guide, please leave your honest opinion and share suggestions—you may inspire other makers to create beautiful coffee cup carriers of their own.