Thread Catcher – TUTORIAL is a practical and charming quilt project designed to make every sewing space more organized and enjoyable. From the very first fabric cut, the Thread Catcher – TUTORIAL focuses on simplicity, usefulness, and the quiet satisfaction that comes from creating something that truly supports your daily quilting routine. This small but mighty project proves that functional items can also be beautiful and full of personality.
A thread catcher is one of those quilting essentials you never realize you need until you have one. The Thread Catcher – TUTORIAL helps keep loose threads, fabric trimmings, and tiny scraps contained, making your workspace cleaner and more peaceful. Instead of clutter building up around your sewing machine, everything has a designated place.
In this article, you will explore the Thread Catcher – TUTORIAL in a warm and humanized way. We will talk about the idea behind the pattern, fabric and structure choices, how the construction comes together, and creative ways to personalize and use your finished piece. This tutorial is suitable for all skill levels and is especially rewarding because it is quick, useful, and endlessly customizable.
The Thread Catcher – TUTORIAL is also a wonderful project for using fabric scraps. Each thread catcher can be completely unique, reflecting your style and the materials you already love.
DISCOVER MORE FREE PATTERNS HERE!
Whether you are sewing every day or just occasionally, this pattern adds comfort, order, and joy to your creative space.
Let’s explore everything that makes the Thread Catcher – TUTORIAL such a beloved quilting project.
1. The Purpose and Appeal of the Thread Catcher – TUTORIAL
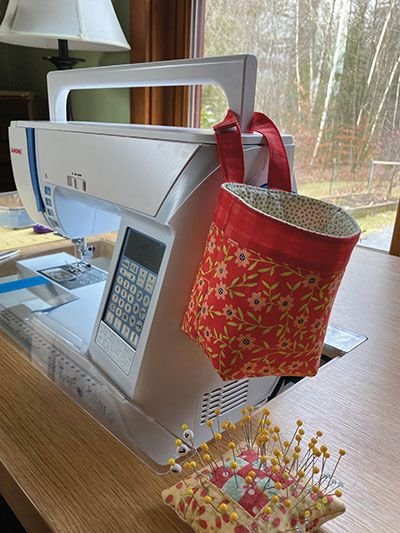
The Thread Catcher – TUTORIAL was created with a clear purpose: to keep your sewing area tidy while you work. Loose threads and fabric scraps are a natural part of quilting, and this pattern offers a simple solution.
Instead of constantly stopping to clean your table or floor, the thread catcher stays right beside your machine, ready to collect every small trimming.
Its open-top design allows you to quickly toss scraps without interrupting your workflow.
Many quilters appreciate how this pattern combines function with creativity, turning a practical tool into a decorative item.
The Thread Catcher – TUTORIAL also adds a sense of calm to the sewing process, as a clean space often leads to clearer focus and enjoyment.
This pattern reminds us that even the smallest projects can greatly improve our creative experience.
2. Fabric and Structure Choices for the Thread Catcher – TUTORIAL
Choosing fabrics for the Thread Catcher – TUTORIAL is part of the fun. Cotton fabrics are commonly used because they are durable and easy to handle.
Many quilters enjoy using leftover scraps, making this project both economical and meaningful.
Sturdy fabrics or interfacing are often added to help the thread catcher hold its shape.
Lining fabric is important, as it adds strength and allows the catcher to stand open while in use.
Some designs include a weighted base or extra stabilizer to prevent tipping.
Thoughtful fabric and structure choices ensure that the Thread Catcher – TUTORIAL is both attractive and reliable.
3. Constructing the Thread Catcher – TUTORIAL Step by Step
The construction of the Thread Catcher – TUTORIAL is straightforward and satisfying. It typically begins with cutting fabric pieces for the outer layer, lining, and base.
These pieces are sewn together carefully to create a box-like shape that stands upright.
Attention to seam alignment helps the finished thread catcher look neat and professional.
Turning the piece right side out and shaping the corners is a rewarding moment in the process.
Topstitching is often added for durability and a polished finish.
Completing the Thread Catcher – TUTORIAL is quick, making it a perfect project for short sewing sessions.
4. Creative Uses and Personalization Ideas
One of the most enjoyable aspects of the Thread Catcher – TUTORIAL is personalization. No two thread catchers need to look the same.
You can coordinate fabrics with your sewing room décor for a cohesive look.
Some quilters add pockets to the outside for small tools like scissors or seam rippers.
Decorative stitching or embroidery can add a personal touch.
Thread catchers can also be made as thoughtful gifts for fellow quilters.
With creativity and imagination, the Thread Catcher – TUTORIAL becomes a reflection of your style and love for sewing.
FAQ About Thread Catcher – TUTORIAL
Is the Thread Catcher – TUTORIAL suitable for beginners?
Yes, it uses basic sewing techniques and is very beginner-friendly.
How long does it take to make a thread catcher?
Most can be completed in under an hour.
Can I use fabric scraps for this project?
Absolutely, scraps are perfect for this pattern.
Does the thread catcher need to be weighted?
Weight is optional but helps keep it stable.
Can I wash the finished thread catcher?
Yes, depending on fabric and interfacing choices.
Is this a good gift idea?
Yes, it makes a thoughtful and useful handmade gift.
Conclusion
The Thread Catcher – TUTORIAL is a small yet powerful quilting project that brings order, beauty, and joy to any sewing space. In this article, we explored its purpose, fabric and structure choices, construction process, and creative ways to personalize it. This pattern shows how thoughtful design can transform everyday sewing habits.
PATTERN VIDEO:
Whether you make one for yourself or several as gifts, the Thread Catcher – TUTORIAL is a rewarding project that combines practicality with creativity. Feel free to leave your honest opinion and share your suggestions or ideas. Your feedback is always appreciated and inspires future creation.