Crocheted Horse Rug – Tutorial is a delightful and creative crochet project that combines comfort, imagination, and handmade charm. From the very first stitches, Crocheted Horse Rug – Tutorial captures attention with its playful design and cozy purpose, making it a wonderful addition to nurseries, children’s rooms, or themed décor. This type of crochet rug is not just functional; it becomes a statement piece that reflects care, creativity, and craftsmanship.
Many crocheters choose the Crocheted Horse Rug – Tutorial because it allows them to explore shapes, textures, and colors in a fun and expressive way. Horse-themed items often symbolize strength, freedom, and gentleness, and turning that symbolism into a soft crochet rug creates an emotional connection with the finished piece. Whether made as a gift or for personal use, this rug quickly becomes a beloved item.
In this article, you will learn everything essential about the Crocheted Horse Rug – Tutorial, including its concept, material selection, construction process, and finishing details. Each step is explained in a clear and approachable way, helping you enjoy the journey from yarn to a finished rug that brings warmth and personality into any space.
The Crocheted Horse Rug – Tutorial is designed to be both decorative and practical. Its unique shape sets it apart from traditional rectangular or circular rugs, making it a focal point in any room. With patience and creativity, this project can be adapted to different sizes, colors, and skill levels.
DISCOVER MORE FREE PATTERNS HERE!
Crochet rugs are known for their durability and texture, and when combined with a horse motif, they become even more special. The Crocheted Horse Rug – Tutorial invites you to slow down, enjoy the craft, and create something meaningful with your hands.
1. Understanding the Crocheted Horse Rug – Tutorial Concept
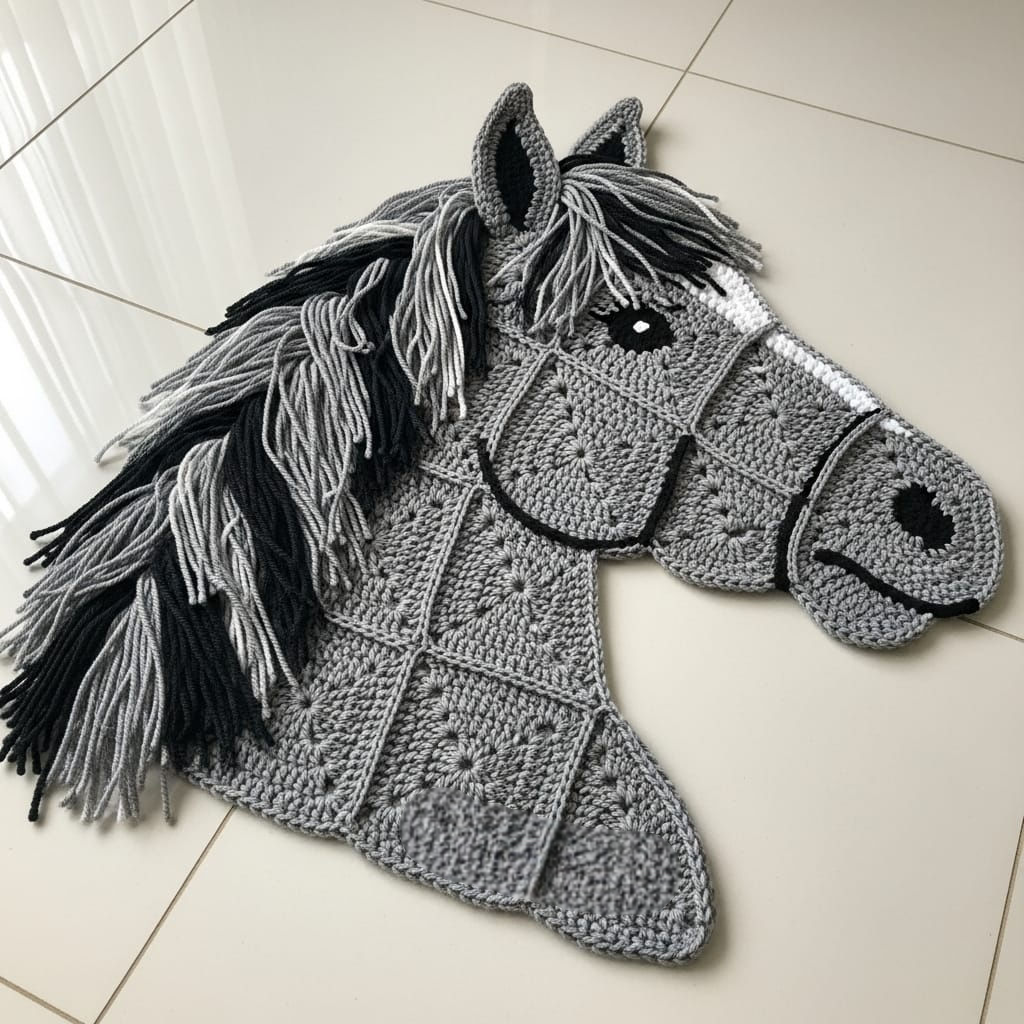
The Crocheted Horse Rug – Tutorial centers on creating a rug shaped or illustrated like a horse.
This design often appeals to children and animal lovers alike.
The rug can be realistic or stylized, depending on personal preference.
Many versions use layered crochet techniques to define details like the mane and tail.
The shape makes the rug visually engaging and playful.
At its heart, the Crocheted Horse Rug – Tutorial is about creativity and comfort.
2. Choosing Yarn and Materials for Crocheted Horse Rug – Tutorial
Yarn selection is essential for the success of the Crocheted Horse Rug – Tutorial.
Thick yarns provide durability and a soft surface underfoot.
Cotton yarn is often chosen for its strength and easy care.
Acrylic yarn offers a wide range of colors and affordability.
A large crochet hook helps create a sturdy but flexible fabric.
Choosing the right materials ensures your Crocheted Horse Rug – Tutorial lasts over time.
3. Crochet Techniques Used in Crocheted Horse Rug – Tutorial
The Crocheted Horse Rug – Tutorial typically uses basic crochet stitches.
Single crochet creates a dense and durable texture.
Increases and decreases help shape the horse design.
Color changes are used to highlight features and details.
Working in rows or rounds depends on the chosen pattern style.
These techniques make the Crocheted Horse Rug – Tutorial accessible and enjoyable.
4. Shaping and Detailing the Horse Rug
Shaping is a key element of the Crocheted Horse Rug – Tutorial.
The head, body, and legs are often crocheted as separate sections.
Each piece is carefully assembled to form the final shape.
Details like ears and mane add personality to the rug.
Surface crochet or embroidery enhances facial features.
These steps give the Crocheted Horse Rug – Tutorial its character and charm.
5. Finishing and Securing the Crocheted Horse Rug
Finishing touches are crucial in the Crocheted Horse Rug – Tutorial.
Loose ends should be securely woven in.
Edges may be reinforced for added durability.
Blocking helps smooth the shape and improve appearance.
Non-slip backing can be added for safety.
A well-finished Crocheted Horse Rug – Tutorial feels professional and polished.
6. Creative Uses and Customization Ideas
The Crocheted Horse Rug – Tutorial allows for endless customization.
Colors can match room décor or favorite themes.
Size adjustments make it suitable for different spaces.
It can be used as a play mat, decorative rug, or wall piece.
Personal touches make each rug unique.
This flexibility makes the Crocheted Horse Rug – Tutorial truly special.
FAQ – Crocheted Horse Rug – Tutorial
Is the Crocheted Horse Rug suitable for beginners?
Yes, with basic stitch knowledge and patience, beginners can complete it.
What yarn weight works best for this rug?
Bulky or super bulky yarn is commonly used for durability.
How long does it take to complete the rug?
Depending on size and detail, it may take several days to a few weeks.
Can the rug be washed?
Most cotton and acrylic yarns are washable on gentle cycles.
Is this rug safe for children?
Yes, when securely finished and used with non-slip backing.
Can I change the horse design?
Absolutely, colors and features can be customized freely.
Conclusion
The Crocheted Horse Rug – Tutorial is a rewarding project that combines creativity, comfort, and personal expression. Throughout this article, you learned about the concept, materials, techniques, shaping, and finishing steps needed to create a beautiful crochet rug shaped like a horse. This project highlights how crochet can transform yarn into a functional piece of art filled with warmth and personality.
If you enjoyed this Crocheted Horse Rug – Tutorial, we would love to hear from you. Please leave your honest opinion and share any suggestions or ideas you may have. Your feedback helps inspire creativity and keeps the crochet community growing and connected.