The How to Make the Sparrows Quilt – TUTORIAL is a beautiful quilting project inspired by the delicate charm and graceful movement of birds in flight. This design captures a sense of lightness and freedom, making it perfect for quilters who appreciate nature-inspired patterns with elegant piecing details.
Whether you are creating a cozy throw, a decorative wall hanging, or a heartfelt handmade gift, the How to Make the Sparrows Quilt – TUTORIAL will guide you step by step through fabric selection, block construction, layout planning, and finishing techniques. With careful piecing and thoughtful color placement, you can bring these graceful sparrows to life in fabric form.
This project is suitable for confident beginners and intermediate quilters who enjoy combining traditional piecing with shaped design elements.
1. Choosing Fabrics and Planning Your Layout
Before beginning the How to Make the Sparrows Quilt – TUTORIAL, take time to plan your color palette. Fabric selection plays a key role in defining the sparrow shapes and creating contrast between the birds and the background.
DISCOVER MORE FREE PATTERNS HERE!
For a natural look, choose soft browns, creams, grays, and muted blues. If you prefer a modern aesthetic, try bold background fabrics with lighter bird silhouettes. High contrast helps the sparrow shapes stand out clearly.
You will need quilting cotton fabrics for the birds, background fabric, thread, rotary cutter, ruler, cutting mat, pins, and an iron. Depending on the size of your quilt, calculate yardage carefully to ensure consistent fabric placement across all blocks.
Consider laying out your fabrics on a design wall before sewing. This allows you to preview how the sparrows will appear across the quilt top and adjust colors as needed.
2. Cutting and Preparing the Sparrow Blocks
Accurate cutting is essential in the How to Make the Sparrows Quilt – TUTORIAL. Begin by cutting your background squares and the pieces required to form the sparrow shapes. Many versions of this quilt use angled units and half-square triangles to create the wings and body.
Label your pieces if necessary to avoid confusion during assembly. Small directional pieces can look similar, so organization helps maintain accuracy.
Create the wing units first by sewing half-square triangles or angled rectangles together. Press seams carefully to maintain sharp points. Next, assemble the bird body section, ensuring that seam allowances remain consistent at one quarter inch.
Precision during this stage ensures that when the blocks are joined together, the sparrow shapes align beautifully without distortion.
3. Assembling the Quilt Top
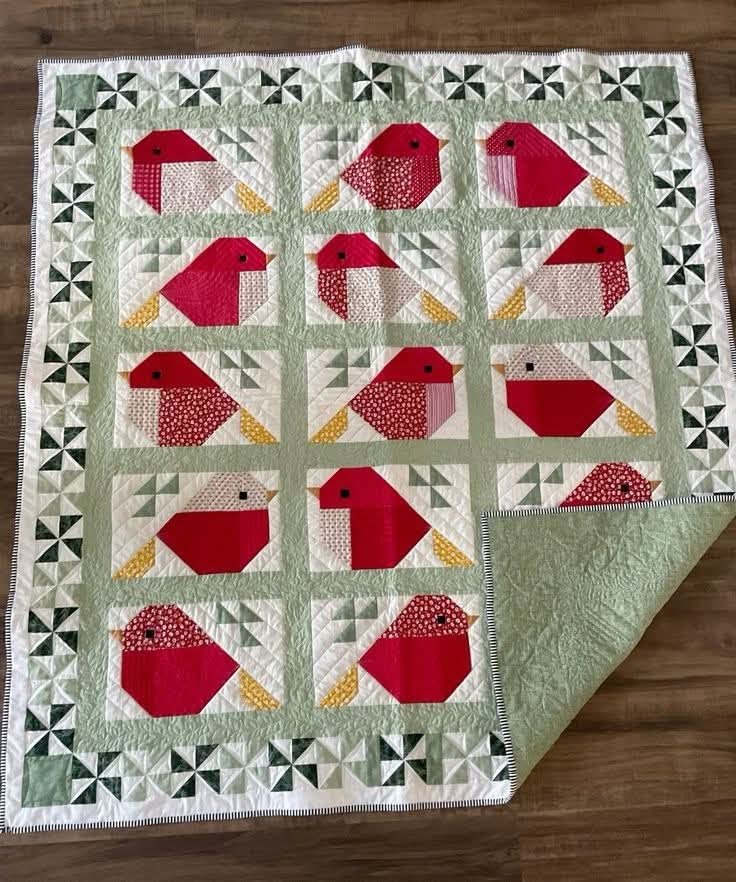
Now it’s time to bring your sparrows together following the How to Make the Sparrows Quilt – TUTORIAL assembly steps. Lay out your completed blocks on a flat surface or design wall. Arrange them in rows, paying attention to the direction of each bird. You may choose to have all sparrows facing the same direction or alternate them for a dynamic effect.
Sew the blocks together row by row, carefully matching seam intersections. Press seams in alternating directions between rows to reduce bulk and improve nesting. Take your time during this step, as accurate alignment will highlight the graceful silhouette of each sparrow. If desired, add sashing between blocks to create visual separation and allow each bird motif to stand out more clearly.
Once the quilt top is fully assembled, measure it to ensure it is square. Trim any uneven edges before preparing for quilting.
4. Quilting and Finishing Touches
After completing the quilt top in the How to Make the Sparrows Quilt – TUTORIAL, prepare your quilt sandwich by layering the backing fabric, batting, and quilt top. Smooth out wrinkles and secure the layers with pins or clips.
Choose a quilting design that complements the bird theme. Gentle wave patterns, echo quilting around the sparrows, or soft diagonal lines can enhance the sense of motion. Avoid overly dense quilting, which may overshadow the delicate bird shapes.
Once quilting is complete, trim the edges and attach binding. A neutral binding creates a subtle frame, while a contrasting color can add a bold finishing touch.
Give your finished quilt a final press and inspect for loose threads or uneven stitching.
Frequently Asked Questions
Is the How to Make the Sparrows Quilt – TUTORIAL beginner-friendly
Yes, confident beginners who are comfortable with half-square triangles and accurate seam allowances can successfully complete this quilt.
What size can this quilt be made
The final size depends on how many sparrow blocks you create. You can make a baby quilt, throw quilt, or even a full bed quilt by adjusting the number of blocks.
Can I use pre-cut fabrics
Yes, pre-cut squares such as charm packs can work well for background pieces and bird components.
How do I keep the sparrow points sharp
Trim half-square triangles carefully and press seams gently to maintain clean points.
What quilting style works best
Light, flowing quilting designs enhance the graceful appearance of the sparrows.
Conclusion
The How to Make the Sparrows Quilt – TUTORIAL offers a wonderful opportunity to combine precision piecing with nature-inspired artistry. The delicate bird shapes create a quilt that feels peaceful, elegant, and timeless.
By carefully selecting fabrics, maintaining accurate seams, and thoughtfully arranging your blocks, you can create a quilt that beautifully showcases these charming sparrows.
PATTERN VIDEO:
Have you tried making the Sparrows Quilt? Share your color choices and layout ideas in the comments. Your creativity may inspire fellow quilters to begin their own bird-inspired quilting journey.