If you’re looking for a stylish, beginner-friendly, and versatile accessory, this Crochet Bandana Tutorial is exactly what you need. Bandanas have made a huge comeback in the fashion world, and the crochet version adds texture, personality, and handmade charm to any outfit.
Whether you want a lightweight summer headscarf, a trendy festival accessory, or a practical hair solution for everyday wear, learning how to crochet a bandana is a fun and rewarding project.
In this complete guide, you’ll discover materials, stitches, step-by-step instructions, and creative variations to make your own beautiful crochet bandana.Let’s get started.
1. Why Make a Crochet Bandana?
The Crochet Bandana Tutorial is popular because it combines fashion and function in a simple design. Unlike larger shawls or scarves, a bandana works up quickly and requires minimal yarn, making it perfect for beginners and experienced crocheters alike.
DISCOVER MORE FREE PATTERNS HERE!
One of the biggest advantages of a crochet bandana is versatility. You can wear it in multiple ways:
As a headscarf tied at the back
As a hair accessory folded into a triangle
As a neck scarf for a soft, boho look
As a festival or beach accessory
As a practical solution to keep hair out of your face
Bandanas are also excellent stash-busting projects. They typically use lightweight yarn such as cotton or bamboo blends, which makes them breathable and comfortable. Because they are small, they are perfect for trying new stitch patterns without committing to a large project.
If you sell handmade items, crochet bandanas are popular in spring and summer collections. They are affordable, trendy, and appeal to all age groups.
2. Materials and Stitch Basics
Before starting this Crochet Bandana Tutorial, gather your materials carefully to ensure the best results.
You will need:
Lightweight yarn (cotton is highly recommended)
Crochet hook that matches your yarn size
Scissors
Yarn needle
Measuring tape
Cotton yarn is ideal because it is breathable, soft, and holds its shape well. For summer wear, choose sport or DK weight yarn. If you prefer a slightly chunkier look, worsted weight can also work.
Basic Stitch Knowledge
Most crochet bandanas are made using simple stitches such as:
Chain (ch)
Single crochet (sc)
Half double crochet (hdc)
Double crochet (dc)
Slip stitch (sl st)
Some designs also include lace patterns using chain spaces and skipped stitches, which create a lightweight and airy effect.
Understanding how to increase at the beginning and end of rows is essential, as bandanas are typically worked in a triangle shape.
3. Step-by-Step Crochet Bandana Tutorial
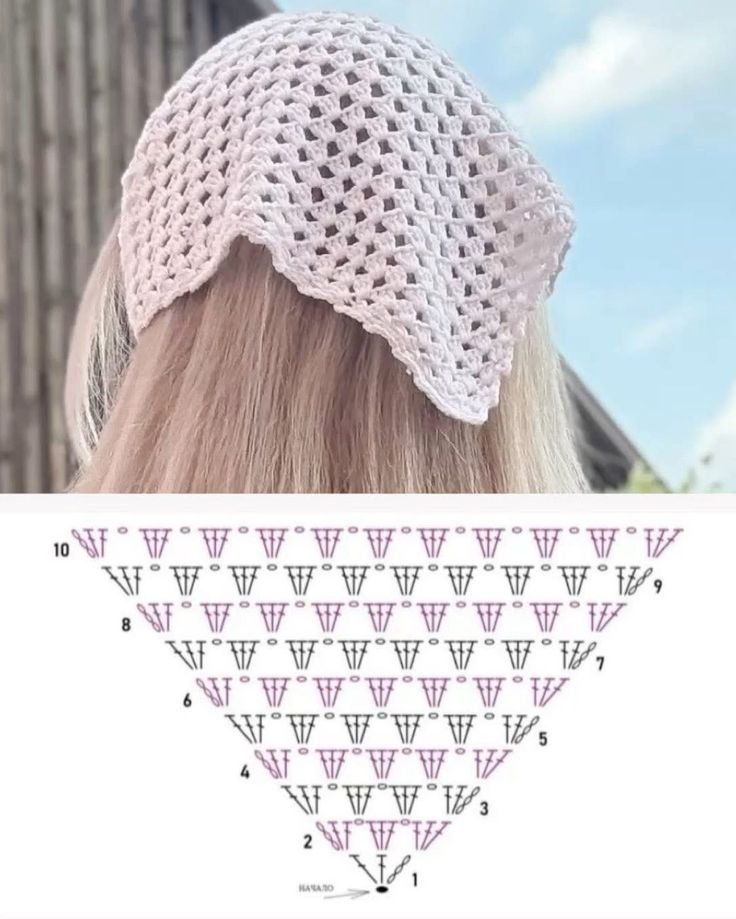
This Crochet Bandana Tutorial follows a classic triangular construction. You will start at the top center and increase outward.
Step 1: Create the Foundation
Begin with a small number of chain stitches, usually four or five, and join or work directly into the chain to form the starting point.
Work your first row by placing double crochet stitches into the chain space. Add a chain in the center and work additional stitches into the same space. This center chain creates the point that allows the triangle to grow evenly.
Step 2: Build the Triangle
Turn your work. At the beginning of each row, chain three (or the appropriate number for your stitch height). Work stitches across until you reach the center chain space.
Into that center space, place two double crochets, chain one, and two double crochets again. This creates the increase that expands the triangle.
Continue working stitches across to the end of the row. Repeat this process for each new row, always increasing in the center.
As the rows grow, your triangle will gradually widen and form the classic bandana shape.
Step 3: Adjust the Size
Continue increasing until the bandana reaches your desired width. For adults, a width of approximately 18 to 22 inches across the top edge is common. For children, slightly smaller measurements work best.
Try the bandana on as you go to ensure a comfortable fit.
Step 4: Add Ties
Once your triangle is complete, do not fasten off. Instead, chain a long string of stitches from one corner to create a tie. Slip stitch back along the chain for extra durability.
Fasten off and repeat on the other side, or attach yarn to the opposite corner and create the second tie.
Alternatively, you can crochet a simple border around the entire bandana before adding ties for a polished look.
Step 5: Finishing Touches
Weave in all loose ends carefully using a yarn needle. Block your bandana lightly if needed to shape it properly and open up lace stitches.
Your crochet bandana is now ready to wear.
4. Creative Variations and Styling Ideas
One of the best parts of this Crochet Bandana Tutorial is how easily you can personalize your design.
Lace Bandana
Use chain spaces and skipped stitches to create an airy lace pattern. This style is perfect for summer and looks delicate and elegant.
Granny Stitch Bandana
Incorporate granny clusters instead of solid double crochet rows. This gives a vintage-inspired appearance with beautiful texture.
Color Block Design
Change yarn colors every few rows to create stripes or bold color-block sections. This works especially well with bright summer shades.
Textured Bandana
Use puff stitches, shell stitches, or crossed stitches to add dimension and interest to the fabric.
Edging Options
Add a decorative edging such as picot stitches, scallops, or a simple single crochet border for a finished appearance.
You can also experiment with different yarn types. Bamboo blends create a soft drape, while mercerized cotton gives a sleek and slightly shiny finish.
Styling options are endless. Wear your bandana with loose waves for a boho look, tie it under a bun for a vintage vibe, or fold it into a narrow headband for a minimalist style.
Frequently Asked Questions (FAQ)
Is this Crochet Bandana Tutorial suitable for beginners?
Yes, this project is beginner-friendly. It mainly uses basic stitches and simple increases in the center of each row.
What type of yarn is best?
Cotton yarn is highly recommended because it is breathable and holds its shape. Lightweight yarn works best for comfortable wear.
How long does it take to make a crochet bandana?
Most crocheters can complete one in two to four hours, depending on the stitch pattern and size.
Can I adjust the size easily?
Yes. Simply continue increasing rows until you reach the desired width.
Can I sell bandanas made from this tutorial?
Yes, handmade crochet bandanas are popular accessories. If using a purchased pattern variation, always review the designer’s selling terms.
Conclusion
This Crochet Bandana Tutorial is a simple yet stylish project that combines creativity and practicality. With just a small amount of yarn and a few basic stitches, you can create a versatile accessory perfect for everyday wear, festivals, beach days, or thoughtful handmade gifts.
Because it works up quickly and allows endless customization, it’s a project you’ll want to make again and again in different colors and textures.
PATTERN VIDEO:
If you enjoyed this tutorial and love discovering new crochet ideas, share your thoughts and tell me what color combination you would choose for your next bandana. Your handmade style starts with one simple stitch.