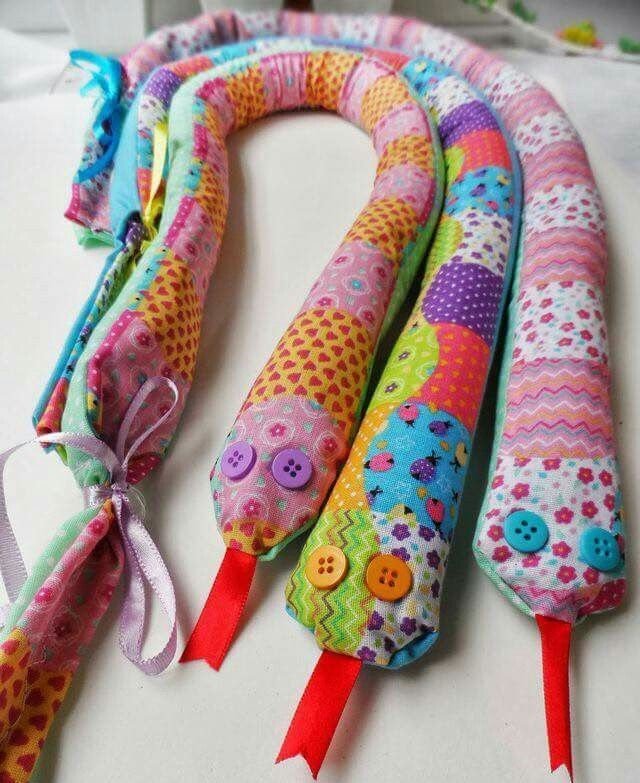
If you love turning leftover fabric into something bold and imaginative, the Snake Made with Scraps – TUTORIAL is the perfect quilt project for you. This design transforms small fabric pieces into a winding, eye-catching snake that slithers across your quilt top with personality and charm.
Scrap quilts are beloved for their sustainability, color variety, and creative freedom. This particular pattern takes that concept even further by giving structure and movement to your scraps, creating a design that feels dynamic and full of life.
Whether you are looking to reduce your fabric stash, experiment with color placement, or create a fun quilt for a child’s room, this tutorial will guide you step-by-step through the entire process.
1. Understanding the Snake Made with Scraps Design
The magic of the Snake Made with Scraps – TUTORIAL lies in its movement. Unlike traditional quilt blocks that repeat in uniform grids, this design features a continuous, curving snake shape that weaves across a background.
DISCOVER MORE FREE PATTERNS HERE!
Key characteristics of this pattern include:
A long, segmented body made from scrap pieces
Curved or angled construction to create a slithering effect
High contrast between snake and background
Playful details like eyes, tongue, or patterned scales
The snake’s body is typically constructed using:
Rectangles or squares joined into segments
Half-square triangles for angled turns
Improvisational piecing for organic curves
This pattern can be modern and minimalist with a solid background, or whimsical and colorful with bold scrap combinations.
The beauty of a scrap snake quilt is that no two versions will ever look the same. Every fabric piece adds personality and storytelling to the design.
2. Materials and Fabric Selection for a Balanced Scrap Look
Because this quilt is scrap-based, fabric selection is both flexible and important.
Materials Needed
Assorted scrap fabrics (cotton quilting fabric recommended)
Background fabric (solid or low-volume print)
Rotary cutter and cutting mat
Quilting ruler
Sewing machine
Thread
Iron and pressing surface
Batting and backing fabric
Choosing Scrap Fabrics
You can use:
Leftover jelly roll strips
Charm square remnants
Small offcuts from previous projects
Fat quarter leftovers
For a cohesive look, consider one of these strategies:
Stick to one color family (greens for a realistic snake)
Use rainbow scraps for a playful design
Alternate light and dark scraps for scale contrast
Mix prints but maintain similar tone value
Background Fabric Tips
Choose a neutral background (white, cream, gray) for maximum contrast.
Use black for a dramatic modern look.
Select soft pastels for a child-friendly design.
The stronger the contrast between the snake body and the background, the more defined and eye-catching the design becomes.
3. Step-by-Step Construction of the Snake Made with Scraps
Before beginning, sketch a rough outline of your snake’s path across the quilt top. Planning the curves helps avoid layout mistakes later.
Step 1: Cut Scrap Segments
Cut scrap pieces into uniform strips or rectangles.
A common size is 2.5” x 4.5” rectangles or 2.5” squares.
You can mix sizes for a more organic look, but keeping consistent width makes assembly easier.
Step 2: Create Snake Body Segments
Sew scrap pieces together in rows to form long strips.
Press seams to one side for durability.
If you want visible “scale” effect, alternate contrasting scraps.
Step 3: Add Curves and Angles
To create a slithering motion:
Insert half-square triangles at strategic points to shift direction.
Sew angled seams between segments.
Trim carefully to maintain smooth transitions.
Lay out the entire snake on your background fabric before attaching. Adjust curves until you are satisfied with the flow.
Step 4: Attach Snake to Background
There are two main methods:
Piece the background around the snake (advanced technique).
Appliqué the snake onto a solid background (beginner-friendly).
For appliqué:
Position the snake body on the background fabric.
Pin or use temporary adhesive.
Stitch around edges using straight or zigzag stitch.
Step 5: Add Head and Tail Details
Cut a rounded head shape.
Add small fabric circles for eyes.
Insert a red fabric tongue for a playful detail.
The tail can taper using angled trimming.
Step 6: Assemble the Quilt Top
Once the snake is secured:
Add borders if desired.
Square up the quilt top.
The winding snake should now appear lively and dynamic across the surface.
4. Quilting, Finishing, and Creative Variations
The quilting design enhances the final result.
Quilting Ideas
Stitch-in-the-ditch along the snake body
Echo quilting around curves
Free-motion quilting to mimic scales
Simple straight-line quilting for modern style
Thread Color Suggestions
Matching thread keeps focus on scraps.
Contrasting thread highlights texture.
Border Ideas
Thin black border for definition
Scrappy border to match the snake body
Wide neutral border for balance
Creative Variations
Make multiple snakes weaving across the quilt.
Create a giant coiled snake centered on the quilt.
Turn the design into a wall hanging.
Add embroidered details for realism.
This project is especially popular for:
Kids’ bedroom quilts
Educational animal-themed quilts
Scrap-busting community projects
Playful modern quilt designs
Because it uses scraps, this quilt is also eco-friendly and budget-conscious.
FAQ – Snake Made with Scraps Quilt
Is this project beginner-friendly?
Yes, especially if using the appliqué method for attaching the snake.
How big should the finished quilt be?
You can make it any size, from a small wall hanging to a full bed quilt.
Can I make the snake realistic?
Absolutely. Use greens, browns, and textured prints to mimic scales.
What is the best way to keep curves smooth?
Lay out the full design before sewing and trim carefully at angle transitions.
Can I use this pattern for a baby quilt?
Yes, just choose soft colors and secure all appliqué details safely.
Conclusion
The Snake Made with Scraps – TUTORIAL is a joyful celebration of creativity, sustainability, and imaginative quilting. It transforms leftover fabric into a bold, flowing design that stands out from traditional block-based quilts.
With thoughtful planning, careful piecing, and playful fabric choices, you can create a quilt that feels lively and completely unique. Scrap quilts tell stories through fabric — and this snake design adds movement and personality to that story.
PATTERN VIDEO:
If you enjoyed this tutorial, share your scrap snake quilt, leave your feedback, and let us know how you customized your design. Your creativity may inspire others to turn their fabric scraps into something extraordinary.