The The “Dreamy Nap” Cat Lamp: An Amigurumi Crochet Tutorial is a charming and creative crochet project that combines the cozy world of amigurumi with soft ambient lighting. In this The “Dreamy Nap” Cat Lamp: An Amigurumi Crochet Tutorial, you will learn how to create a delightful sleeping cat design that can gently glow and decorate any room with warmth and personality.
Many crochet enthusiasts love projects that are both decorative and functional. The The “Dreamy Nap” Cat Lamp: An Amigurumi Crochet Tutorial offers exactly that. It allows crafters to build a soft crochet sculpture of a peacefully sleeping cat while incorporating a small LED light source that transforms the piece into a soothing lamp.
Beyond being a fun craft project, the The “Dreamy Nap” Cat Lamp: An Amigurumi Crochet Tutorial is perfect for bedrooms, nurseries, reading corners, or cozy living spaces. Handmade lamps bring a special handmade charm that cannot be found in store-bought decorations, making this crochet project truly unique.
1. Understanding The “Dreamy Nap” Cat Lamp: An Amigurumi Crochet Tutorial
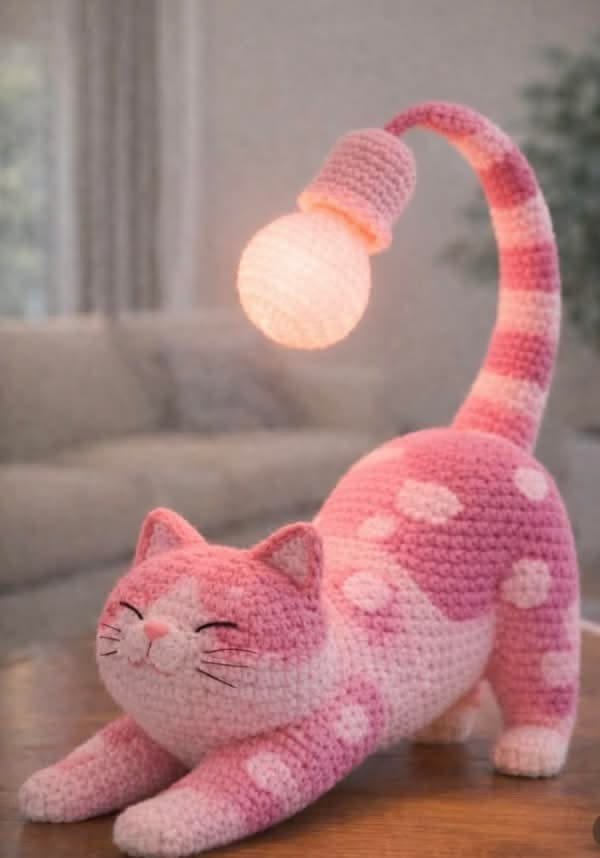
The The “Dreamy Nap” Cat Lamp: An Amigurumi Crochet Tutorial focuses on creating a soft, sculpted crochet cat designed in a relaxed sleeping pose. The cat gently rests around a small LED light, creating a peaceful glow that enhances the cozy atmosphere of any room.
DISCOVER MORE FREE PATTERNS HERE!
Amigurumi crochet techniques are at the heart of this project. In The “Dreamy Nap” Cat Lamp: An Amigurumi Crochet Tutorial, the cat is created using tight stitches that form a smooth, structured fabric capable of holding its shape.
One of the most appealing aspects of the The “Dreamy Nap” Cat Lamp: An Amigurumi Crochet Tutorial is the emotional expression of the design. The curled body, tiny ears, and embroidered closed eyes create the impression of a cat enjoying a quiet nap.
The lighting component used in the The “Dreamy Nap” Cat Lamp: An Amigurumi Crochet Tutorial is typically a small battery-powered LED light or LED puck light. These lights remain cool and safe when placed inside crochet creations.
This tutorial is loved by many crocheters because it blends art and practicality. Instead of simply creating a decorative toy, the The “Dreamy Nap” Cat Lamp: An Amigurumi Crochet Tutorial results in a functional piece of home décor.
Additionally, this project allows crocheters to explore sculptural crochet techniques while still using simple stitches like single crochet, increases, and decreases.
2. Materials Needed for The “Dreamy Nap” Cat Lamp: An Amigurumi Crochet Tutorial
To begin the The “Dreamy Nap” Cat Lamp: An Amigurumi Crochet Tutorial, gathering the right materials will help ensure that the finished lamp looks polished and functions properly.
The most important material is yarn. Cotton yarn is often recommended for the The “Dreamy Nap” Cat Lamp: An Amigurumi Crochet Tutorial because it produces firm stitches and maintains shape well. However, acrylic yarn can also work depending on your preference.
A crochet hook that matches your yarn size is essential. Many amigurumi projects like The “Dreamy Nap” Cat Lamp: An Amigurumi Crochet Tutorial use hooks between 2.5 mm and 4 mm to achieve tight stitches.
You will also need stuffing material such as polyester fiberfill. The stuffing gives the cat its soft, rounded form and helps maintain the sleeping pose design.
The lighting component is crucial. A small LED puck light or LED tea light works perfectly for the The “Dreamy Nap” Cat Lamp: An Amigurumi Crochet Tutorial, as these lights stay cool and are safe for yarn projects.
Other helpful tools include stitch markers, embroidery thread for facial features, scissors, a yarn needle for sewing parts together, and optional safety eyes if desired.
Finally, some crafters like to add decorative details such as tiny bows, collars, or small embroidered whiskers to personalize their lamp design.
3. Step-by-Step Overview of The “Dreamy Nap” Cat Lamp: An Amigurumi Crochet Tutorial
The The “Dreamy Nap” Cat Lamp: An Amigurumi Crochet Tutorial usually begins with crocheting the main body of the cat. This is typically worked in continuous rounds starting with a magic ring.
The body is gradually shaped using increases and decreases. In The “Dreamy Nap” Cat Lamp: An Amigurumi Crochet Tutorial, the goal is to form a curled shape that naturally wraps around the light source.
Next, the head and ears are crocheted. These pieces are small but essential in giving the cat its recognizable personality.
Once the pieces are completed, the cat is lightly stuffed. The The “Dreamy Nap” Cat Lamp: An Amigurumi Crochet Tutorial requires careful stuffing to maintain the relaxed sleeping pose.
The facial details are then embroidered. Closed eyes, a tiny nose, and subtle whiskers help capture the peaceful feeling of a cat enjoying a quiet nap.
Finally, the LED light is placed inside or beneath the crochet structure. When illuminated, the lamp softly glows through the stitches, creating a warm and calming light.
4. Creative Ideas and Customization for Your Dreamy Cat Lamp
One of the most enjoyable aspects of the The “Dreamy Nap” Cat Lamp: An Amigurumi Crochet Tutorial is the opportunity to personalize your design.
For example, you can experiment with different yarn colors to create black cats, gray kittens, orange tabbies, or fantasy-colored cats.
You can also change the size of the lamp by adjusting yarn thickness or hook size when following The “Dreamy Nap” Cat Lamp: An Amigurumi Crochet Tutorial.
Another creative option is to add small accessories such as a crochet pillow, blanket, or moon-shaped base under the sleeping cat.
Some crocheters also enjoy creating matching decorations, such as crochet stars or clouds, to place around the lamp and create a dreamy atmosphere.
This project is also perfect as a handmade gift. A lamp made using The “Dreamy Nap” Cat Lamp: An Amigurumi Crochet Tutorial can be a thoughtful present for cat lovers, children, or anyone who appreciates cozy handmade décor.
FAQ About The “Dreamy Nap” Cat Lamp: An Amigurumi Crochet Tutorial
1. Is this crochet lamp safe to use?
Yes, as long as you use LED lights that do not produce heat. The The “Dreamy Nap” Cat Lamp: An Amigurumi Crochet Tutorial is designed for cool LED lighting only.
2. Is the tutorial suitable for beginners?
Yes, beginners who know basic amigurumi stitches can successfully follow The “Dreamy Nap” Cat Lamp: An Amigurumi Crochet Tutorial.
3. What type of yarn works best for this project?
Cotton yarn is highly recommended for the The “Dreamy Nap” Cat Lamp: An Amigurumi Crochet Tutorial because it creates a sturdy and clean stitch structure.
4. Can the lamp be washed?
If the lighting element is removable, the crochet portion from The “Dreamy Nap” Cat Lamp: An Amigurumi Crochet Tutorial can usually be gently hand washed.
5. How long does this project take to complete?
Depending on skill level, the The “Dreamy Nap” Cat Lamp: An Amigurumi Crochet Tutorial can take between a few hours and a full weekend.
6. Can I sell lamps made from this tutorial?
Many handmade creators sell items made from crochet tutorials, but it is always best to verify the original designer’s usage guidelines.
Conclusion
The The “Dreamy Nap” Cat Lamp: An Amigurumi Crochet Tutorial is a wonderful project that blends crochet artistry with cozy home décor. By following this tutorial, you can create an adorable sleeping cat that not only looks beautiful but also glows softly as a comforting lamp.
Throughout this guide, we explored the purpose of the The “Dreamy Nap” Cat Lamp: An Amigurumi Crochet Tutorial, the materials required, the general construction process, and creative ways to personalize the design. This project is perfect for crocheters who enjoy creating decorative pieces with practical uses.
If you enjoyed this article and the ideas shared here, feel free to leave your honest opinion and suggestions. Your feedback is always valuable and helps inspire more creative crochet projects in the future. Happy crocheting!