The Chicken Pincushion – TUTORIAL is a charming quilting and sewing project that combines creativity, practicality, and a touch of farmhouse-inspired design. This adorable chicken-shaped pincushion is not only a decorative craft but also a useful tool for quilters, sewists, and anyone who enjoys working with needles and pins. The Chicken Pincushion – TUTORIAL transforms small fabric scraps into a delightful handmade item that can brighten any sewing space.
Many quilters enjoy projects that allow them to use leftover fabric pieces, and the Chicken Pincushion – TUTORIAL is perfect for that purpose. Because the pincushion is small and requires only a few materials, it offers a quick yet satisfying sewing project. At the same time, the playful chicken shape adds personality and charm to an everyday sewing accessory.
In this guide, you will learn how to create the Chicken Pincushion – TUTORIAL step by step, including the materials required, the process of constructing the chicken shape, and the finishing details that give the pincushion its adorable character. Whether you are a beginner exploring small quilting projects or an experienced maker looking for a fun craft, this tutorial will help you create a beautiful and practical chicken pincushion.
1. The Inspiration Behind the Chicken Pincushion Design
The Chicken Pincushion – TUTORIAL is inspired by traditional farmhouse crafts and the long history of handmade sewing tools. Pincushions have been used for centuries to keep pins and needles organized, making them an essential accessory in any sewing or quilting workspace.
DISCOVER MORE FREE PATTERNS HERE!
Over time, crafters began turning functional pincushions into decorative items by shaping them into animals, fruits, and other creative forms. The chicken design became especially popular because it fits perfectly with the cozy, rustic atmosphere often associated with sewing rooms and craft spaces.
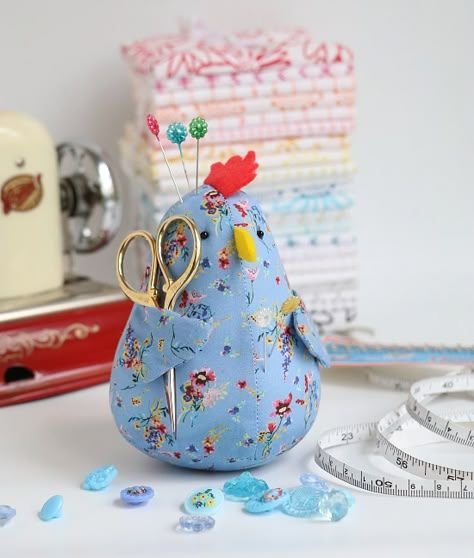
In the Chicken Pincushion – TUTORIAL, the chicken shape adds warmth and personality to a simple sewing tool. The rounded body, small wings, and playful comb create a recognizable silhouette that is both cute and practical.
Another reason this design is so appealing is its versatility. Quilters can experiment with different fabrics, from colorful prints to classic farmhouse patterns, to give their chicken pincushion a unique style.
The project also reflects the creative spirit of quilting communities, where small handmade accessories often carry personal touches and storytelling elements.
By understanding the inspiration behind the Chicken Pincushion – TUTORIAL, crafters can appreciate how this small project connects functionality with creativity and tradition.
2. Materials and Tools Needed for the Chicken Pincushion
Before starting the Chicken Pincushion – TUTORIAL, gathering the right materials will make the process smoother and more enjoyable. One of the best aspects of this project is that it requires only a small amount of fabric and basic sewing supplies.
The main material needed is cotton quilting fabric. Because the pincushion is small, it is a perfect opportunity to use fabric scraps from previous quilting projects.
Different fabrics can be chosen for the chicken’s body, wings, and decorative elements such as the comb and beak. Bright colors and playful prints often work beautifully for this design.
You will also need stuffing material to fill the pincushion. Polyester fiberfill is commonly used because it provides softness and structure, allowing pins to be inserted easily.
Basic sewing tools are essential as well. These include a sewing machine or hand-sewing needle, thread, fabric scissors, pins, and a marking tool for tracing the pattern.
Some crafters like to add extra details such as small buttons for eyes or embroidered features to enhance the personality of the Chicken Pincushion.
With these materials prepared, you will be ready to begin assembling the adorable chicken-shaped pincushion.
3. Constructing the Chicken Pincushion Step by Step
The construction process in the Chicken Pincushion – TUTORIAL begins with cutting the fabric pieces that will form the chicken’s body and decorative details.
Typically, the body is created using two rounded fabric pieces that will be sewn together to form the main shape. These pieces are placed with right sides facing each other before stitching.
Additional small pieces are cut for the chicken’s comb, beak, and wings. These elements add character and help define the chicken shape once the pincushion is assembled.
After preparing the fabric pieces, the comb and beak are positioned between the body layers before sewing. This method ensures that the decorative parts are securely attached when the seams are stitched.
Next, the body pieces are sewn together, leaving a small opening that will be used to turn the fabric right side out and insert the stuffing.
Once the pincushion is turned right side out, the body is carefully filled with stuffing material. The amount of stuffing can be adjusted to create a firm yet soft pincushion surface.
Finally, the opening is closed with hand stitching, completing the main structure of the Chicken Pincushion.
4. Finishing Details and Creative Customization
After the main body of the Chicken Pincushion – TUTORIAL is complete, the final step is adding decorative details that bring the chicken to life.
One of the most common finishing touches is adding eyes. These can be embroidered with thread, created with small fabric pieces, or made using tiny buttons.
Wings can also be stitched onto the sides of the pincushion. These wings may be simple fabric shapes or lightly quilted pieces that add texture to the design.
Some quilters like to create patchwork-style chickens by combining multiple fabric pieces for the body. This approach adds color variety and makes each pincushion unique.
Decorative stitching can also enhance the project. Simple embroidery lines can define the wings or outline the chicken’s body for added detail.
Because the Chicken Pincushion is a small project, it is easy to experiment with different fabric combinations and creative ideas.
Once the finishing touches are complete, the pincushion becomes both a functional sewing tool and a charming handmade decoration for your crafting space.
FAQ – Chicken Pincushion Tutorial
Is the Chicken Pincushion suitable for beginners?
Yes, the Chicken Pincushion – TUTORIAL is beginner-friendly. It uses simple sewing techniques and small fabric pieces, making it a great project for those learning to sew or quilt.
What type of fabric works best for the pincushion?
Cotton quilting fabric is the most recommended choice because it is durable, easy to sew, and holds its shape well.
What can I use to fill the pincushion?
Polyester fiberfill is commonly used, but some crafters prefer crushed walnut shells or other natural fillers for a firmer surface.
Can I make the chicken pincushion larger?
Yes, the pattern can be scaled up to create a larger pincushion or even a small decorative pillow.
Is this project good for using fabric scraps?
Absolutely. The Chicken Pincushion – TUTORIAL is perfect for using leftover fabric pieces from other quilting projects.
Can this pincushion be used as a gift?
Yes, it makes a wonderful handmade gift for quilters, sewists, and craft enthusiasts.
Conclusion
The Chicken Pincushion – TUTORIAL is a delightful quilting and sewing project that combines practicality with creativity. By using small fabric pieces and simple sewing techniques, crafters can create an adorable chicken-shaped pincushion that is both useful and decorative.
In this article, we explored the inspiration behind the design, the materials required for the project, the step-by-step construction process, and the creative finishing details that give the pincushion its unique charm.
Creating the Chicken Pincushion is not only a fun crafting experience but also a great way to use fabric scraps and personalize your sewing tools.
Now we would love to hear from you. Did you enjoy learning about the Chicken Pincushion – TUTORIAL? Do you have creative ideas or fabric combinations you would like to try?
Leave your honest opinion and share your suggestions. Your feedback helps inspire new quilting projects and keeps the crafting community growing