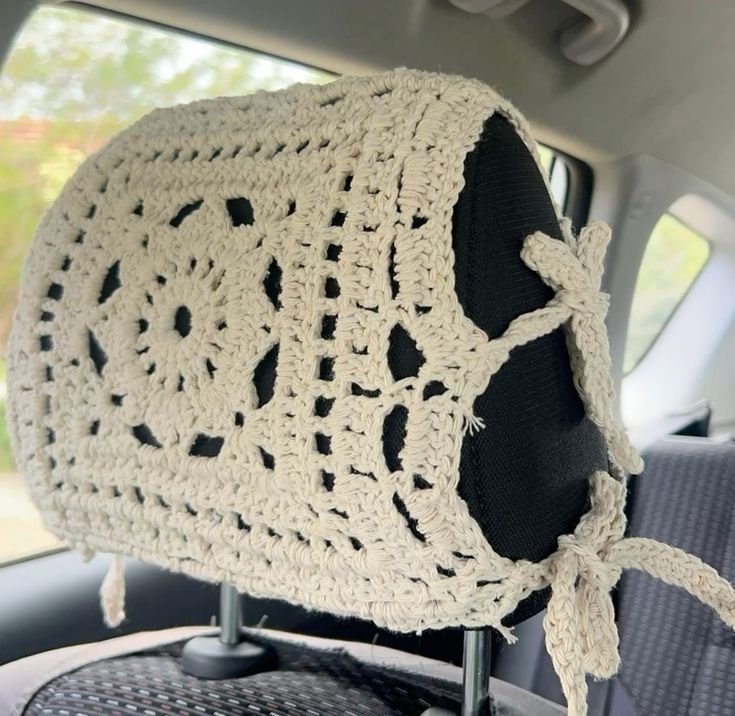
DIY Crochet Willow Granny Square Headrest Cover – TUTORIAL is a creative and practical crochet project that combines comfort, style, and traditional crochet techniques. If you enjoy making decorative and functional crochet items for your home or car, learning the DIY Crochet Willow Granny Square Headrest Cover – TUTORIAL is a wonderful way to add a handmade touch to everyday spaces.
The charm of the DIY Crochet Willow Granny Square Headrest Cover – TUTORIAL lies in the classic granny square design. Granny squares have been loved by crocheters for generations because they are versatile, easy to customize, and visually appealing. When combined with the willow granny square pattern, the result is a beautiful textured design that adds elegance and personality to a simple headrest.
In this complete DIY Crochet Willow Granny Square Headrest Cover – TUTORIAL, you will learn how to choose the right materials, understand the structure of the willow granny square, crochet the squares step by step, and assemble them into a comfortable and decorative headrest cover. This project is ideal for crocheters who want to create something useful while practicing traditional crochet techniques.
Before beginning the first section, it is important to understand that the DIY Crochet Willow Granny Square Headrest Cover – TUTORIAL can be customized in many ways. From color combinations to square sizes, each project can reflect the crocheter’s personal style.
DISCOVER MORE FREE PATTERNS HERE!
Another great advantage of this pattern is that it works well with leftover yarn. Many crocheters enjoy using yarn scraps to create colorful granny squares that form a vibrant patchwork design.
Whether you are decorating a car headrest, a chair, or a cozy reading nook, the DIY Crochet Willow Granny Square Headrest Cover – TUTORIAL offers a practical and beautiful crochet solution.
1. Materials Needed for the DIY Crochet Willow Granny Square Headrest Cover
The first step in the DIY Crochet Willow Granny Square Headrest Cover – TUTORIAL is gathering the materials needed for the project. Having the right supplies will make the crochet process smoother and more enjoyable.
The most important material is yarn. Cotton yarn is often recommended because it is durable, breathable, and holds its shape well. Acrylic yarn is also a popular option because it offers a wide range of colors and is easy to care for.
Choosing the right yarn colors is an exciting part of this project. Some crocheters prefer soft neutral tones for a modern and elegant look, while others enjoy creating colorful granny square combinations.
A crochet hook that matches the yarn weight is also required. Most DIY Crochet Willow Granny Square Headrest Cover – TUTORIAL projects use hooks between 3.5 mm and 5 mm depending on the yarn thickness.
You will also need scissors and a yarn needle. The yarn needle is used to weave in loose ends and sew the granny squares together.
Measuring tape can be helpful for ensuring the headrest cover fits properly. Accurate measurements help determine how many granny squares are required.
Optional materials such as decorative buttons, small tassels, or crocheted edging can be used to personalize the final design and add extra style to the headrest cover.
2. Understanding the Willow Granny Square Design
Before starting the stitches in the DIY Crochet Willow Granny Square Headrest Cover – TUTORIAL, it is helpful to understand the structure of the willow granny square pattern. This square is known for its elegant and slightly textured appearance.
Unlike traditional granny squares that rely mainly on clusters, the willow granny square incorporates a mix of stitches that create layered texture and gentle shaping.
The pattern typically begins with a small center ring. This ring forms the foundation of the square and anchors the first round of stitches.
As the rounds continue, clusters of stitches and chain spaces begin to form the decorative elements of the square. These stitches create the signature willow-like pattern.
Corners are created using chain spaces that allow the square to expand evenly. These corners ensure the square remains balanced and flat.
Many crocheters enjoy the DIY Crochet Willow Granny Square Headrest Cover – TUTORIAL because the pattern offers a relaxing rhythm once the stitch sequence becomes familiar.
Understanding the stitch structure also makes it easier to modify the size of the squares if you want to adjust the dimensions of your headrest cover.
3. Crocheting the Granny Squares Step by Step
The next stage of the DIY Crochet Willow Granny Square Headrest Cover – TUTORIAL involves crocheting the individual granny squares that will form the headrest cover.
Start by creating a magic ring or a small chain loop. This loop will form the center of the granny square.
In the first round, work several stitches into the ring to build the base structure of the square. These stitches may include double crochet clusters separated by chain spaces.
The second round begins shaping the square more clearly. Stitches are placed into the chain spaces from the previous round to form the corners and side sections.
As the rounds continue, the square grows larger and the willow pattern becomes more visible. The stitch combinations create a layered, decorative texture.
Each round builds upon the previous one, maintaining the square shape while expanding the pattern outward.
Once the desired square size is reached, fasten off the yarn and weave in the loose ends. Repeat this process until you have crocheted enough squares for the headrest cover.
4. Assembling and Finishing the Headrest Cover
The final stage of the DIY Crochet Willow Granny Square Headrest Cover – TUTORIAL is assembling the granny squares and shaping them into a functional cover.
Begin by arranging the squares in the desired layout. Most headrest covers use two or more squares depending on the size of the headrest.
Lay the squares on a flat surface and experiment with color placement if you are using multiple yarn colors. This step helps achieve a balanced and attractive design.
Once the layout is finalized, sew the squares together using a yarn needle and matching yarn. Some crocheters also prefer joining the squares with slip stitches or single crochet seams.
After the squares are joined, fold or shape the piece to fit around the headrest. You may crochet additional edging rows to adjust the size.
Adding a border around the outer edges can give the headrest cover a polished and finished appearance.
Finally, attach buttons, ties, or elastic loops if needed so the cover stays securely in place on the headrest.
Once finished, your DIY Crochet Willow Granny Square Headrest Cover – TUTORIAL project will provide both comfort and style while showcasing your crochet skills.
FAQ – DIY Crochet Willow Granny Square Headrest Cover
Is this project suitable for beginner crocheters?
Yes, the DIY Crochet Willow Granny Square Headrest Cover – TUTORIAL can be suitable for beginners who already know basic stitches like chain, double crochet, and slip stitch.
How many granny squares are needed for a headrest cover?
The number of squares depends on the size of the headrest and the dimensions of each square. Many covers use two to four squares.
What yarn works best for this project?
Cotton yarn is often recommended because it is durable, breathable, and easy to maintain.
Can I use leftover yarn for this pattern?
Yes. This project is perfect for using leftover yarn, especially if you want to create a colorful patchwork design.
Can the cover be washed?
Most yarn types used in the DIY Crochet Willow Granny Square Headrest Cover – TUTORIAL are machine washable, but it is always best to follow the yarn care instructions.
Can this pattern be used for other home décor items?
Absolutely. The willow granny square can also be used to create cushions, blankets, table runners, or decorative covers.
Conclusion
The DIY Crochet Willow Granny Square Headrest Cover – TUTORIAL is a creative and practical crochet project that blends classic crochet techniques with everyday functionality. By combining traditional granny squares with the elegant willow stitch pattern, you can create a stylish headrest cover that adds personality and comfort to your space.
Throughout this tutorial, you learned how to select materials, understand the willow granny square structure, crochet the individual squares, and assemble them into a finished headrest cover. These techniques can also be applied to many other crochet home décor projects.
This project is perfect for crocheters who enjoy making handmade items that are both decorative and useful. With different color choices and finishing details, every headrest cover can become a unique creation.
If you enjoyed this tutorial, feel free to share your honest opinion and leave suggestions for future crochet patterns. Your feedback and ideas help inspire new projects and support the growing crochet community.