Granny Square Bucket Hat Pattern is a fun and stylish crochet project that blends classic crochet techniques with modern fashion trends. Learning the Granny Square Bucket Hat Pattern allows crocheters to transform simple granny squares into a wearable accessory that is both practical and visually appealing. This project has become extremely popular among crochet lovers because it combines creativity, color, and functionality.
The beauty of the Granny Square Bucket Hat Pattern lies in its versatility. You can create the hat using vibrant colors, pastel tones, or even leftover yarn from previous crochet projects. The granny square itself is one of the most recognizable crochet motifs, and when arranged together to form a bucket hat, the result is a trendy handmade item that stands out.
In this complete Granny Square Bucket Hat Pattern tutorial, you will learn how to select materials, crochet the granny squares, assemble the hat, and finish the brim for a comfortable and stylish design. Whether you are new to crochet or already experienced with granny squares, this guide will help you create a beautiful bucket hat step by step.
1. Materials Needed for the Granny Square Bucket Hat
The first step in creating a Granny Square Bucket Hat Pattern is preparing the materials required for the project. Having the right supplies makes the crochet process smoother and helps achieve the best final result.
DISCOVER MORE FREE PATTERNS HERE!
Yarn is the most important material for this project. Cotton yarn is often recommended because it provides structure and durability for wearable items like hats.
However, acrylic yarn can also be used if you prefer a softer and lighter feel. The choice of yarn depends on the look and texture you want for your Granny Square Bucket Hat Pattern.
A crochet hook that matches the yarn weight is also essential. Most bucket hat patterns work well with hooks ranging from 4 mm to 5.5 mm.
You will also need scissors for cutting yarn and a yarn needle for sewing the granny squares together.
Stitch markers can be helpful when crocheting the brim of the hat, especially for beginners who want to keep track of rounds.
Choosing multiple yarn colors can make the Granny Square Bucket Hat Pattern even more eye-catching, as each square can feature a unique color combination.
2. How to Crochet the Granny Squares
The foundation of the Granny Square Bucket Hat Pattern is, of course, the granny square motif. These squares will later be joined together to form the top and sides of the hat.
Begin by creating a magic ring or chain loop to start the granny square. This forms the center of the motif.
The first round usually consists of groups of double crochet stitches separated by chain spaces. These clusters create the signature granny square design.
As you continue the Granny Square Bucket Hat Pattern, additional rounds expand the square while maintaining the same stitch structure.
Changing yarn colors between rounds can create beautiful color transitions and highlight the square design.
Most bucket hats require several granny squares, often five or six, depending on the pattern and the desired hat size.
Once all the squares are finished, weave in the yarn ends neatly to prepare them for assembly.
3. Joining the Granny Squares to Form the Hat
After completing the squares, the next stage of the Granny Square Bucket Hat Pattern is joining them together to create the shape of the hat.
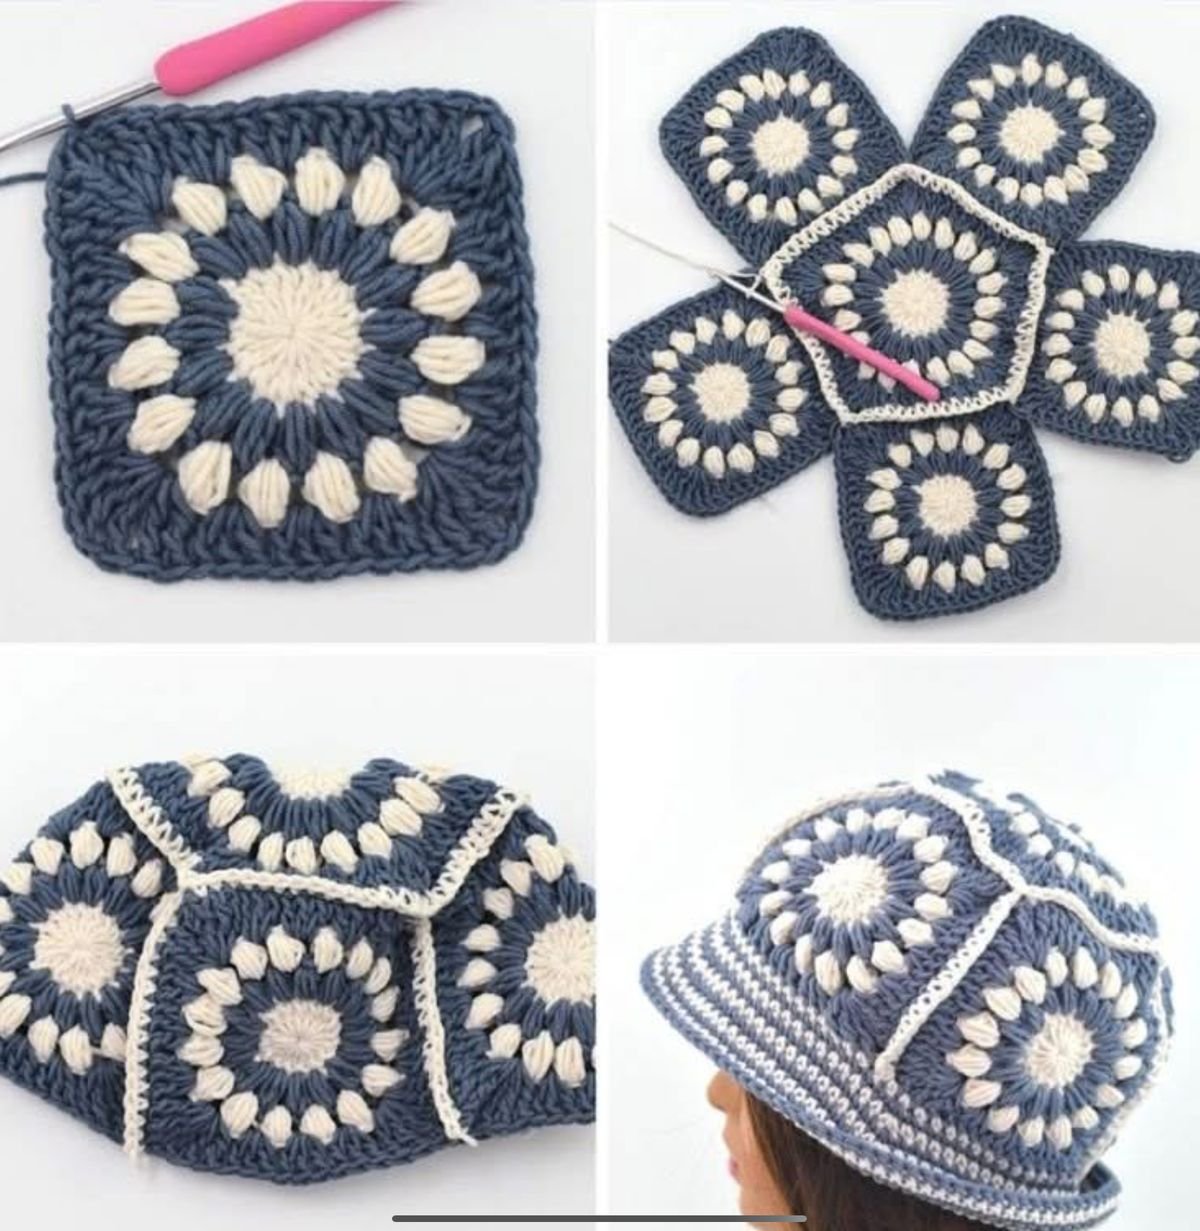
Start by arranging the granny squares on a flat surface to visualize how they will connect. One square typically forms the top, while the others create the sides.
There are different methods for joining squares, including slip stitch joins, whip stitch seams, or crocheting them together.
When working on the Granny Square Bucket Hat Pattern, careful alignment of corners helps maintain the hat’s structure.
Once the squares are connected, the hat will begin to resemble a shallow cap.
Make sure all seams are secure and tidy, as this improves both durability and appearance.
After the squares are joined, the base structure of the hat is complete and ready for the final step.
4. Crocheting the Bucket Hat Brim
The final step in the Granny Square Bucket Hat Pattern is crocheting the brim. The brim gives the hat its classic bucket hat silhouette and provides a comfortable fit.
Begin crocheting around the bottom edge of the assembled squares. This round connects the brim directly to the body of the hat.
Most brim sections use simple stitches such as single crochet or half double crochet.
Some patterns include gradual increases to help the brim expand slightly outward.
In the Granny Square Bucket Hat Pattern, the brim can be adjusted to different widths depending on personal preference.
A wider brim provides more shade and a bold style, while a narrow brim creates a minimal look.
After completing the final round, fasten off the yarn and weave in any remaining ends.
Your crochet bucket hat is now ready to wear.
FAQ – Granny Square Bucket Hat Pattern
Is the Granny Square Bucket Hat suitable for beginners?
Yes. The Granny Square Bucket Hat Pattern is beginner-friendly because it mainly uses basic stitches such as double crochet and chain stitches.
How many granny squares are needed for the hat?
Most patterns use five or six squares, depending on the hat size and design.
What yarn works best for this pattern?
Cotton yarn is often preferred for the Granny Square Bucket Hat Pattern because it provides structure and durability.
Can I customize the colors?
Absolutely. One of the most enjoyable aspects of the pattern is experimenting with different color combinations.
How long does it take to make the hat?
Depending on experience level, many crocheters can complete the project within a few hours.
Is the bucket hat suitable for all seasons?
Yes. Lighter yarns are perfect for spring and summer, while thicker yarns can make warmer versions for cooler weather.
Conclusion
The Granny Square Bucket Hat Pattern is a creative crochet project that combines the timeless granny square motif with a fashionable bucket hat design. This pattern is perfect for crocheters who enjoy colorful projects and wearable handmade accessories.
In this tutorial, you learned how to gather materials, crochet granny squares, join them together, and finish the hat with a structured brim. Each step helps transform simple yarn into a stylish and functional piece.
Crochet projects like the Granny Square Bucket Hat Pattern allow crafters to express creativity through color, texture, and design. The finished hat is not only fashionable but also a wonderful example of handmade craftsmanship.
If you enjoyed this tutorial, feel free to share your honest opinion and leave suggestions. Your feedback helps inspire new crochet patterns and tutorials for the crafting community.