Celtic Radiance – tutorial is a stunning quilt pattern that blends intricate geometry with timeless elegance. Learning the Celtic Radiance – tutorial allows quilters to create a visually striking design inspired by traditional Celtic motifs, featuring interwoven shapes and radiant symmetry. This project is perfect for those who want to challenge their skills while producing a breathtaking quilt.
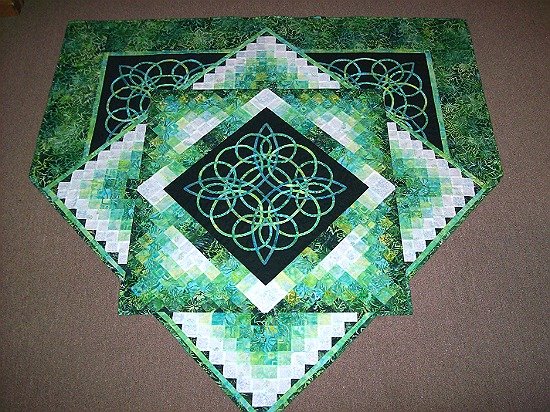
One of the most captivating aspects of the Celtic Radiance – tutorial is its ability to create a sense of movement and light through carefully arranged fabric pieces. The interplay of colors and shapes gives the illusion of depth, making the quilt appear almost three-dimensional. This makes it a favorite among quilters who enjoy detailed and artistic designs.
In this complete Celtic Radiance – tutorial, you will learn how to choose fabrics, cut precise shapes, assemble the quilt blocks, and finish your project with professional techniques. Whether you are an intermediate or advanced quilter, this guide will help you bring this intricate pattern to life.
1. Materials Needed for Celtic Radiance Quilt
The first step in the Celtic Radiance – tutorial is selecting the right materials. Proper preparation ensures a smoother quilting process and a more polished final result.
DISCOVER MORE FREE PATTERNS HERE!
High-quality cotton fabric is recommended for this project because it is easy to cut and sew.
Choosing a color palette is especially important in the Celtic Radiance – tutorial, as contrast helps highlight the intricate design.
You will need a rotary cutter, cutting mat, and quilting ruler for precise measurements.
Thread that matches or complements your fabric colors will help create a seamless finish.
Batting is required to give the quilt structure and warmth.
An iron is essential for pressing seams and maintaining accuracy throughout the process.
2. Cutting and Preparing the Fabric Pieces
Accurate cutting is a crucial part of the Celtic Radiance – tutorial, as the design relies on precise shapes and alignment.
Start by carefully measuring and marking your fabric according to the pattern instructions.
Use a rotary cutter and ruler to cut clean, straight edges.
In the Celtic Radiance – tutorial, even small inaccuracies can affect the final layout, so take your time with this step.
Organize your fabric pieces by color and shape to make assembly easier.
Labeling pieces can help prevent confusion during the sewing process.
Press all fabric pieces before assembling to ensure smooth seams.
3. Assembling the Celtic Radiance Blocks
The next step in the Celtic Radiance – tutorial is assembling the quilt blocks, where the design truly begins to emerge.
Start by sewing smaller units together to form larger sections.
Pay close attention to seam allowances to ensure all pieces fit together correctly.
In the Celtic Radiance – tutorial, maintaining consistent seam allowances is key to achieving a precise design.
Press seams as you go to keep the blocks flat and well-structured.
Arrange the blocks to create the signature radiating pattern.
Once all blocks are complete, join them together to form the quilt top.
4. Finishing and Quilting the Project
The final stage of the Celtic Radiance – tutorial involves finishing the quilt and adding the final touches.
Layer the quilt top, batting, and backing fabric to create a quilt sandwich.
Secure the layers using pins or basting spray to prevent shifting.
Quilt through all layers using your preferred design, such as straight lines or free-motion patterns.
In the Celtic Radiance – tutorial, quilting enhances the texture and highlights the design.
Trim excess fabric and batting from the edges for a clean finish.
Add binding around the edges to complete your quilt.
FAQ – Celtic Radiance – Tutorial
Is this pattern suitable for beginners?
The Celtic Radiance – tutorial is better suited for intermediate or advanced quilters due to its complexity.
What fabrics work best for this quilt?
High-quality cotton fabrics are ideal for precision and durability.
How do I choose the right colors?
Use contrasting colors to emphasize the intricate pattern and create visual impact.
How long does this project take?
Depending on your experience, it may take several days to complete.
Do I need special tools?
Basic quilting tools like a rotary cutter and ruler are sufficient.
Can I adjust the quilt size?
Yes, you can modify the number of blocks to create different sizes.
Conclusion
The Celtic Radiance – tutorial is a rewarding quilting project that combines precision, creativity, and artistry. It allows you to create a quilt that is not only functional but also visually stunning.
In this tutorial, you learned how to select materials, cut fabric pieces accurately, assemble intricate blocks, and finish the quilt with professional techniques. Each step plays an essential role in achieving a high-quality result.
Projects like the Celtic Radiance – tutorial showcase the beauty and complexity of quilting, turning fabric into a work of art. This quilt can become a treasured piece in your home or a meaningful handmade gift.
If you enjoyed this tutorial, feel free to leave your honest opinion and share your suggestions. Your feedback helps inspire more creative quilting ideas and tutorials.