Neck Pillow Pattern is a practical and comfortable quilting-inspired sewing project that allows you to create a supportive pillow designed for travel and relaxation. By following the Neck Pillow Pattern, you can craft a personalized accessory that provides comfort while also showcasing your creativity with fabric.
One of the best features of the Neck Pillow Pattern is its functionality combined with style. Whether you are traveling by car, plane, or simply relaxing at home, a handmade neck pillow offers both support and a unique aesthetic. You can customize it with your favorite fabrics, making it both useful and visually appealing.
In this complete Neck Pillow Pattern, you will learn how to choose the right materials, cut and prepare your fabric, assemble the pillow, and finish it with professional details. This project is perfect for beginners and experienced crafters who want to create something both practical and beautiful.
1. Materials Needed for Neck Pillow Pattern
The first step in the Neck Pillow Pattern is gathering all the materials needed for a smooth sewing process.
DISCOVER MORE FREE PATTERNS HERE!
Soft cotton fabric is highly recommended for comfort and breathability.
You can also use minky or fleece fabric for a softer and cozier feel.
Thread that matches your fabric will help create a clean finish.
Basic tools such as scissors, pins, a sewing machine, and a measuring tape are essential.
Stuffing material like fiberfill is needed to provide support.
An iron is important for pressing seams and ensuring accuracy.
2. Cutting and Preparing the Fabric
Preparation is a key part of the Neck Pillow Pattern, ensuring that all pieces are ready for assembly.
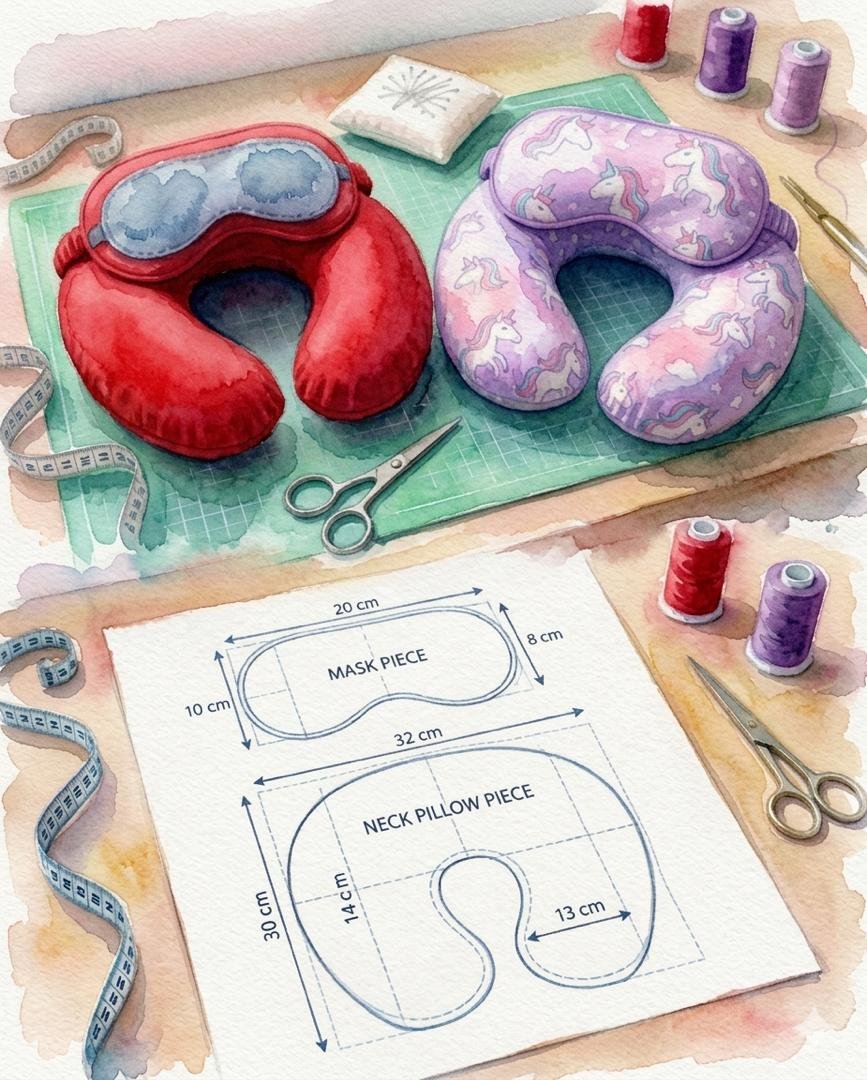
Start by tracing the neck pillow shape onto your fabric using a template.
Cut two identical pieces for the front and back.
In the Neck Pillow Pattern, accurate cutting ensures a comfortable and well-fitting pillow.
Mark seam allowances and any opening needed for stuffing.
Press the fabric pieces to remove wrinkles.
Organize your materials before moving to the next step.
3. Assembling and Sewing the Pillow
The next stage in the Neck Pillow Pattern is assembling the pillow structure.
Place the two fabric pieces right sides together.
Sew around the edges, leaving a small opening for turning and stuffing.
In the Neck Pillow Pattern, strong and even stitching ensures durability.
Turn the pillow right side out and gently shape the curves.
Fill the pillow with stuffing until it reaches your desired firmness.
Close the opening with neat hand stitching.
4. Finishing and Customizing Your Neck Pillow
The final stage of the Neck Pillow Pattern focuses on finishing touches and personalization.
Trim any excess threads and press lightly if needed.
You can add decorative elements such as piping or embroidery.
Consider adding a removable cover for easy washing.
In the Neck Pillow Pattern, customization allows you to create a unique and comfortable accessory.
Adjust the amount of stuffing for personalized support.
Once completed, your neck pillow is ready to use.
FAQ – Neck Pillow Pattern
Is this project suitable for beginners?
Yes, the Neck Pillow Pattern is beginner-friendly and easy to follow.
What fabric works best?
Cotton is ideal, but fleece or minky can provide extra softness.
How long does it take to complete?
Most neck pillows can be made in a few hours.
Can I wash the pillow?
Yes, especially if you use washable fabric or add a removable cover.
How firm should the pillow be?
It depends on personal preference and comfort.
Can I customize the size?
Yes, you can adjust the template to fit your needs.
Conclusion
The Neck Pillow Pattern is a simple yet highly practical project that combines comfort with creativity. It allows you to create a handmade accessory that is perfect for travel or relaxation.
In this tutorial, you learned how to select materials, prepare fabric pieces, assemble the pillow, and finish it with personalized details. Each step contributes to a comfortable and durable final product.
Projects like the Neck Pillow Pattern demonstrate how quilting and sewing can be used to create functional everyday items with a personal touch.
PATTERN VIDEO:
If you enjoyed this tutorial, feel free to leave your honest opinion and share your suggestions. Your feedback helps inspire more creative sewing and quilting ideas.