DIY 3D Butterfly is a captivating crochet project that brings dimension, elegance, and a touch of nature into your handmade creations. This pattern is perfect for crafters who want to explore texture and layering while creating something delicate yet visually striking.
One of the most enchanting aspects of the DIY 3D Butterfly is its lifelike appearance. Unlike flat appliqués, this design uses layered wings and shaping techniques to create a realistic three-dimensional effect, making it ideal for decorations, accessories, and embellishments.
In this complete guide, you will learn everything you need to create your own DIY 3D Butterfly, including understanding the structure, selecting the best materials, following a step-by-step process, and exploring creative customization ideas.
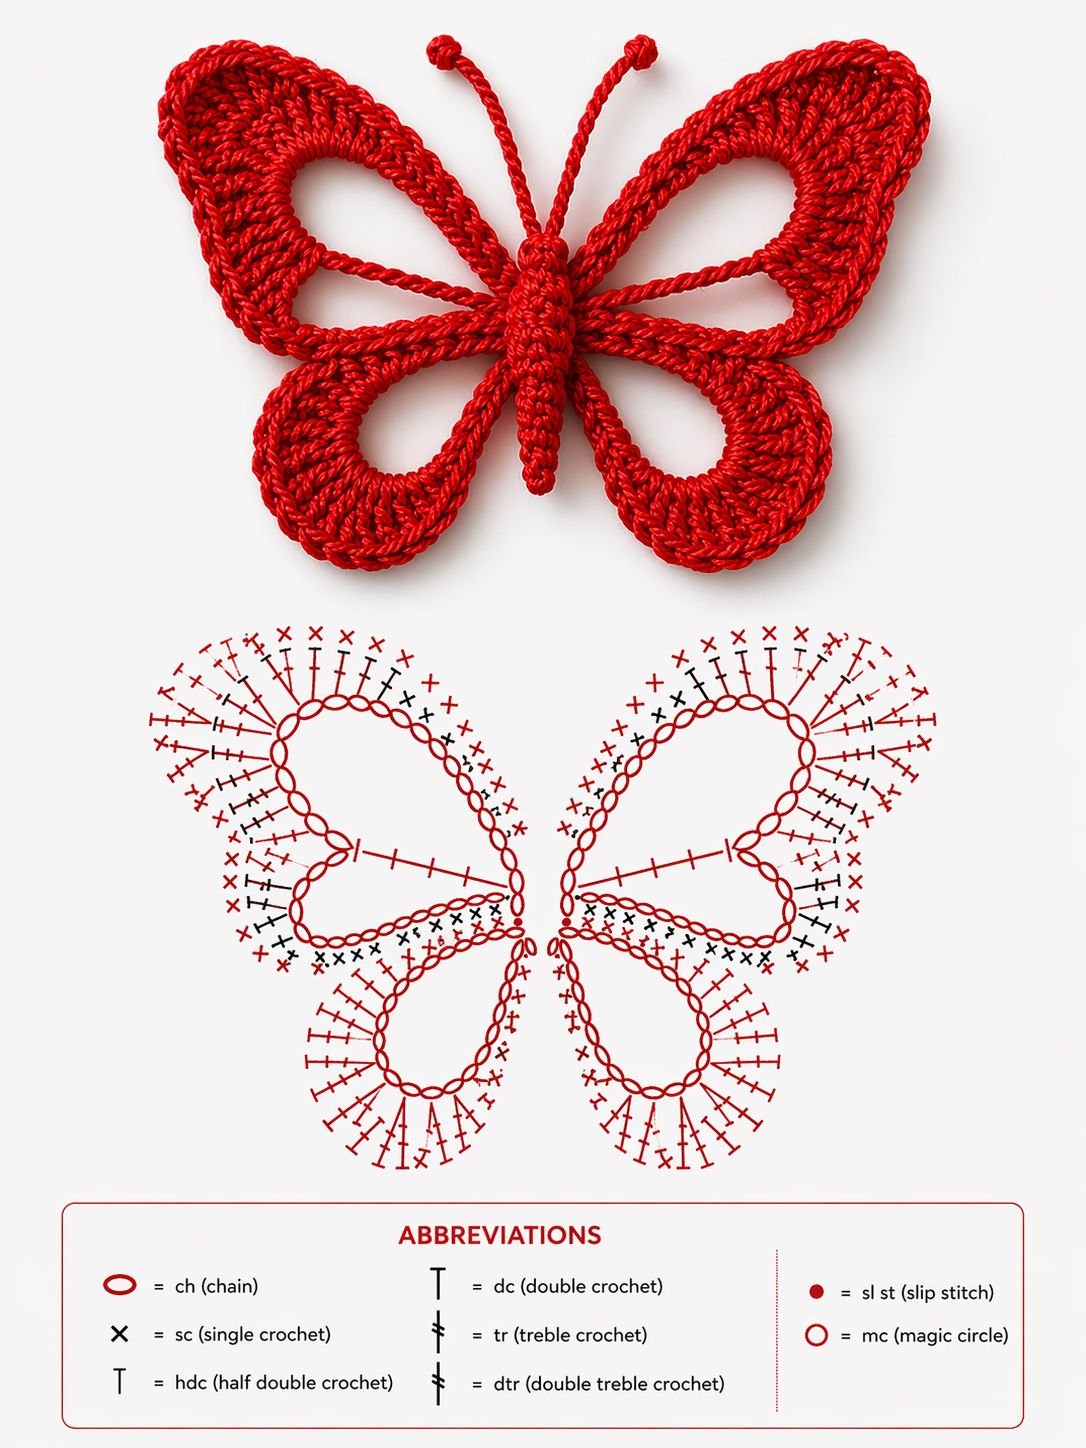
1. Understanding the DIY 3D Butterfly
The DIY 3D Butterfly is typically constructed using separate crochet pieces that are later assembled into a dimensional shape.
DISCOVER MORE FREE PATTERNS HERE!
The wings are often made in pairs—top and bottom—using different stitch combinations to create texture and volume.
The body is crocheted or formed using tight stitches to provide structure and hold the wings in place.
One of the defining features of the DIY 3D Butterfly is the layering effect, which gives the illusion of movement and realism.
This pattern usually involves working in rounds or small sections that are joined together.
Understanding how each part connects is essential for achieving a balanced and natural-looking butterfly.
2. Best Materials for DIY 3D Butterfly
Choosing the right materials is key to achieving the best results with your DIY 3D Butterfly.
Lightweight yarn such as cotton is highly recommended for its structure and stitch definition.
You can also use acrylic blends for a softer and more flexible finish.
A smaller crochet hook helps create tight stitches, which are important for maintaining the shape of the butterfly.
Bright or gradient colors work beautifully to mimic real butterfly patterns.
Additional tools include a yarn needle, scissors, and stitch markers.
Optional materials like wire can be used inside the wings to help maintain their shape.
Using quality materials will enhance both durability and appearance.
3. Step-by-Step DIY 3D Butterfly Process
Creating your own DIY 3D Butterfly becomes manageable when broken into clear steps.
Start by crocheting the upper wings using a combination of chain spaces and taller stitches.
Next, crochet the lower wings, slightly smaller in size for a balanced look.
Create the body by working tight stitches in a cylindrical shape or by wrapping yarn around a base.
Attach the wings to the body, positioning them symmetrically.
Add antennae using yarn, thread, or thin wire for a realistic touch.
Finally, weave in all ends and shape the wings gently to enhance the 3D effect.
4. Creative Ideas for DIY 3D Butterfly
The DIY 3D Butterfly offers endless opportunities for creativity and personalization.
You can use these butterflies as decorative appliqués for blankets, bags, or clothing.
They are perfect for home décor, such as wall hangings or table centerpieces.
The DIY 3D Butterfly can also be turned into hair accessories, brooches, or keychains.
Experimenting with different color combinations can create a variety of unique designs.
Adding beads or metallic thread can enhance the elegance of your butterfly.
Creating a collection of butterflies in different sizes can result in a stunning visual display.
FAQ About DIY 3D Butterfly
Is this pattern suitable for beginners?
It is suitable for beginners with some experience in basic crochet techniques.
What yarn works best for this project?
Cotton yarn is ideal for structure and stitch clarity.
How do I keep the wings in shape?
Using tight stitches or adding wire can help maintain the shape.
Can I make the butterfly larger?
Yes, simply use thicker yarn and a larger hook.
How long does it take to complete one butterfly?
It usually takes 1 to 2 hours depending on complexity.
Can I sell items made from this pattern?
Yes, handmade crochet butterflies are popular and can be sold.
Conclusion
The DIY 3D Butterfly is a beautiful and creative crochet project that allows you to explore dimension and artistic expression. In this guide, you learned how to understand the structure, choose the best materials, follow a step-by-step process, and explore creative ideas.
This pattern is perfect for adding a delicate and unique touch to your handmade creations, whether for personal use or as gifts.
Now it’s your turn to create your own DIY 3D Butterfly. Experiment with colors, shapes, and details to make your project truly one of a kind. Don’t forget to leave your honest opinion and share your suggestions—your feedback helps inspire even more creative ideas!