A DIY Fabric Bunny Doll is a charming handmade project that combines creativity, sewing skills, and the joy of crafting something truly special. Whether you are a beginner learning basic stitches or an experienced crafter looking for a delightful soft toy project, making a DIY Fabric Bunny Doll can be both relaxing and rewarding.
Creating a DIY Fabric Bunny Doll allows you to personalize every detail, from the choice of fabric and colors to the size, accessories, and facial expressions. This handmade bunny can become a lovely nursery decoration, a heartfelt handmade gift, or even a beautiful collectible for seasonal décor like Easter and spring celebrations.
One of the best things about a DIY Fabric Bunny Doll is that it does not require expensive materials or advanced tools. With some fabric scraps, stuffing, thread, and a little patience, you can create an adorable bunny that looks professional and unique. In this guide, we will explore everything you need to know to make your own bunny doll successfully.
1. Choosing the Best Materials for a DIY Fabric Bunny Doll
Selecting the right materials is the first step in creating a beautiful DIY Fabric Bunny Doll. The fabric you choose directly affects the final appearance, softness, and durability of your handmade bunny.
DISCOVER MORE FREE PATTERNS HERE!
Cotton fabric is one of the most popular choices because it is easy to sew, widely available, and comes in countless prints and colors. Soft linen is another excellent option if you want a rustic or elegant finish.
Fleece and felt are also commonly used for bunny dolls because they are soft and beginner-friendly. Felt, in particular, does not fray easily, making it ideal for simple projects and decorative details like ears or bows.
For stuffing, polyester fiberfill is the most common material. It helps the bunny keep a soft yet structured shape. Avoid overstuffing, as it can make sewing the final seam difficult.
Embroidery thread is perfect for facial details such as eyes, nose, and mouth. Some crafters also use safety eyes, but embroidered features are often safer for children.
You may also want decorative elements like ribbons, lace, buttons, or mini dresses to make your DIY Fabric Bunny Doll even more unique and visually appealing.
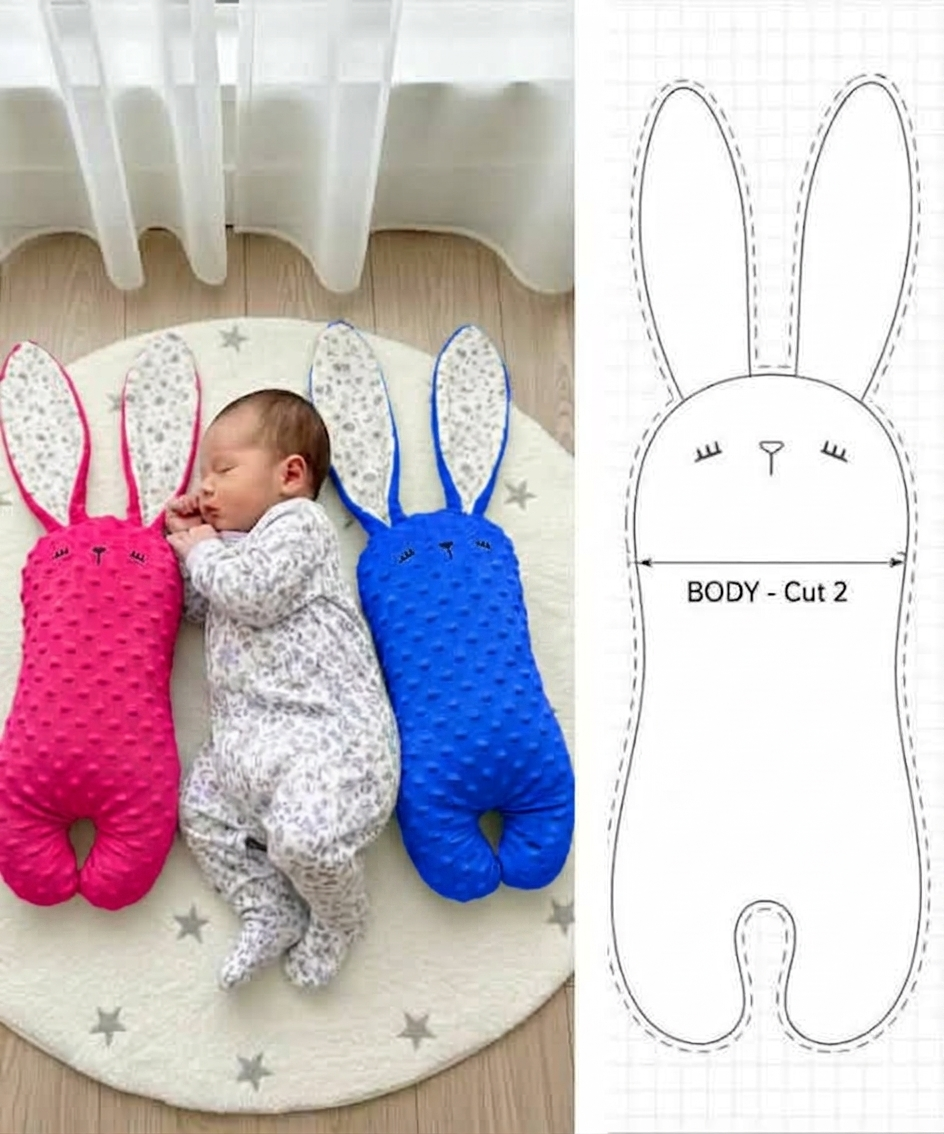
2. How to Create and Cut the Bunny Pattern
A good pattern is the foundation of a successful DIY Fabric Bunny Doll. Before cutting the fabric, it is important to prepare a clear and balanced template for the bunny’s body.
Start by drawing the bunny shape on paper. Most designs include a rounded head, long ears, a soft body, arms, and legs. Some simpler patterns combine the head and body into one single piece.
Fold your fabric in half before placing the pattern. This helps ensure symmetry and makes cutting faster. Pin the pattern securely so it does not move during cutting.
Always leave a seam allowance around the pattern, usually about 0.5 to 1 centimeter. This extra space is necessary for sewing and helps prevent the bunny from becoming too small after stitching.
Carefully cut each piece using sharp fabric scissors. Clean edges make sewing easier and improve the final appearance of your bunny doll.
Labeling the pieces can also help if your pattern includes multiple parts. This is especially useful for beginners working on their first DIY Fabric Bunny Doll project.
3. Sewing and Stuffing Your Bunny Doll Properly
Once your pieces are cut, it is time to sew your DIY Fabric Bunny Doll together. This stage transforms flat fabric into a soft and lovable handmade bunny.
Place the fabric pieces with the right sides facing inward. Sew around the edges using either a sewing machine or hand stitching, leaving a small opening for turning and stuffing.
Take your time around curved areas like the head and ears. Smaller, careful stitches help maintain smooth curves and prevent bunching in the finished doll.
After sewing, gently turn the bunny right side out. A chopstick or blunt pencil can help push out corners and shape the ears properly without damaging the fabric.
Add the stuffing little by little. Start with the ears, arms, and legs if your design includes separate limbs. Then continue filling the body evenly for a balanced shape.
Once the bunny feels soft but firm, close the opening with an invisible ladder stitch. This gives your DIY Fabric Bunny Doll a clean and polished final look.
4. Decorating and Personalizing Your DIY Fabric Bunny Doll
The decoration stage is where your DIY Fabric Bunny Doll truly comes to life. Personal details make each bunny unique and full of personality.
Embroidery is one of the best ways to create a sweet face. Small stitched eyes, a triangle nose, and a soft smile can completely transform the doll’s expression.
Clothing adds even more charm. A simple dress, overalls, scarf, or tiny bow tie can turn your bunny into a memorable keepsake or themed decoration.
You can also add blush to the cheeks using fabric-safe coloring methods or soft pink embroidery for a delicate handmade touch.
Accessories like floral crowns, mini handbags, or seasonal decorations make the bunny perfect for special occasions such as birthdays, baby showers, or Easter gifts.
Personalized names embroidered onto the bunny’s clothing can make the gift even more meaningful for children and loved ones.
The beauty of a DIY Fabric Bunny Doll is that there are no strict rules. Your creativity is what makes the final project truly special.
FAQ About DIY Fabric Bunny Doll
What is the best fabric for a DIY Fabric Bunny Doll?
Cotton is usually the best choice because it is easy to sew, durable, and available in many beautiful patterns. Felt and fleece are also great for beginners.
Can beginners make a DIY Fabric Bunny Doll?
Yes, absolutely. Simple bunny patterns are beginner-friendly and require only basic sewing knowledge. Hand stitching can work just as well as machine sewing.
How much stuffing should I use?
Use enough stuffing to help the bunny hold its shape while keeping it soft. Avoid overstuffing because it may distort the seams or make the doll too stiff.
Is a DIY Fabric Bunny Doll safe for children?
It can be, especially if you use embroidered eyes instead of plastic safety eyes for younger children. Secure all decorations firmly for better safety.
How long does it take to make one bunny doll?
A simple bunny doll may take two to four hours depending on the complexity of the pattern and your sewing experience. Decorative details may add extra time.
Can I sell handmade DIY Fabric Bunny Dolls?
Yes, many crafters sell handmade bunny dolls online or at local craft fairs. Just make sure your design is original or that you have permission to use the pattern commercially.
Conclusion
Making a DIY Fabric Bunny Doll is a wonderful way to combine creativity, sewing, and handmade charm into one meaningful project. From choosing the right materials to cutting patterns, sewing carefully, and adding beautiful personal details, each step helps create a bunny that is both adorable and unique.
This project is perfect for gifts, home décor, seasonal celebrations, or simply enjoying the satisfaction of handmade crafting. A well-made DIY Fabric Bunny Doll carries warmth and personality that store-bought items often cannot match.
We hope this guide has helped you understand how to create your own bunny doll with confidence. If you have made one already or plan to start soon, please leave your honest opinion and share your suggestions—we would love to hear your creative ideas and experiences.