
Summer Hat Pattern is a charming sewing project that combines practical sun protection with a soft, elegant handmade style. The wide brim helps shade the face and neck, while the shaped crown creates a comfortable fit that can be adjusted with elastic at the back. Decorative details such as a fabric bow, gathered ruffle, lace trim, or contrasting topstitching allow each hat to feel completely unique. This project is especially attractive in floral cotton, pastel polka dots, gingham, or lightweight solid fabrics. By following the construction process carefully, you can create a polished accessory that looks beautiful during vacations, garden parties, outdoor celebrations, or relaxing summer afternoons.
Making your own Summer Hat Pattern also gives you greater control over sizing, fabric quality, color, and finishing details. Store-bought hats may feel too tight, too loose, or uncomfortable after extended wear, but a handmade version can be adjusted to the wearer’s exact head circumference. The crown can be made slightly deeper for additional coverage, while the brim may be widened or shortened according to personal preference. Because the design uses relatively small fabric pieces, it is also an excellent way to use coordinating remnants from previous quilting and sewing projects.
This tutorial explains how to recreate the wide-brim hat shown in the image using clearly organized steps. You will learn how to select suitable fabric, calculate the correct size, prepare the crown and brim pieces, add interfacing, assemble the exterior and lining, create an adjustable elastic casing, and finish the hat with a decorative bow. Although the project requires accurate cutting and careful curved stitching, patient beginners can achieve an excellent result. More experienced makers can personalize the same Summer Hat Pattern with decorative quilting, embroidery, ruffles, lace, piping, or reversible construction.
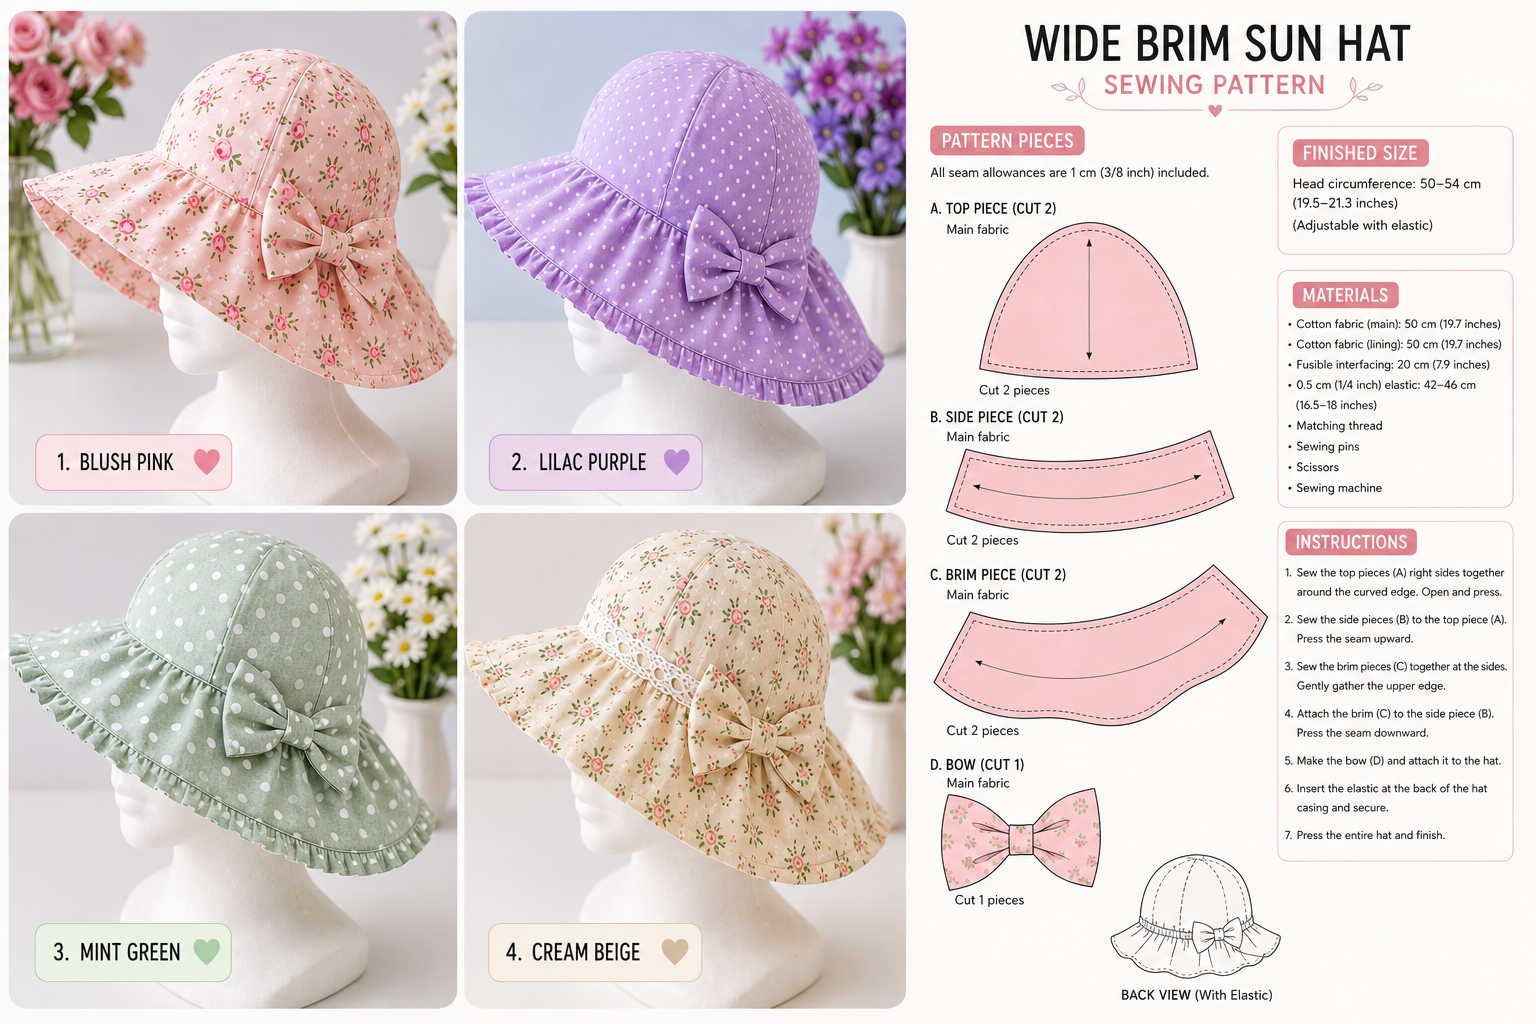
Materials, Measurements, and Preparation for the Summer Hat Pattern
Choose lightweight or medium-weight cotton fabric for the main exterior of the hat. Quilting cotton is an excellent option because it is easy to cut, press, and sew, while also being available in countless beautiful prints. Approximately 20 inches, or 50 centimeters, of main fabric should be enough for an average adult or older child’s hat. Floral prints create a romantic appearance, while polka dots, stripes, gingham, or solid linen-look cotton can produce a more modern wide-brim sun hat.
DISCOVER MORE FREE PATTERNS HERE!
Prepare the same amount of cotton fabric for the lining. The lining may match the exterior, but using a coordinating print creates a more interesting finish. Since the inside will touch the head, select a breathable fabric that feels smooth and comfortable. Avoid extremely heavy upholstery fabrics because they may make the finished Summer Hat Pattern stiff, warm, and difficult to shape around the curved crown seams.
Lightweight fusible interfacing provides structure to the brim and helps it remain extended instead of collapsing around the face. Approximately 8 inches, or 20 centimeters, should be sufficient, although a wider brim may require more. For a softly draped hat, apply interfacing only to one brim layer. For a firmer hat, interface both brim layers or use a slightly heavier product, testing it on a fabric scrap first.
You will also need matching thread, fabric scissors or a rotary cutter, sewing pins or clips, a flexible measuring tape, tailor’s chalk, an iron, and a sewing machine. Prepare a piece of 1/4-inch elastic measuring approximately 16 1/2 to 18 inches, depending on the wearer’s head size. A safety pin or elastic-threading tool will make inserting the elastic through the back casing much easier.
Measure the head circumference by wrapping a flexible tape around the widest part of the head, passing just above the eyebrows and ears. Keep the tape comfortably snug without pulling it tightly. The illustrated size range of approximately 19 1/2 to 21 1/4 inches fits many older children and smaller adults, but your Summer Hat Pattern should always be adjusted according to the actual measurement.
Before cutting the final fabric, make a simple paper or inexpensive muslin test when possible. Add a 3/8-inch seam allowance around every pattern piece unless it is already included. Mark the center front, center back, joining points, and elastic casing placement. Accurate notches and alignment marks are extremely important because the top, side crown, and brim contain several curved edges that must meet evenly.
Cutting and Sewing the Crown of the Wide-Brim Hat
The crown is usually constructed from two top pieces and two curved side pieces. Fold the main fabric with right sides together and position the pattern pieces according to the grainline. Cut two mirrored top pieces and two mirrored side-crown pieces. Repeat the same cutting process with the lining fabric. Transfer every notch and center mark without cutting too deeply into the seam allowance.
If your pattern uses two rounded top sections, place them right sides together and sew along the long curved center seam. Use a shorter stitch length to maintain control around the curve. Gently clip or notch the seam allowance, being careful not to cut through the stitching. Open the pieces and press the seam carefully over a tailor’s ham or rolled towel to preserve the rounded shape.
Join the two side-crown pieces at their short ends to form a circular band. Press the seams open to reduce bulk. Mark the center front, center back, and side points on both the crown top and the side band. These reference marks will help distribute the fabric evenly and prevent the top from twisting while you assemble the Summer Hat Pattern.
With right sides together, pin the upper curved edge of the side band around the crown top. Begin by matching the center front, center back, and side marks, then add pins between those points. Sew slowly around the entire curve, stopping occasionally with the needle down to adjust the fabric. Avoid stretching either layer because stretching may create ripples or an uneven crown.
Clip small notches into the curved seam allowance, especially where the fabric resists turning smoothly. Press the seam allowance toward the side band and topstitch close to the seam if you want a crisp, professional finish. Repeat the same crown-construction process with the lining, but leave an opening of approximately 3 inches in one seam if you plan to turn the entire hat through the lining later.
Try the exterior crown gently over the intended wearer’s head before attaching the brim. It should sit comfortably without creating pressure around the forehead. Remember that an elastic section will provide additional security at the back. Make any necessary circumference adjustments now, because changing the crown after the brim is attached will be much more difficult.
Constructing the Brim, Elastic Casing, and Decorative Bow
Cut two mirrored brim sections from the main fabric and two from the lining or coordinating fabric. Apply fusible interfacing to the wrong side of the designated brim layer according to the manufacturer’s temperature instructions. Allow the interfaced pieces to cool completely before handling them, since moving warm fabric may cause bubbles, distortion, or incomplete adhesion.
Sew the short ends of the exterior brim sections together to create a complete ring. Press the seams open. Repeat with the lining brim. Place the two brim rings right sides together, matching their seams and outer edges. Sew around the full outer curve, then trim the seam allowance and carefully clip the curve so it can turn smoothly.
Turn the brim right side out and press the outer edge thoroughly. Topstitch approximately 1/8 inch from the edge to keep the layers aligned. You may add several additional rows of parallel topstitching around the brim for extra stability. These rows create a lightly quilted appearance and help the wide-brim hat hold its shape without feeling excessively rigid.
Match the upper edge of the brim to the lower edge of the completed exterior crown, placing the right sides together. Align the center front, center back, side points, and seam lines before pinning. Sew around the circumference with an even seam allowance. Press the seam toward the crown and check that the brim hangs evenly without accidental folds or puckers.
Attach the lining crown so that its right side faces the right side of the exterior crown, enclosing the brim between the layers. Sew around the lower crown seam, keeping the brim folded inward and away from the needle. Turn the hat through the opening left in the lining, shape every seam carefully, and hand-stitch or machine-stitch the opening closed with a neat finish.
Create the elastic casing across the back section by stitching two parallel lines through the crown and lining. Thread the elastic through the casing, adjust it until the hat fits securely, and stitch both ends firmly in place. Finish your Summer Hat Pattern by sewing a fabric bow near the back or side. A gathered ruffle, lace band, covered button, ribbon, or small fabric flower may also be added for personalization.
Frequently Asked Questions About the Summer Hat Pattern
Is the Summer Hat Pattern suitable for beginners? Yes, especially for beginners who already understand basic seams, pressing, and sewing around curves. The most challenging steps are joining the rounded crown and attaching the circular brim. Using plenty of pins, matching all reference marks, and sewing slowly will make those stages much easier. A test version made from inexpensive cotton can also increase confidence before using special fabric.
What fabric is best for a summer sun hat? Breathable cotton is one of the best choices because it is comfortable, washable, and easy to sew. Quilting cotton provides structure and attractive prints, while cotton lawn produces a lighter and softer result. Linen blends can also work, although they may wrinkle more easily. Avoid fabrics that feel heavy, scratchy, or too warm against the skin.
How can I make the brim firmer? Apply fusible interfacing to one or both brim layers and add multiple rows of topstitching around the outer edge. A sew-in stabilizer can also be used when a stronger brim is desired. Test the structure before final assembly, because a brim that is too stiff may become uncomfortable or difficult to fold for travel.
Can I make the hat reversible? Yes. Select two attractive fabrics and use both as visible sides instead of treating one as a basic lining. Hide all seam allowances between the layers and avoid permanently attaching decorations that prevent reversal. A removable bow or small fabric brooch can provide decoration while allowing both sides of the Summer Hat Pattern to remain wearable.
How do I change the size of the hat? Compare the pattern’s finished crown circumference with the wearer’s head measurement. To enlarge it, evenly add width to the side-crown and brim pieces while maintaining the same seam shapes. To reduce it, remove equal amounts at balanced points. Make a sample crown first, because even a small adjustment can noticeably change the finished fit.
How should the finished hat be washed and stored? Hand washing in cool water is the safest method, particularly when the brim contains fusible interfacing. Use mild detergent, rinse gently, and avoid twisting the fabric. Reshape the crown and brim while damp, then air-dry on a rounded form or clean towel. Store the hat flat or lightly supported so the brim does not develop permanent creases.
Conclusion
The Summer Hat Pattern is a practical and beautiful sewing project that allows you to create a personalized accessory for sunny days. Throughout this tutorial, you learned how to select breathable cotton fabrics, measure the head accurately, cut the top, side, brim, lining, and bow pieces, reinforce the brim with interfacing, assemble the curved crown, add an adjustable elastic casing, and complete the design with professional finishing details.
PATTERN VIDEO:
By changing the fabric, brim width, decorative edging, and embellishments, the same pattern can produce many different styles. A blush floral version feels romantic, lilac polka dots create a playful look, mint green offers a fresh appearance, and cream floral fabric gives the hat a timeless vintage character. These customization possibilities make the project suitable for personal use, summer gifts, coordinated outfits, and small handmade collections.
Please leave your honest opinion about this Summer Hat Pattern and share any suggestions you have for future sewing and quilting tutorials. Your experiences, creative ideas, preferred colors, and construction tips can inspire other makers and help make future projects even more useful and enjoyable.