
Chicken Oven Mitt Pattern is a delightful quilting and sewing project that combines functionality with farmhouse-inspired charm. Whether you’re creating handmade kitchen accessories for your own home, preparing thoughtful gifts, or sewing products for craft fairs, the Chicken Oven Mitt Pattern is a project that is both practical and enjoyable. With its adorable chicken shape, quilted construction, and convenient front pocket, this oven mitt adds personality to any kitchen while providing protection when handling hot cookware.
One of the reasons the Chicken Oven Mitt Pattern has become so popular is its perfect balance of decorative appeal and everyday usefulness. Unlike ordinary oven mitts, this whimsical design serves as both kitchen décor and a reliable cooking accessory. The charming combination of floral fabrics, gingham accents, and quilted layers makes it suitable for farmhouse, country, cottage, or vintage-inspired kitchens. Best of all, the project can easily be customized using your favorite fabric collections and quilting techniques.
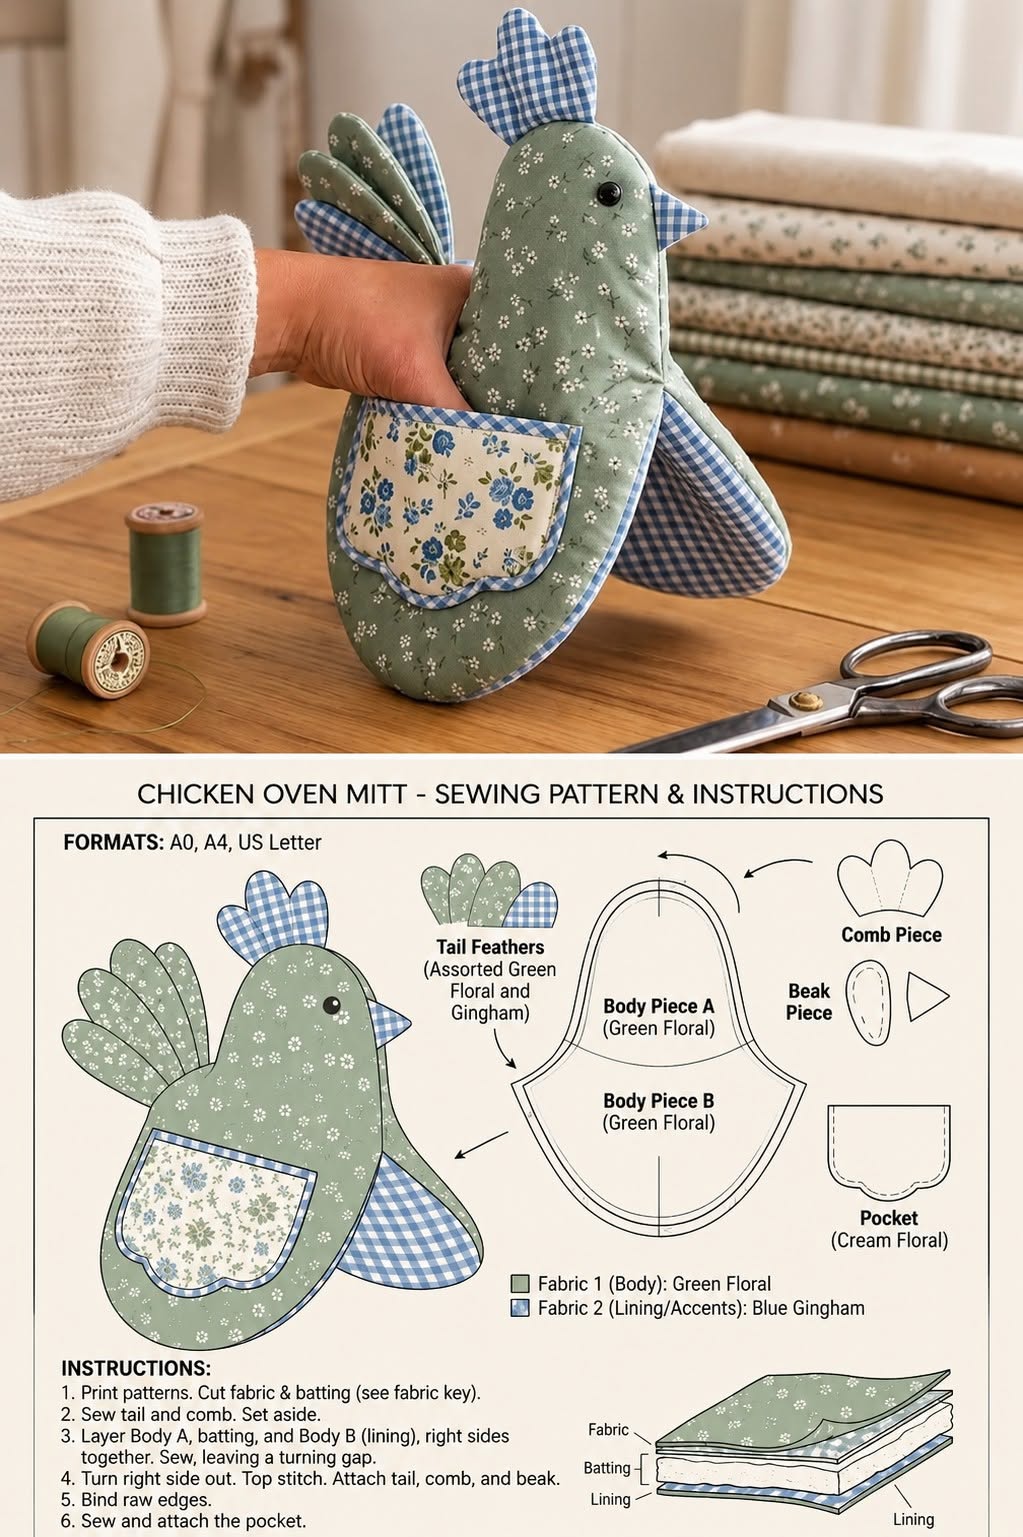
In this step-by-step tutorial, you’ll learn how to recreate the charming chicken oven mitt shown in the image using traditional quilting methods. We’ll cover selecting fabrics, cutting the pattern pieces, preparing the insulated layers, assembling the chicken shape, attaching decorative features, and finishing the project with professional details. Using basic sewing techniques and careful construction, you’ll create a beautiful handmade kitchen accessory that is both durable and eye-catching.
Choosing Materials for the Chicken Oven Mitt Pattern
Selecting quality materials is the first step toward creating a durable and attractive Chicken Oven Mitt Pattern.
DISCOVER MORE FREE PATTERNS HERE!
Quilting cotton is the preferred fabric for both the exterior and lining because it is easy to sew, presses beautifully, and comes in countless coordinating prints. Small florals, gingham, polka dots, and tone-on-tone fabrics work especially well for this farmhouse-inspired project.
For heat protection, use insulated batting specifically designed for oven mitts, combined with a layer of cotton batting for additional softness and quilting definition. Always choose materials that are intended for kitchen use when making heat-resistant accessories.
Prepare coordinating thread, rotary cutter, quilting ruler, cutting mat, sewing clips, scissors, pins, fabric marking tools, sewing machine, and a hot iron. These basic quilting supplies will help ensure accurate construction and clean finishing.
If you would like additional structure, lightweight fusible interfacing can be applied to certain decorative pieces such as the comb, wings, or front pocket.
Before cutting, wash and press all fabrics to minimize shrinkage and achieve accurate measurements throughout the project.
Cutting and Preparing the Chicken Oven Mitt Pattern
Accurate cutting makes assembling the Chicken Oven Mitt Pattern much easier and ensures all decorative elements align correctly.
Print or trace the full-size Chicken Oven Mitt Pattern, making sure your printer settings preserve the correct scale. Verify all measurements before cutting fabric.
Cut two exterior body pieces, two lining pieces, two insulated batting pieces, two cotton batting pieces, one front pocket, two wings, one beak, one comb, and several tail feathers according to the pattern template.
Transfer any placement marks for the pocket, wings, beak, and comb using washable fabric markers or tailor’s chalk.
Fuse interfacing to smaller decorative pieces if extra stability is desired. This helps the comb and wings maintain their shape after repeated use.
Quilt the exterior body pieces by layering the exterior fabric with cotton batting. Straight-line quilting, diagonal quilting, gentle waves, or echo quilting all provide beautiful texture while strengthening the fabric.
After quilting, trim every piece back to the exact pattern size before beginning assembly.
Sewing the Chicken Oven Mitt Pattern Step by Step
Construction begins by assembling the decorative components before joining the main body.
Start by sewing the tail feathers together, slightly overlapping each feather to create the layered appearance shown in the sample. Secure them with a row of stitching inside the seam allowance.
Sew the comb and beak pieces with right sides together, clip the curves, turn them right side out, and press carefully before attaching them to the body.
Fold and topstitch the front pocket, then position it on the exterior body piece using the placement markings. Stitch around the curved edges while leaving the top open for use.
Place the wings on each side of the body, securing them temporarily with clips or basting stitches. These pieces will be permanently enclosed during final assembly.
Layer the exterior body, insulated batting, cotton batting, and lining according to the pattern instructions. Stitch around the perimeter using a consistent ¼-inch seam allowance while leaving a turning opening.
Turn the mitt right side out, shape every curve carefully, press thoroughly, and topstitch around the outer edge to secure all layers while giving the oven mitt a professional appearance.
Finishing the Chicken Oven Mitt Pattern Like a Professional
Professional finishing techniques will make your Chicken Oven Mitt Pattern both attractive and durable for everyday kitchen use.
Close the turning opening using an invisible ladder stitch or neat machine topstitching, depending on your preferred finishing method.
Reinforce high-stress areas around the pocket opening and wing attachments with additional rows of stitching for long-lasting durability.
If desired, embroider facial details or attach small safety eyes intended for decorative kitchen accessories. For projects that will be used frequently around heat, embroidered features are often the safest option.
Add a fabric hanging loop between the comb and body so the finished oven mitt can easily hang from a kitchen hook when not in use.
Give the entire project a final steam press, carefully shaping the curved body and decorative elements. This simple step greatly improves the finished appearance.
Once complete, your Chicken Oven Mitt Pattern becomes both a charming kitchen decoration and a functional handmade accessory that can be enjoyed for years.
FAQ About Chicken Oven Mitt Pattern
Is the Chicken Oven Mitt Pattern suitable for beginners?
Yes. Beginners with basic sewing experience can complete this project successfully by following the pattern carefully and working step by step.
What fabric works best?
High-quality quilting cotton is the most popular choice because it is durable, easy to sew, and available in many coordinating prints.
Should I use insulated batting?
Yes. Insulated batting specifically designed for oven mitts provides additional heat resistance and helps protect your hands during cooking.
Can I customize the colors?
Absolutely. You can create traditional farmhouse chickens, colorful country designs, holiday-themed versions, or modern fabric combinations.
Can the pocket be made larger?
Yes. Many sewists adjust the pocket size to fit larger hands while maintaining the overall chicken shape.
Can this project be machine washed?
Yes. Most cotton versions can be machine washed using a gentle cycle and air dried or tumble dried on low heat.
Is this a good handmade gift?
Definitely. The Chicken Oven Mitt Pattern makes an excellent gift for housewarmings, birthdays, Mother’s Day, Christmas, weddings, or anyone who enjoys cooking.
Can I sell finished oven mitts?
In many cases, yes, provided you comply with the licensing terms of the specific pattern you are using and follow all applicable product safety requirements.
Conclusion
The Chicken Oven Mitt Pattern is a charming quilting project that combines creativity, practicality, and timeless farmhouse style. Throughout this tutorial, you learned how to select appropriate fabrics, prepare insulated quilting layers, accurately cut each pattern piece, assemble the decorative chicken features, sew the body, attach the pocket, and apply professional finishing techniques for a durable and attractive kitchen accessory.
This project is ideal for using fabric scraps, practicing quilting techniques, and creating personalized gifts that are both beautiful and functional. Once you’ve mastered the basic construction, you can experiment with different color palettes, quilting motifs, embroidery details, and seasonal fabrics to create an entire collection of unique chicken oven mitts.
I hope this guide has inspired you to create your own Chicken Oven Mitt Pattern and enjoy the satisfaction of sewing a handmade kitchen accessory that is as practical as it is decorative. If you found this tutorial helpful, please leave your honest opinion and share your suggestions or creative ideas. Your feedback is greatly appreciated and helps inspire even more quilting projects for fellow sewing enthusiasts.