
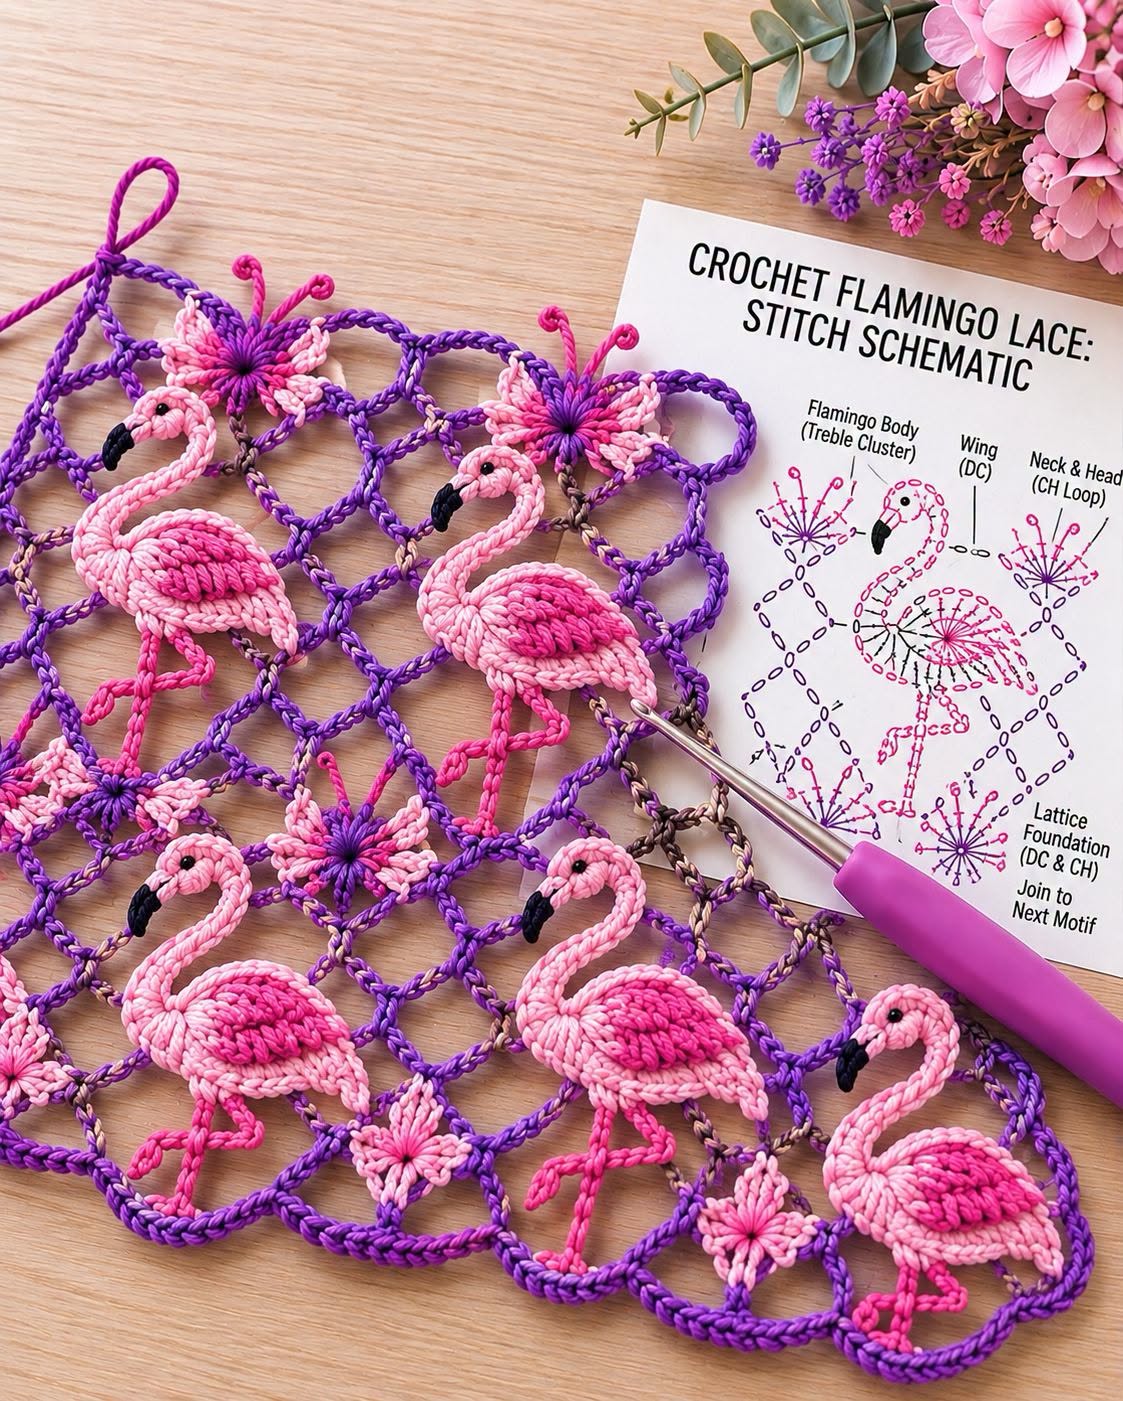
Crochet Flamingo Stitch Pattern is a colorful decorative crochet technique that combines dimensional flamingo motifs, floral accents, and an open lace foundation into one eye-catching textile. Inspired by the project shown in the image, this design uses shades of pink for the flamingos, purple for the connecting lace, darker pink for the legs, and a small amount of black for the characteristic curved beak. The result is much more than a simple repeating stitch: it is a motif-based crochet fabric in which each flamingo becomes part of the overall lace composition.
The charm of this Crochet Flamingo Stitch Pattern comes from the contrast between solid and open crochet. The flamingo body is relatively dense and dimensional, while the surrounding chains create large airy spaces. Small floral motifs fill selected intersections and help connect neighboring flamingos. This balance keeps the finished fabric light enough for decorative projects while allowing every bird to remain clearly recognizable. It could be adapted for table runners, decorative panels, scarves, shawls, curtain accents, bags, cushion overlays, or even a statement garment.
Although the finished pattern appears complicated, it becomes much easier when treated as a collection of smaller components. Instead of trying to crochet an entire flamingo at once, you can divide the motif into the body, wing, curved neck, head, beak, legs, flower, and lattice connections. Once one complete motif has been mastered, the same sequence can be repeated and connected to form a larger piece. The instructions below use standard U.S. crochet terminology and are intended as a practical interpretation of the visual design, so you can adjust stitch counts slightly to suit your yarn, tension, and desired finished size.
Materials, Crochet Stitches, and Preparing the Flamingo Motif
For this Crochet Flamingo Stitch Pattern, choose a smooth cotton or cotton-blend yarn that provides good stitch definition. A lightweight category 2 or category 3 yarn works particularly well. Crochet thread can also be used if you want a finer lace effect. For a more substantial decorative panel, lightweight DK cotton is a practical alternative.
DISCOVER MORE FREE PATTERNS HERE!
Prepare approximately 150–200 yards (137–183 m) of pink, 100–150 yards (91–137 m) of purple, and smaller quantities of hot pink, black, and a contrasting floral color. Actual yardage depends heavily on the finished dimensions. A 2.5–3.5 mm crochet hook is a useful starting range for fine cotton yarn. You will also need scissors, a tapestry needle, stitch markers, and optionally small black beads if the finished project is purely decorative.
The primary stitches are chain (ch), slip stitch (sl st), single crochet (sc), half double crochet (hdc), double crochet (dc), and treble crochet (tr). You should also be comfortable working several stitches into the same space and making simple clusters. These taller stitches are especially useful because they allow the flamingo body and surrounding flowers to expand quickly while creating the fan-shaped appearance visible in the design.
Start each flamingo with the body. Using the darker pink shade, make a magic ring. Chain 3, which can count as the first double crochet, and work approximately 11 additional double crochets into the ring. Pull the ring closed and join with a slip stitch. This creates the compact center from which the body develops.
For the next round, increase around the circle by working combinations of two double crochets into selected stitches. Rather than making a perfectly round disk, begin placing taller stitches toward one side. For example, use half double crochet, double crochet, and treble crochet progressively along one half of the round. This gradually produces the elongated oval shape needed for the flamingo’s torso.
Change to a lighter pink for the outer body and wing definition. Work a combination such as sc, hdc, dc, tr, tr, dc, hdc, sc around the outer edge of the body, adjusting the number of repetitions according to your yarn. The objective is an oval measuring approximately 2.5–3.25 inches (6.5–8 cm) wide. Finish with a row or partial round of single crochet or slip stitches to produce a clean outline.
Crocheting the Wing, Curved Neck, Head, Beak, and Legs
The raised wing gives the Crochet Flamingo Stitch Pattern much of its dimensional character. Attach darker pink yarn near the center of the body. Chain 3 and work several double crochets into nearby stitches or spaces, gradually increasing the stitch height toward the center and decreasing again toward the opposite side. This creates a small layered oval.
For additional texture, work the wing in front loops only or use front-post stitches where appropriate. A second short row can be placed over the first. Keep the wing slightly smaller than the main torso so the lighter outer body remains visible around it. Fasten off and weave the yarn tail behind the motif.
The neck is created separately or directly from the upper front edge of the body. Attach light pink yarn and chain approximately 18–24 stitches. The exact number depends on your yarn thickness. Work slip stitches or single crochets back along the chain while gently shaping it into the characteristic flamingo curve.
A useful technique is to work two single crochets into occasional chains on the outside of the curve while skipping or slip-stitching selected positions on the inside. This differential shaping naturally encourages the neck to bend. Arrange it into a graceful S or inverted J shape and secure its lower end firmly to the body.
At the upper end of the neck, form the head by working several stitches into the final chain space. Try 2 sc, 2 hdc, 2 dc, 2 hdc, 2 sc, adjusting until you obtain a small rounded head. You can add another short round of single crochet if more definition is necessary.
Switch to black yarn for the beak. Attach the yarn to the front of the head, chain 3 or 4, and work back with a combination of slip stitches and single crochet. Keep the beak small and slightly curved downward. Secure the yarn carefully on the back. For the eye, embroider a tiny black French knot. If the finished item will be kept away from young children, a small bead can alternatively be sewn securely into position.
The legs can be made with hot-pink yarn. Attach yarn underneath the body and chain 10–14. Slip stitch back several chains to strengthen the leg. To form the bent knee, chain another short section at an angle, then create two or three tiny chains for the toes. Repeat for the second leg, positioning it slightly differently so the flamingo has the natural one-leg-bent posture associated with the bird.
Creating the Purple Lace Foundation and Joining the Motifs
The surrounding crochet lace foundation is essential because it transforms separate flamingos into continuous fabric. The visual inspiration uses large chain loops and decorative floral intersections. Purple provides dramatic contrast, but green, turquoise, cream, or another coordinating shade can be substituted.
Begin with a chain long enough to establish the width of your project. For a sample, chain approximately 48–60 stitches. Instead of working continuously into every chain, create large loops by working sequences such as ch 8, skip 5, sc in next chain. Continue across the foundation.
On the next row, work into the chain spaces rather than individual stitches. A useful sequence is sc into loop, ch 6–8, sc into next loop. Alternating the position of these connections produces a diamond-shaped lattice. Keep the loops relaxed because excessive tension will make the finished lace curl.
The floral connectors can be created from a small central ring. Make a magic ring and work 8 single crochets into it. For each petal, try sl st, ch 3, 2 dc, ch 3, sl st into the appropriate space. Repeat until you have approximately six or eight petals. Alternating light pink and darker pink makes these flowers coordinate naturally with the flamingos.
Join each flower to the purple lattice while working its final round. Instead of completing every chain independently, replace selected chains with slip stitches into neighboring lattice loops. This join-as-you-go technique reduces sewing and makes the finished fabric appear more integrated.
Place a completed flamingo inside one of the larger lattice sections. Join the body at approximately three or four points: near the upper back, lower body, neck area, and one leg or adjacent flower. Use slip stitches or carefully sewn connections. Avoid attaching every edge because some open space around the flamingo emphasizes its silhouette.
Repeat the layout across subsequent rows. Staggering the flamingos creates a more organic composition. For example, one row can contain birds positioned toward the left side of each lattice unit, while the next row offsets them toward the right. Small flowers can occupy the spaces between motifs and visually connect the repeated pattern.
Finishing, Blocking, Sizing, and Creative Uses
Once all flamingos and flowers are connected, place the project on a flat surface and examine the overall alignment. The lattice should appear relatively even, and individual flamingos should face consistently unless you intentionally created alternating directions. Make any final adjustments before weaving in the remaining yarn tails.
Weave each tail through several stitches on the wrong side, reverse direction, and weave through another short section. This is particularly important around the flamingo neck and legs because these narrow areas can experience additional movement. Trim the yarn only after the end feels secure.
Blocking dramatically improves this Crochet Flamingo Stitch Pattern. For cotton yarn, gently dampen the finished piece and place it on blocking mats. Pin the outer edges first, then adjust each large lattice loop so the openings have similar dimensions. Shape the necks, legs, flowers, and bodies individually.
Do not overstretch the lace. The goal is to open the chain spaces and establish clean lines without distorting the flamingos. Allow the project to dry completely before removing the pins. Proper blocking makes the complicated motif structure look significantly cleaner and more professional.
To enlarge the pattern, simply continue adding lattice sections and flamingo motifs. A small arrangement of four to six birds could become a decorative panel. A longer strip could form a table runner or scarf. Several rows can create a lightweight shawl, while a large rectangular version could become a decorative curtain panel.
Color experimentation offers even more possibilities. Traditional pink flamingos look striking against purple, but coral and turquoise can produce a tropical palette. Pale pink and ivory create a romantic appearance, while hot pink against black produces a dramatic modern version. Regardless of your palette, keeping enough contrast between the flamingos and lattice helps preserve the recognizable bird silhouettes.
FAQ About the Crochet Flamingo Stitch Pattern
Is the Crochet Flamingo Stitch Pattern suitable for beginners?
It is best suited to adventurous beginners or intermediate crocheters. Basic stitches are straightforward, but shaping the flamingo and joining motifs require patience and consistent tension.
Which crochet terminology does this tutorial use?
The instructions use U.S. crochet terminology, including single crochet, half double crochet, double crochet, and treble crochet.
What yarn works best?
Smooth cotton or cotton-blend yarn is particularly suitable because it provides excellent stitch definition and holds blocking well.
What hook size should I use?
A hook between approximately 2.5 and 3.5 mm works well with lightweight cotton. Always match your hook to the yarn and desired lace density.
How large is one flamingo motif?
With lightweight cotton, expect approximately 4–6 inches (10–15 cm) from the top of the head to the lowest part of the legs, depending on your tension.
How do I make the flamingo body oval rather than circular?
Use taller stitches such as double and treble crochet along one section of the round while using shorter stitches on the opposite side.
How is the curved neck made?
The neck begins as a chain. Strategic increases on the outer curve and shorter stitches on the inner curve encourage it to bend naturally.
Can I make the neck separately?
Yes. Crocheting the neck separately and sewing it onto the body can actually make shaping easier.
How should I make the flamingo eye?
A small embroidered French knot is simple and secure. Decorative beads can be used only when appropriate for the intended use.
How is the black beak created?
A few chains followed by slip stitches and single crochets are enough to create the small curved tip.
How do I crochet the legs?
Use narrow chains reinforced with slip stitches. Additional short chains can form the bent knee, foot, and toes.
Why does the pattern use large chain spaces?
The large chains form the openwork crochet lattice, giving the project its airy lace appearance and creating spaces for the flamingo motifs.
Can I use only one shade of pink?
Absolutely. Multiple shades add depth, but a single pink yarn can produce a cleaner and simpler design.
Can the flowers be removed?
Yes. You can connect the lattice directly, although the flowers help stabilize large spaces and add decorative interest.
How do I join multiple flamingos together?
The easiest method is to build a repeating lattice and attach each completed flamingo at several strategic points using slip stitches or invisible sewing.
Should the flamingos all face the same direction?
They can, but alternating some motifs can create a more dynamic pattern.
Does this project need blocking?
Blocking is strongly recommended because it opens the lace, evens the chain loops, and improves the shape of the birds.
Can I use this pattern for a shawl?
Yes. Use a lightweight, soft yarn and make enough repeating sections to achieve your desired width and length.
Can this become a table runner?
Yes. Cotton yarn is particularly appropriate for a decorative table runner because it provides structure and clear stitch definition.
How can I make the flamingos more dimensional?
Layer the wing over the body, use front-loop or front-post stitches, and avoid blocking the raised portions completely flat.
Conclusion
The Crochet Flamingo Stitch Pattern combines several enjoyable crochet techniques into a single decorative design. Instead of relying on one repeating stitch alone, the pattern is built from shaped flamingo motifs, dimensional wings, curved necks, delicate legs, small flowers, and an airy chain lattice.
The construction begins with the flamingo’s oval body, using double crochet and treble crochet increases to establish its shape. A layered wing adds texture, while chains and carefully positioned stitches create the long curved neck. The small head, black beak, embroidered eye, and thin pink legs complete the recognizable flamingo silhouette.
The purple crochet lace foundation is then created from repeated chain loops. These loops provide both structure and negative space, while the small floral motifs stabilize intersections and add another decorative element. Individual flamingos can be connected as the lace grows or attached afterward.
One of the biggest advantages of this design is its flexibility. You can change the yarn weight, hook size, flamingo colors, flower arrangement, and number of repeats. The same basic Crochet Flamingo Stitch Pattern can therefore become a narrow decorative edging, a table runner, a lace panel, a scarf, a shawl, or a larger statement textile.
Careful finishing is especially important. Secure the narrow legs and necks thoroughly, weave in all yarn tails, and block the completed fabric so the lattice opens evenly. Once blocked, the contrast between the dimensional flamingos and geometric openwork becomes much more visible.
This is a project that rewards experimentation and attention to detail. If you make your own Crochet Flamingo Stitch Pattern, leave your sincere opinion about the tutorial and share your suggestions. I would also love to know which color combination you would choose and what type of project you would create with these flamingo motifs.