
The Cooking Hat Pattern is a practical and stylish sewing project for anyone who enjoys creating useful accessories for the kitchen. Inspired by the soft pink bouffant-style chef hat shown in the reference design, this project combines a generously gathered crown with a structured fabric band to create a comfortable handmade cooking hat. It is an excellent way to use quilting cotton, linen blends, or lightweight woven fabric, and the finished hat can be customized in countless colors and prints.
Unlike a tall traditional restaurant toque, this fabric chef hat pattern has a softer, rounded silhouette. The large crown provides room for the hair while the fitted band helps the hat remain comfortably positioned around the head. This construction makes it useful for home cooking, baking, craft fairs, themed events, cooking classes, or as part of a coordinated handmade apron set. Because the design relies primarily on straightforward cutting, gathering, and basic seams, it can also be a satisfying project for sewists who are still developing their skills.
The measurements in this tutorial are based on the proportions visible in the reference project, but head sizes differ. Treat them as a starting point and measure the intended wearer before cutting the final fabric. The most important elements are the large circular crown, shaped front band, back band, and optional elastic. Once you understand how these components work together, the same Cooking Hat Pattern can easily be resized for different wearers.
Materials, Measurements, and Preparing the Cooking Hat Pattern
Start with approximately ½–¾ yard (0.45–0.70 m) of prewashed woven fabric. Quilting cotton is particularly beginner-friendly because it cuts cleanly and holds gathers nicely. Linen-cotton blends create a softer artisan look, while lightweight cotton prints can turn the same pattern into a colorful kitchen accessory.
DISCOVER MORE FREE PATTERNS HERE!
You will also need matching polyester or cotton thread, fabric scissors or a rotary cutter, a cutting mat, pins or sewing clips, a fabric marking pen, flexible measuring tape, iron, ironing board, safety pin or bodkin, and sewing machine. If you want an adjustable back, prepare approximately 4–6 in (10–15 cm) of ½–¾ in (1.3–2 cm) elastic.
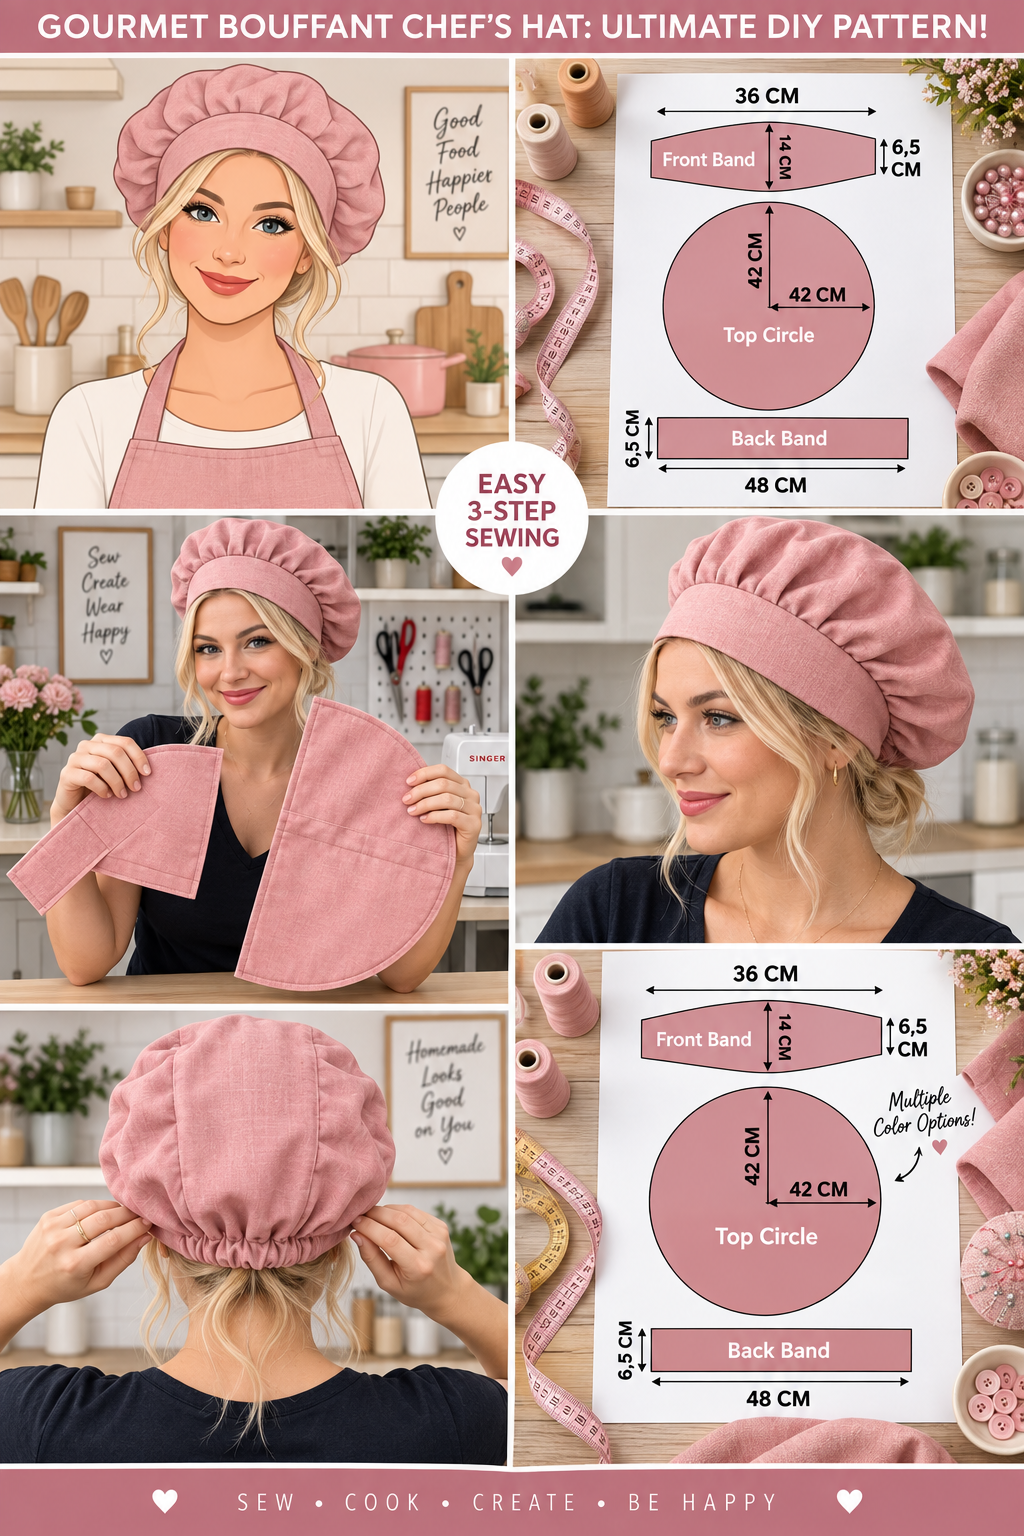
The main feature is the top circle. Following the reference proportions, begin with a circle approximately 16½ in (42 cm) in diameter. This creates the extra circumference required for the attractive gathered bouffant effect. Remember that this is a suggested size rather than a universal measurement.
For the front band, prepare a shaped piece approximately 14 in (36 cm) long. The center can be approximately 5½ in (14 cm) deep before folding or lining, tapering toward ends approximately 2½ in (6.5 cm) deep. A gently curved band sits more naturally around the forehead than a completely straight rectangle.
The back band can begin at approximately 19 in (48 cm) long × 2½ in (6.5 cm) wide. Depending on your chosen finishing method, this section may contain elastic or overlap with the front band. Before cutting, measure around the wearer’s head where the finished chef hat will naturally sit.
Add approximately ⅜ in (1 cm) seam allowance wherever necessary if your drafted templates do not already include it. Make a paper version first, label every pattern piece, and mark the center front, center back, quarter points, fold lines, and elastic openings. Accurate preparation makes the actual sewing considerably easier.
Cutting and Sewing the Large Gathered Crown
Fold the fabric carefully and transfer the 42 cm top circle onto the wrong side. If you do not have a large circular template, create one from paper using a compass or a string-and-pencil method. Check the diameter in several directions before cutting because an uneven circle can cause irregular gathers later.
Cut the crown cleanly without stretching the bias portions of the fabric. Because a circle contains both straight and bias grain, certain sections can distort easily. Handle the piece gently and avoid pulling the circumference while moving it around the sewing table.
Sew one or two rows of long machine basting stitches approximately ¼ in (6 mm) and ⅜ in (1 cm) inside the crown edge. Do not backstitch. Leave generous thread tails at both ends so you can pull the bobbin threads gradually to create the gathers.
Divide the crown into four equal sections and mark them with removable fabric markers or clips. Do the same with the completed headband. Matching these quarter points before gathering is one of the easiest ways to distribute fullness evenly around a bouffant cooking hat.
Pull the gathering threads slowly until the crown circumference corresponds with the upper edge of the headband. Rather than pushing all the fullness into one area, distribute small gathers throughout the entire circle. The fabric should look full and soft without forming large accidental pleats.
Once the circumference matches, pin or clip the crown to the band with right sides together. Use plenty of clips because gathered fabric tends to shift. Sew slowly around the circumference, checking frequently that no folds have become trapped underneath the presser foot.
Constructing the Front Band, Back Band, and Adjustable Fit
The front band gives the Cooking Hat Pattern its polished appearance. Cut two matching front-band pieces if you want a lined finish. Place them right sides together and sew along the appropriate edges, leaving the crown-attachment edge accessible according to your chosen construction method.
Trim bulky seam allowances and clip curved sections where necessary. Turn the band right side out and press carefully. A crisp front band contrasts beautifully with the soft gathered crown and helps the hat maintain its recognizable chef-hat silhouette.
Prepare the back band next. Fold the long edges toward the wrong side, press, and create a clean casing if elastic will be used. A 48 × 6.5 cm starting rectangle corresponds with the reference proportions, but adjust its final length according to actual head circumference.
Insert elastic through the casing using a safety pin or bodkin. Before permanently securing the ends, test the fit. The hat should remain in place without producing uncomfortable pressure. Elastic should stretch gently; excessively tight elastic can make even a correctly sized hat uncomfortable.
Another option is to create an adjustable tie closure. Extend the back band into two fabric ties rather than installing elastic. This variation is particularly useful when the hat will be shared by several people because the circumference can be adjusted each time it is worn.
Join the front and back sections securely, reinforcing the connection points with a second line of stitching if needed. Press all seams toward the most comfortable direction so bulky seam allowances do not rub against the forehead or sides of the head.
Attaching the Crown and Finishing the Cooking Hat
With the crown already gathered, match the center front of the circle to the center of the front band. Match the center back and both side quarter points next. This ensures that the fullness remains symmetrical rather than concentrating unexpectedly on one side.
Sew the crown to the band using approximately a ⅜ in (1 cm) seam allowance. Work slowly over the gathers and remove pins before they reach the needle. After completing the seam, inspect both sides carefully for accidental tucks.
Finish the raw seam with a serger, overcast stitch, or zigzag stitch. Since a fabric cooking hat may be washed regularly, clean seam finishes are worthwhile. Another attractive method is enclosing the raw edge inside the band lining for a professional interior.
Topstitching around the upper and lower edges of the front band can help it remain flat after washing. Use a stitch length around 2.5–3 mm and sew slowly so the topstitching remains evenly spaced from the edge.
Try the finished hat on and distribute the crown fullness with your hands. The crown should appear rounded and generously gathered rather than standing vertically like a traditional toque. Adjust the elastic if necessary before permanently closing its casing.
Finally, trim loose threads and give the band a careful final press. Avoid flattening the crown aggressively with the iron because the soft volume is part of the design. Your finished DIY chef hat is now ready for cooking, baking, or gifting.
Suggested Pattern Measurements
| Pattern Piece | Suggested Measurement |
|---|---|
| Top crown | 16½ in / 42 cm diameter |
| Front band | Approx. 14 in / 36 cm long |
| Front band center depth | Approx. 5½ in / 14 cm |
| Front band ends | Approx. 2½ in / 6.5 cm |
| Back band | Approx. 19 × 2½ in / 48 × 6.5 cm |
| Elastic | Approx. 4–6 in / 10–15 cm, adjusted to fit |
| Seam allowance | Approx. ⅜ in / 1 cm |
These measurements should be adapted to the wearer’s head. The 42 cm crown diameter mainly controls fullness, while the completed band determines fit.
Easy Construction Sequence
A simple order for making the hat is: measure the head and draft the pattern; cut the crown and band pieces; prepare and line the front band; construct the elasticized or adjustable back section; sew gathering stitches around the crown; divide both crown and band into quarters; gather the crown evenly; attach it to the band; finish the interior seams; topstitch the band; and complete the final fitting.
Following this sequence keeps the project organized and reduces the chance of attaching a band section backward or distributing the gathers unevenly.
Choosing Fabric for Your Chef Hat
Quilting cotton is one of the easiest materials for this pattern. It has enough body to showcase the gathered crown but remains lightweight enough for comfortable wear. It also comes in thousands of prints, making customization simple.
Cotton-linen blends create a slightly more relaxed appearance similar to the soft pink example. Avoid extremely heavy upholstery fabrics because the gathered crown can become bulky and uncomfortable.
Fabric should ideally be washable because cooking accessories can encounter food splashes and frequent handling. Prewashing the fabric before cutting is a sensible precaution when using washable cotton or linen.
For a coordinated handmade kitchen set, use matching fabric to create an apron, oven mitts, pot holders, or utensil holders alongside the Cooking Hat Pattern.
FAQ About the Cooking Hat Pattern
Is this Cooking Hat Pattern suitable for beginners?
Yes. A beginner who can sew basic seams and gathering stitches should be able to complete it. The most important skill is distributing the crown gathers evenly.
What is the best fabric for a handmade chef hat?
Lightweight woven cotton is an excellent option. Quilting cotton is particularly easy to sew and wash.
How large should the crown circle be?
The reference design suggests approximately 42 cm (16½ in) in diameter. A larger circle creates greater fullness, while a smaller circle creates a flatter crown.
How do I resize the hat?
Measure the wearer’s head circumference first and modify the band accordingly. The crown can then be adjusted depending on how much fullness you want.
Can I make the hat without elastic?
Yes. Replace the elasticized back with adjustable fabric ties, hook-and-loop tape, snaps, or another suitable closure.
Why are my gathers uneven?
The crown may not have been divided into quarters before gathering. Marking quarter points on both pieces helps distribute the fabric consistently.
Can I make the crown less puffy?
Yes. Reduce the diameter of the circular crown while keeping the headband fitted to the wearer’s head.
Can I quilt the fabric first?
You can, although heavy batting may make the crown too warm or bulky. If you want a quilted effect, use very lightweight batting or quilt only the band.
Should I prewash the fabric?
For washable cotton or linen, prewashing is recommended because it reduces the risk of shrinkage after the hat has been completed.
Can I use scraps?
The crown requires a reasonably large piece, but the bands can easily be made from coordinating scraps. Piecing the crown from several fabrics is also possible for a patchwork version.
How can I make the inside look professional?
Use a lined band and enclose the crown seam inside it, or finish exposed seams with an overlocker or narrow zigzag stitch.
Can I make matching hats in several colors?
Absolutely. Pink creates a soft feminine style, while red, turquoise, navy, floral prints, gingham, or patchwork combinations can completely transform the same pattern.
Conclusion
The Cooking Hat Pattern is an enjoyable sewing project that combines a simple circular crown with a comfortable fitted band to produce an attractive bouffant-style chef hat. The basic construction is uncomplicated, yet gathering, careful pressing, lining, and neat topstitching give the finished piece a polished appearance.
The pattern is also highly customizable. Change the 42 cm gathered crown, modify the band according to head circumference, add elastic or ties, and experiment with quilting cotton, linen blends, gingham, florals, or coordinated kitchen prints. Once the basic construction is understood, it is easy to create several versions for different occasions.
Whether made for baking at home, a cooking class, a handmade kitchen set, or simply as a fun sewing project, this easy fabric chef hat pattern offers an appealing combination of practicality and creativity. Careful measuring, evenly distributed gathers, secure seams, and a comfortable band are the key details that turn a few simple fabric pieces into a charming handmade cooking hat.