
Hooded Cape Pattern projects are a wonderful way to combine the warmth of a scarf, the comfort of a hood, and the polished appearance of a handmade fabric wrap in one practical sewing project. Inspired by the design shown in the reference image, this tutorial creates a long draped cape with a generously shaped hood and contrasting fabric on the inside. The finished piece can be worn over sweaters, long-sleeve tops, dresses, or lightweight jackets, making it especially useful for fall and winter wardrobes.
The beauty of this quilted hooded cape is its relatively simple construction. Instead of working with complicated sleeves, armholes, collars, or fitted bodice pieces, the project relies primarily on long fabric sections and a carefully curved hood. This makes it approachable for confident beginners while still providing enough opportunities for experienced sewists to personalize the result. Plaid flannel, brushed cotton, lightweight quilted fabric, wool blends, and soft cotton can all produce attractive versions.
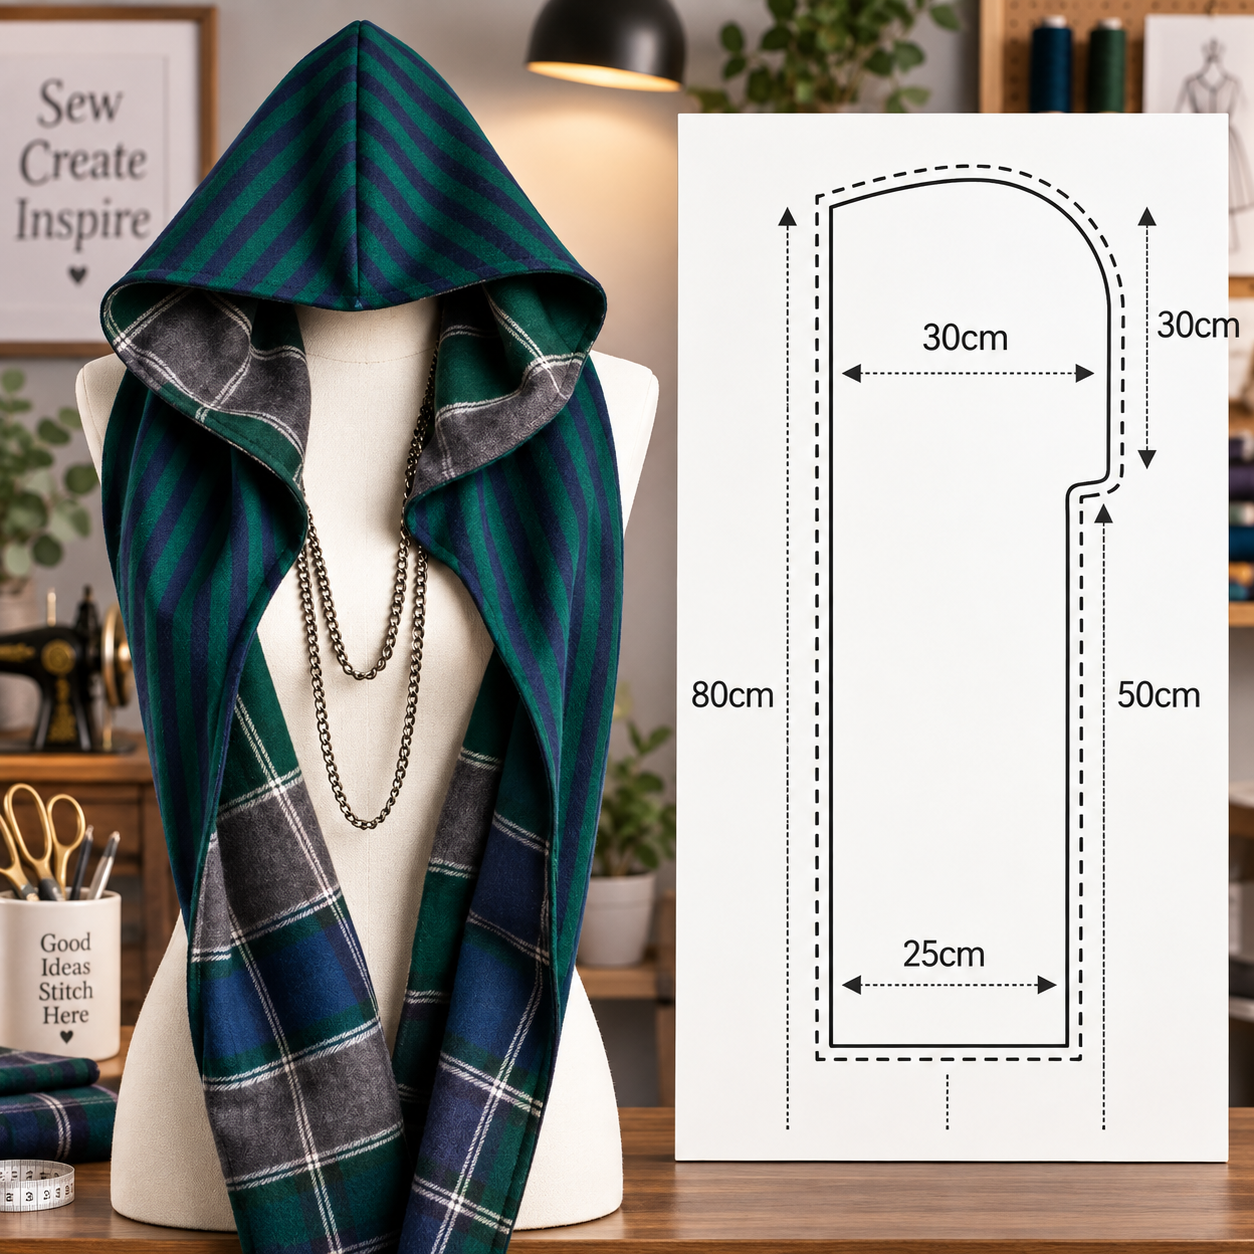
The measurements visible in the inspiration suggest a long silhouette of approximately 80 cm (31.5 in), with a lower width around 25 cm (9.8 in) and a hood area reaching approximately 30 cm (11.8 in) wide and deep. These measurements provide a useful starting point rather than an absolute rule. Because head size, height, fabric behavior, and desired drape vary, making a simple paper or muslin test before cutting valuable fabric is highly recommended.
Materials, Measurements, and Preparing the Hooded Cape Pattern
For the Hooded Cape Pattern, choose a main fabric with enough body to hold the shape while remaining soft enough to drape around the shoulders. Medium-weight cotton, flannel, lightweight wool blends, brushed cotton, and pre-quilted fabric are all suitable possibilities. The dark green and navy combination in the inspiration gives the garment a classic, sophisticated appearance.
DISCOVER MORE FREE PATTERNS HERE!
A contrasting lining makes the cape more interesting when the front edges fold outward. Plaid fabric works particularly well because it adds visual depth without requiring additional embellishment. If your exterior fabric is already heavily patterned, consider using a quieter lining.
For an adult-sized version, plan for approximately 2–2.5 yards (1.8–2.3 m) of both outer fabric and lining, depending on fabric width and how long you want the front tails. Additional fabric may be required when matching plaids, stripes, or directional prints.
You will also need coordinating thread, fabric scissors or a rotary cutter, cutting mat, pins or sewing clips, measuring tape, tailor’s chalk or washable fabric marker, sewing machine, iron, and paper for creating the pattern. A point turner can also be helpful during finishing.
A practical starting measurement for each long cape section is approximately 80 cm (31.5 in) long. The lower portion can measure about 25 cm (9.8 in) wide, gradually transitioning toward the wider hood region. The hood itself can be drafted within an area approximately 30 × 30 cm (11.8 × 11.8 in).
Add approximately 1 cm (3/8 in) to 1.5 cm (5/8 in) seam allowance around pattern edges unless your drafted pattern already includes it. Mark your seam allowance clearly because consistent stitching is important for keeping both sides symmetrical.
Before cutting, prewash and press washable fabrics. Flannel and cotton can shrink noticeably during their first wash. Prewashing prevents an otherwise beautifully fitted DIY hooded cape from changing dimensions after completion.
Drafting and Cutting the Hood and Long Cape Sections
Begin by drawing a long vertical rectangle approximately 80 cm (31.5 in) in total length. At the lower end, establish a width of approximately 25 cm (9.8 in). This creates the long hanging section that drapes down the front of the body.
At the upper portion, widen the pattern gradually toward approximately 30 cm (11.8 in). The transition should be smooth rather than abrupt because this area becomes part of the hood and shoulder drape.
Draft the hood with approximately 30 cm (11.8 in) of depth. Round the upper-back corner generously instead of creating a sharp square corner. A smooth curve allows the hood to follow the head more naturally and creates a softer silhouette.
The front neckline transition is particularly important. Draw a small inward curve where the hood meets the long hanging section. Avoid cutting an excessively deep curve on your first attempt. You can always refine the opening during a muslin fitting.
Cut mirrored pieces as required by your construction method. When using plaid or striped fabric, pay close attention to pattern direction. Aligning prominent stripes at important seams gives the finished Hooded Cape Pattern a much more professional appearance.
Transfer all important marks onto the wrong side of the fabric. Mark the hood crown, neckline transition, matching points, center back, and turning opening. Repeat these markings on the lining pieces.
Before sewing, place the pieces around a dress form or carefully test them against the body. Check that the front panels reach your preferred length and that the hood comfortably covers the head without pulling backward.
Sewing the Hooded Cape Step by Step
Start by joining the appropriate outer hood pieces with right sides together. Pin carefully around the curved crown and sew using your chosen seam allowance. Sew slowly around the curve rather than pulling the fabric through the machine.
Clip or notch the curved seam allowance without cutting through the stitching. This helps the seam relax when turned. Press the seam carefully toward one side or open, depending on the thickness of your material.
Repeat the same process for the lining. The outer cape and lining should now mirror each other closely. Place them together temporarily and check that their edges correspond before continuing.
With right sides facing, align the outer fabric and lining around the long front edges and hood opening. Pin or clip generously, especially around curves. Sew around the perimeter while leaving an adequately sized opening for turning.
Trim bulky seam allowances and clip curved areas. At corners, remove a small amount of excess fabric without cutting too close to the stitching. Turn the entire fabric hooded wrap right side out through the opening.
Use your fingers or a blunt point turner to shape the seams. Press carefully according to the fabric’s recommended temperature. Rolling the seam slightly between your fingers before pressing can help prevent the lining from showing unintentionally along the exterior edge.
Close the turning opening with a ladder stitch by hand or a narrow machine stitch. Then topstitch approximately 1/8–1/4 in (3–6 mm) from the outer edge. Topstitching gives the cape a crisp outline and helps prevent the lining from shifting during wear.
Quilting, Finishing, Fit Adjustments, and Styling
If you want a true quilted hooded cape, add a lightweight batting layer between the outer fabric and lining. Thin cotton batting or lightweight polyester batting provides warmth without creating excessive bulk around the neck.
Quilting can be completed before final assembly. Straight vertical lines, diagonal diamonds, or simple channel quilting are excellent choices. Keep the quilting relatively open so the fabric remains flexible and drapes naturally.
Try the cape on before considering it completely finished. The hood should sit comfortably without pulling the long panels backward. The front sections should fall naturally on either side of the chest.
If the hood feels too large, take a slightly deeper seam along the crown or back. If it feels restrictive, enlarge the hood pattern before making another version rather than reducing the seam allowance excessively.
The long ends can remain straight or be rounded for a softer look. Another attractive option is gently tapering the ends. For an especially polished finish, add narrow topstitching around the entire perimeter.
A decorative closure can also be added near the upper chest. Consider a fabric loop and button, toggle, magnetic closure, or decorative brooch. However, leaving the garment open creates the flowing scarf-like appearance shown in the inspiration.
For cold-weather use, flannel combined with lightweight batting provides excellent comfort. A wool-blend exterior with satin or cotton lining produces a dressier version, while two coordinating cotton prints make a lighter hooded scarf pattern suitable for transitional weather.
When working with reversible fabrics, the project can even be designed to look attractive from both sides. Use coordinating thread and carefully finished seams so either surface can become the visible side.
Suggested Hooded Cape Measurements
| Pattern Area | Approximate Measurement |
|---|---|
| Overall length | 80 cm / 31.5 in |
| Lower panel width | 25 cm / 9.8 in |
| Hood width | 30 cm / 11.8 in |
| Hood depth | 30 cm / 11.8 in |
| Lower straight section | Approx. 50 cm / 19.7 in |
| Seam allowance | 1–1.5 cm / 3/8–5/8 in |
These dimensions are a starting point. For the most comfortable result, compare them with the intended wearer’s head circumference, shoulder width, and desired finished length.
Tips for Better Results
When sewing plaid, carefully match the strongest horizontal and vertical lines before stitching. Even simple pattern matching can dramatically improve the professional appearance of the finished cape.
Always press after major construction steps. Pressing is particularly important around the hood because curved seams can otherwise appear bulky or uneven.
Do not use extremely thick batting around the hood unless you specifically want a structured appearance. Too much thickness can prevent the fabric from falling gracefully around the face.
For a reversible design, select two fabrics that complement each other. A solid outer fabric combined with plaid lining is timeless, while two coordinated prints create a more playful look.
If your fabric stretches or shifts easily, baste the layers before permanent stitching. This can prevent one layer from becoming longer than the other.
For a personalized fit, lengthen or shorten the hanging sections rather than changing the entire pattern proportionally. The hood dimensions should primarily be determined by head size and desired coverage.
FAQ About the Hooded Cape Pattern
Is the Hooded Cape Pattern beginner-friendly?
Yes. A simplified version is suitable for confident beginners because there are no traditional sleeves, button plackets, or complicated fitted bodice sections. Curved sewing around the hood requires the most attention.
What is the best fabric for this pattern?
Flannel, brushed cotton, medium-weight cotton, lightweight wool blends, and quilted cotton are excellent options. Choose fabric according to the amount of warmth and structure you want.
Can I make this cape reversible?
Yes. Use two attractive fabrics and keep the construction clean on both sides. Reversible construction is especially effective with contrasting plaid and solid fabrics.
Should I add batting?
Batting is optional. Add lightweight batting if you want a warmer quilted hooded cape. Leave it out for a lighter scarf-like version.
How much fabric do I need?
Approximately 2–2.5 yards (1.8–2.3 m) each of outer fabric and lining is a reasonable estimate for many adult versions. Actual requirements depend on fabric width, garment length, and pattern matching.
Can I make the hood larger?
Yes. Increase its depth and height gradually. Making a test hood from inexpensive fabric is the safest way to determine the ideal size.
Can fleece be used?
Yes, although fleece can become bulky when combined with another thick lining. Consider using a lighter lining and reducing unnecessary seam bulk.
Can I add pockets?
Certainly. Patch pockets can be positioned on the long front sections before the outer fabric and lining are assembled.
Can I make a children’s version?
Yes, but the measurements should be redrafted for the child’s head and body rather than simply using the adult dimensions. Avoid long cords or other features that could create an entanglement hazard.
How should the cape be washed?
Follow the care requirements of the most delicate material used. If combining different fabrics, make sure their washing and drying requirements are compatible before sewing.
Can I lengthen the front panels?
Absolutely. Extending the long sections is one of the easiest customizations. Remember that extra length also increases fabric requirements.
Why does my lining show along the outer edge?
This usually happens when the seam was not pressed or rolled evenly. Carefully roll the seam toward the lining side and press before topstitching.
Conclusion
The Hooded Cape Pattern offers a practical way to create a cozy handmade accessory without the complexity of a fully tailored coat. Its combination of a roomy hood, long flowing panels, optional quilting, and contrasting lining makes it versatile enough for casual outfits, autumn layering, winter accessories, and handmade gifts.
The approximately 80 cm (31.5 in) length, 25 cm (9.8 in) lower width, and 30 cm (11.8 in) hood proportions shown in the inspiration provide a useful foundation for drafting your first version. From there, the dimensions can be adjusted to create a longer cape, oversized hood, narrower scarf-style silhouette, or warmer quilted design.
PATTERN VIDEO:
Most importantly, this DIY Hooded Cape Pattern gives you plenty of room for creativity. Plaid and dark green can create a classic woodland aesthetic, while florals, solids, patchwork, or coordinated quilting cottons can completely transform the finished piece. With careful cutting, smooth curved seams, consistent topstitching, and thoughtful fabric selection, a relatively straightforward sewing project can become a polished and distinctive handmade garment.