
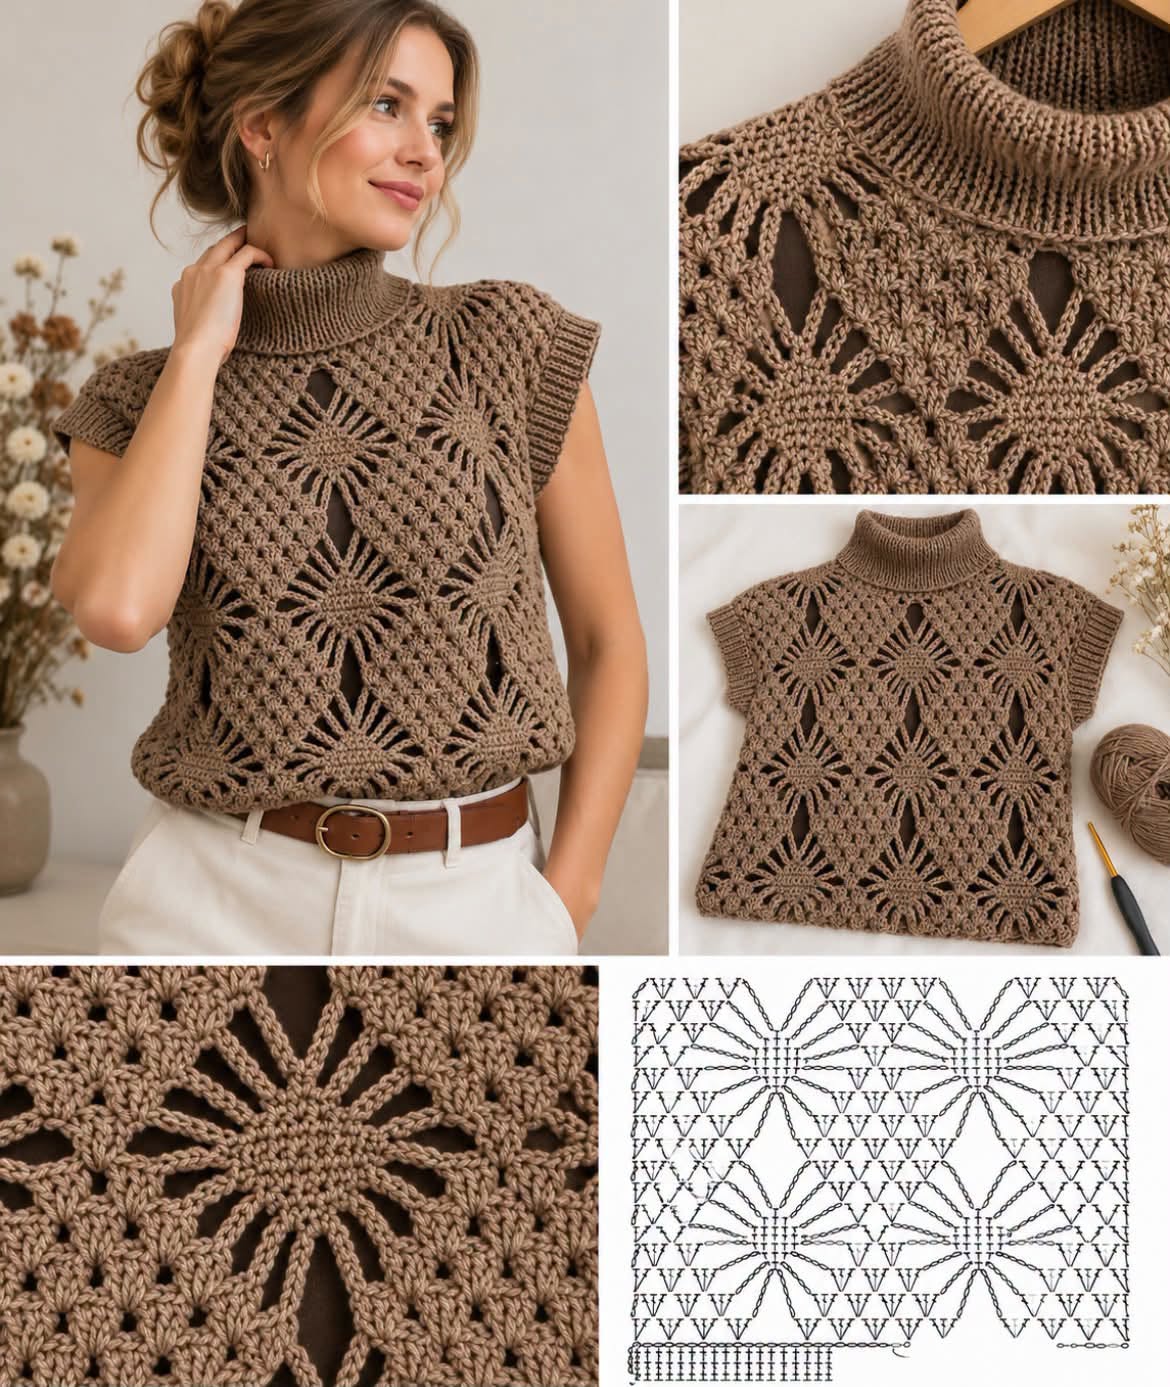
The Elegant Crochet Turtleneck Vest Tutorial is a beautiful approach to creating a polished handmade garment that combines dramatic lace motifs, a comfortable sleeveless silhouette, and a structured high neckline. The design is especially striking because it balances open crochet sections with denser textured stitches. Large radiating floral or sunburst-inspired motifs become the focal point, while smaller stitch groups connect them into a fabric that looks intricate without feeling excessively heavy. Finished with neat armhole borders and a ribbed turtleneck, the vest can be styled over a camisole, blouse, long-sleeved shirt, or lightweight dress.
What makes this crochet turtleneck vest particularly interesting is its modular appearance. Rather than relying on one uninterrupted stitch pattern from hem to neckline, the garment can be planned around repeating lace motifs arranged across the front and back. Chains form the elongated openings around each motif, while double crochet stitches, clusters, and connecting spaces provide stability between them. This construction also gives the crocheter considerable freedom when adjusting the width and length.
The following guide uses U.S. crochet terminology and explains an adaptable method for creating a vest inspired by the pictured style rather than claiming an exact stitch-for-stitch reproduction. Because yarn, tension, body measurements, and motif size can vary considerably, make a sample motif before beginning the full garment. The finished vest should have enough positive ease to hang naturally rather than stretching the decorative motifs across the body.
Materials, Crochet Stitches, Gauge, and Vest Measurements
A smooth DK weight (#3) yarn is an excellent choice for this project. Cotton, cotton-acrylic, bamboo-cotton, or another yarn with clear stitch definition will emphasize the radiating motifs. For an adult vest, approximately 900–1,400 yards (825–1,280 m) is a useful planning range, although larger sizes, longer bodies, and taller turtlenecks will require more.
DISCOVER MORE FREE PATTERNS HERE!
Begin with a 4.0 mm to 4.5 mm crochet hook for DK yarn. If your stitches are particularly tight, moving up half a hook size can improve the drape of the lace. You will also need stitch markers, scissors, a tapestry needle, measuring tape, and blocking mats with rust-resistant pins.
The essential U.S. crochet abbreviations are: ch = chain, sl st = slip stitch, sc = single crochet, hdc = half double crochet, dc = double crochet, tr = treble crochet, FPdc = front post double crochet, BPdc = back post double crochet, sp = space, sk = skip, and st/sts = stitch/stitches.
For the decorative sections, you should also understand a cluster stitch. A simple 3-dc cluster can be worked by beginning three double crochets in the same space while leaving the final loop of each stitch on the hook, then yarn over and pull through all remaining loops. Clusters create attractive textured areas between the open chains.
Instead of relying on a universal stitch gauge, make one complete decorative motif first. A useful motif size for an adult garment is approximately 5–7 inches (13–18 cm) across after blocking. Record its exact measurement because this determines how many motifs or repeats are required across your garment.
For a relaxed medium vest, a finished bust circumference around 40–44 inches (102–112 cm) can provide comfortable ease depending on the wearer’s measurements. The finished body length can be approximately 22–25 inches (56–64 cm) from shoulder to hem. For best results, measure the intended wearer and add approximately 3–6 inches (7.5–15 cm) of positive ease.
Crocheting the Sunburst Lace Motifs and Main Body
The distinctive sunburst crochet motif begins from the center. Make a magic ring, or ch 4 and join with sl st to form a ring. For Round 1, work approximately 12 sc into the ring and join. This establishes a compact center from which the decorative rays can develop.
For the next round, increase evenly. One possible foundation is to work 2 dc into each stitch around, creating 24 stitches. If the circle begins to cup, loosen your tension or increase the hook size slightly. If it ripples excessively, reduce the number of increases.
The radiating openings can then be established with long chains. Work a sequence such as dc in next st, ch 5, sk 1–2 sts, dc in next st around the motif. The precise number of chain spaces should remain evenly distributed. These elongated chain loops create the recognizable rays around the central circle.
On the following round, crochet into the chain spaces to strengthen the motif. For example, work sc, hdc, several dc, hdc, sc into each large chain space. Alternatively, leave portions of the chains exposed if you prefer a more open appearance. The objective is to develop petal-like or triangular radiating elements without closing all the negative space.
Continue building outward using alternating chain spaces, double crochet groups, and clusters. As the motif expands, begin shaping its outer boundary so it can connect neatly with neighboring motifs. The final round should contain clearly identifiable joining points around the perimeter.
Make enough motifs for your chosen garment dimensions. For a medium vest, you might arrange approximately three major repeats across the front and three across the back, with additional partial motifs or connecting lace where necessary. Your sample motif measurement determines the exact arrangement.
Before permanently joining anything, arrange all completed motifs on a flat surface. Place them according to the intended front and back layout. This simple step prevents a common problem: discovering after assembly that the garment is considerably wider or narrower than expected.
Constructing the Front, Back, Shoulders, and Armholes
The Elegant Crochet Turtleneck Vest can be assembled using either join-as-you-go construction or individually blocked motifs sewn together afterward. For greater control, beginners may find it easier to complete and block the motifs first, then join them with slip stitches or mattress-style seaming.
Position the front motifs so the design remains symmetrical around the center line. Join neighboring motifs only at designated outer points. Avoid pulling the joins too tightly because the garment needs enough flexibility to drape naturally.
Use connecting rows of dc groups and chain spaces to fill larger gaps between motifs. A useful filler sequence is 3 dc, ch 2, 3 dc worked into appropriate spaces. For narrower gaps, use sc, ch 3, sc connections. The exact filler depends on the distance between motifs.
Build the back using the same overall width as the front. The back can use the complete motif arrangement, while the front neckline needs additional shaping. Stop joining the upper-center motifs when you reach the desired neckline opening.
For a high-neck vest, the neckline opening should initially be relatively close to the base of the neck. A circumference of approximately 18–22 inches (46–56 cm) before adding the collar is a reasonable adult starting range, but always check the opening over the wearer’s head before proceeding.
Join the shoulders, leaving the armholes open. A comfortable sleeveless armhole depth is approximately 8–10 inches (20–25 cm) from the shoulder. Taller or fuller-busted wearers may prefer slightly deeper openings.
Once the shoulders are joined, try the vest on. Check the width, armhole depth, body length, and neckline before adding borders. This fitting stage is extremely important because edging and ribbing will slightly change the finished dimensions.
Crocheting the Turtleneck, Ribbed Edges, and Finishing the Vest
The high collar provides an elegant contrast to the airy body. Join yarn at the back neckline and work one round of sc evenly around the opening. Count the stitches and adjust them so the neckline lies flat without puckering.
For a vertically ribbed appearance, alternate FPdc and BPdc around. A typical round is: *ch 2, FPdc around next st, BPdc around next st; repeat from * around, join with sl st. Continue without increasing.
Work the collar until it measures approximately 5–7 inches (13–18 cm) high. A taller collar can be folded downward to create a substantial turtleneck. If you prefer a mock neck, stop around 3–4 inches (7.5–10 cm).
The collar should stretch comfortably over the head but return to shape afterward. If it is too tight, increase the hook size or add stitches during the foundation round. Never force a neckline that cannot comfortably pass over the head.
Finish each armhole with a round of single crochet. For the ribbed appearance seen on many sophisticated crochet garments, add alternating FPdc/BPdc stitches for approximately 1–1.5 inches (2.5–4 cm). Keep the tension slightly firm but not restrictive.
A similar border can be added along the bottom hem. Alternatively, preserve the decorative edges of the motifs for a more pronounced lace finish. The best choice depends on whether you want a tailored or more bohemian appearance.
Weave all yarn ends securely before wet blocking the finished vest. Shape the motifs carefully, straighten the shoulder seams, and open each chain space. Allow the garment to dry completely while lying flat. Blocking crochet lace is particularly important because it transforms uneven-looking motifs into a much cleaner and more professional fabric.
Frequently Asked Questions About the Elegant Crochet Turtleneck Vest
Is the Elegant Crochet Turtleneck Vest Tutorial suitable for beginners?
It is best for confident beginners or intermediate crocheters. You should already understand chains, single crochet, double crochet, working in rounds, basic joining, and reading repeated stitch instructions.
What yarn is best for this vest?
A smooth DK cotton or cotton-blend yarn is an excellent option because it provides clear stitch definition and comfortable drape.
Can I use worsted-weight yarn?
Yes, but the motifs will become larger and heavier. You will need to recalculate the garment dimensions rather than following the same motif count.
How much yarn should I buy?
Approximately 900–1,400 yards (825–1,280 m) is a reasonable starting estimate for many adult sizes, but yarn consumption depends strongly on size, motif density, collar height, and yarn thickness.
How do I make the vest larger?
Add width through extra motif repeats or wider connecting sections. You can also add rows at the side seams, provided they are distributed symmetrically.
How do I make it longer?
Add another horizontal motif section or work additional lace rows before finishing the hem.
How should I size the armholes?
An adult armhole depth of roughly 8–10 inches (20–25 cm) works as a starting point. Measure a comfortable sleeveless garment you already own for greater accuracy.
Why are my circular motifs curling?
Curling usually indicates an imbalance between increases and stitch tension. Block your sample first. If it still cups, slightly increase the stitch count or use a larger hook.
Why is my motif rippling?
Excessive increases can create waves. Reduce the number of increases in the affected round or adjust your hook size.
Can I make the collar shorter?
Yes. Work approximately 3–4 inches (7.5–10 cm) for a mock-neck style rather than a full folded turtleneck.
Can I use several colors?
Absolutely. You could crochet the sunburst centers in one shade and the connecting lace in another. A monochromatic palette, however, emphasizes the sophisticated texture particularly well.
Should the vest have positive ease?
Yes. Approximately 3–6 inches (7.5–15 cm) of positive ease usually works well for this relaxed silhouette.
Can I wear the vest directly against the skin?
You can, but the openwork sections are intentionally transparent. Many people will prefer wearing a camisole or fitted top underneath.
Is blocking really necessary?
For this design, it is strongly recommended. Blocking opens the sunburst motifs, improves symmetry, straightens the joins, and helps the garment achieve its intended dimensions.
How should I wash the finished vest?
Follow the care instructions on your yarn label. Gentle hand washing and flat drying are generally appropriate for delicate handmade lace garments.
Conclusion
The Elegant Crochet Turtleneck Vest Tutorial brings together several elements that make handmade clothing visually impressive: large sunburst crochet motifs, geometric openwork, textured connecting stitches, structured ribbed edges, and a dramatic high neckline. The contrast between the airy body and substantial turtleneck gives the garment an elegant appearance that can work with both casual and more polished outfits.
The secret to creating a successful version is not simply counting stitches. Begin with an accurate sample motif, block it, measure it, and use those measurements to plan the entire garment. Maintaining symmetry across the front and back is particularly important when working with large repeating motifs.
This pattern is also highly adaptable. Shorten the collar for a crochet mock-neck vest, lengthen the body for a tunic effect, change the number of motifs for different sizes, or experiment with contrasting colors. A warm neutral shade produces a timeless look, while black, burgundy, cream, forest green, or deep blue can completely transform the character of the same construction.
With careful joining, consistent tension, and thorough blocking, the Elegant Crochet Turtleneck Vest becomes much more than a collection of individual crochet motifs. It becomes a sophisticated handmade garment that demonstrates how traditional crochet lace techniques can be adapted into contemporary wearable fashion.