
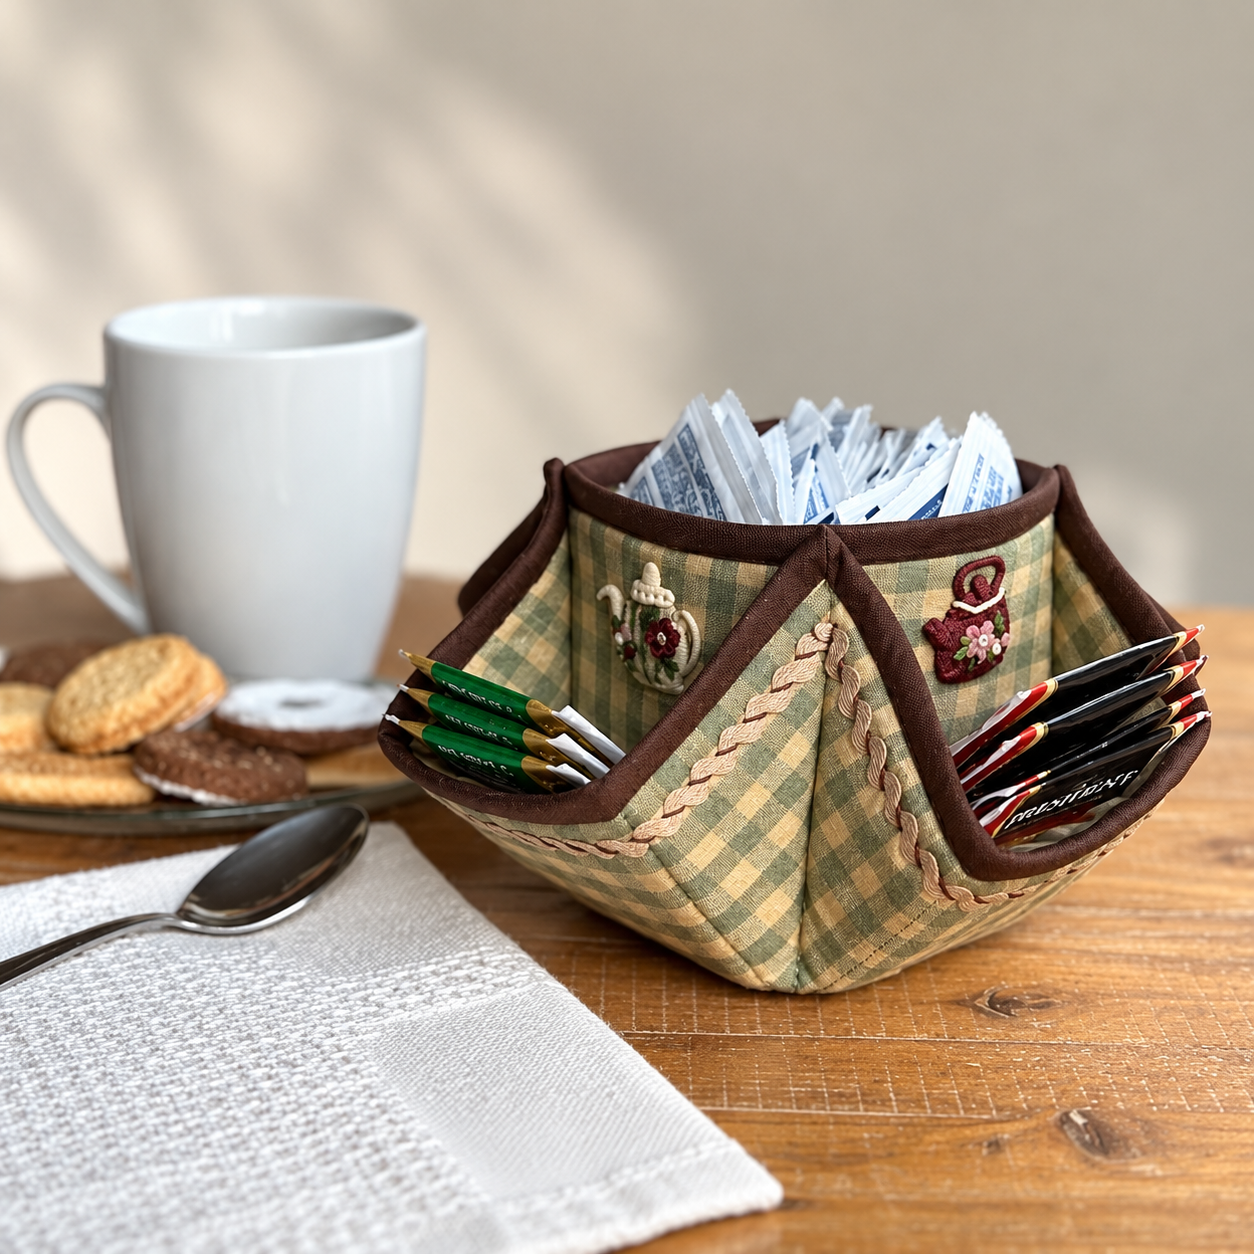
The Organizer Basket Tutorial is a practical and attractive quilting project designed to turn coordinated cotton fabrics into a structured multi-pocket basket for everyday storage. Inspired by the organizer shown in the reference image, this project combines a roomy central compartment with several convenient exterior pockets, making it useful for organizing tea packets, coffee supplies, sewing notions, craft tools, cosmetics, stationery, or other small household essentials. The decorative construction also makes the basket attractive enough to leave on a kitchen counter, sewing table, dresser, or desk.
One of the best features of this quilted organizer basket pattern is the combination of function and traditional fabric craft. The basket can be made from quilting cotton, coordinating prints, scraps, and contrasting binding. Fusible fleece or batting provides body, while interfacing can be added when a firmer finished basket is desired. The exterior pockets are divided into sections, allowing several different items to remain visible and easy to reach without disturbing the contents of the main compartment.
This fabric organizer basket is also highly customizable. The approximate finished size suggested in this tutorial is 9 inches (23 cm) wide, 9 inches (23 cm) deep, and 5½ inches (14 cm) high, but the dimensions can easily be adjusted. Beginners can simplify the project by using one fabric throughout, while experienced quilters can combine patchwork, embroidery, appliqué, decorative stitching, or leftover quilt fabrics to create a more detailed version.
Materials, Measurements, and Preparing the Organizer Basket Pieces
For the main fabric, choose a good-quality quilting cotton with enough stability to hold crisp seams. Approximately ½ yard (46 cm) of exterior fabric and ½ yard (46 cm) of lining fabric should be sufficient for a medium organizer, although additional fabric may be needed if you are matching directional prints.
DISCOVER MORE FREE PATTERNS HERE!
You will also need approximately ½ yard of fusible fleece, cotton batting, or foam stabilizer. Fusible fleece produces a softer quilted basket, while thin foam gives the organizer a firmer, more upright structure. Medium-weight fusible interfacing can be combined with batting if your fabrics are particularly lightweight.
For an organizer approximately 9 × 9 × 5½ inches (23 × 23 × 14 cm), begin with two exterior body rectangles approximately 15 × 10½ inches (38 × 27 cm) and two matching lining pieces. These dimensions include extra material for shaping the bottom and creating seam allowances.
Prepare exterior pocket pieces approximately 15 × 8 inches (38 × 20 cm). Cut enough pieces to provide pockets around the sides you want to use. Folded pockets are particularly useful because the doubled fabric gives the pocket openings additional strength.
For the contrasting binding, prepare 2¼-inch (5.7 cm) strips. Join the strips diagonally if additional length is required. A dark contrasting binding, like the brown trim in the reference design, helps emphasize the sculpted edges of the basket and gives the finished project a polished appearance.
Additional supplies include coordinating thread, a sewing machine, quilting needle, rotary cutter, cutting mat, acrylic ruler, fabric scissors, pins or quilting clips, iron, ironing board, removable fabric marker, and a hand-sewing needle. A ¼-inch (6 mm) seam allowance works well for most of the piecing.
Constructing the Quilted Body and Exterior Storage Pockets
Begin by placing each exterior fabric piece over its corresponding batting or fusible fleece. If using fusible products, follow the manufacturer’s instructions to permanently bond the layers before sewing. Make sure the stabilizer reaches close enough to the edges to provide consistent structure.
Quilt the exterior panels before constructing the basket. Simple straight-line quilting works beautifully and keeps the project beginner-friendly. Stitch vertical lines, diagonal lines, a crosshatch pattern, or gentle curves approximately 1–1½ inches (2.5–4 cm) apart.
Next, prepare the exterior organizer pockets. Fold each pocket piece with wrong sides together and press firmly along the folded upper edge. For additional structure, place lightweight interfacing or a narrow strip of batting inside the fold.
Topstitch approximately ⅛ inch (3 mm) below the folded pocket edge. You can add a second parallel line of stitching approximately ¼ inch below the first if you want a more decorative, reinforced finish.
Position the prepared pocket panel over the lower portion of the quilted exterior panel. Align the raw bottom and side edges. Mark vertical dividing lines to create separate compartments. Depending on your intended use, pockets approximately 3–4 inches (7.5–10 cm) wide work well for tea packets, sewing tools, pens, crochet hooks, or small notions.
Sew along each marked dividing line from the bottom toward the upper pocket edge. Backstitch securely at the top because this area receives considerable stress during everyday use. Baste the pocket’s remaining raw edges to the exterior panel inside the seam allowance.
To achieve the softly shaped pockets visible in the reference design, give each pocket a little extra fullness rather than stretching the pocket fabric completely flat. A small pleat at the bottom of each compartment can provide additional capacity.
Shaping, Sewing, and Assembling the Organizer Basket
Place the prepared exterior body pieces right sides together. Sew the side and bottom seams using a ¼-inch (6 mm) seam allowance. Reinforce the beginning and end of each seam with backstitching.
To transform the flat panels into a dimensional basket, create boxed corners. Flatten one lower corner so the side seam sits directly over the bottom seam. Measure approximately 2¼ inches (5.7 cm) from the point and draw a line perpendicular to the seam.
Sew across the marked line and trim away the excess corner, leaving approximately a ¼–⅜-inch (6–10 mm) seam allowance. Repeat for the opposite corner. When the basket is opened, these boxed corners create its flat base.
Construct the lining in the same manner, but leave approximately 4 inches (10 cm) unstitched along the bottom seam. This opening will later allow the organizer to be turned right side out.
Place the exterior basket inside the lining so that the right sides of the fabrics face one another. Carefully align the upper edges, side seams, and corners. Clip generously around the opening to prevent shifting.
Sew around the entire upper edge. Turn the organizer right side out through the opening left in the lining. Carefully push the corners into shape and then close the lining opening with a narrow machine stitch or invisible hand stitching.
Push the lining into the basket and press the upper edge. Topstitching around the rim gives the DIY organizer basket additional stability. For the highly structured appearance shown in the inspiration image, decorative binding can instead be wrapped around the upper edge and sewn securely in place.
Adding Binding, Decorative Details, and Professional Finishing
The contrasting quilt binding is one of the details that can transform a simple fabric basket into a polished handmade organizer. Fold a prepared binding strip lengthwise with wrong sides together and press. Attach it around the upper edge using the same basic method used for quilt binding.
Additional binding can be applied vertically over selected pocket seams. This technique hides construction seams while visually dividing the basket into individual storage sections. It also reinforces the points where several fabric layers meet.
Decorative braid, ric-rac, piping, or narrow trim can be stitched across the pocket fronts. Keep embellishments relatively flat if the organizer will be used frequently, since bulky decorations can catch on stored objects.
Small fabric appliqués can personalize each compartment. For a kitchen organizer, consider teacups, flowers, spoons, or tiny baskets. For a sewing-room version, use spools, scissors, sewing machines, buttons, or patchwork motifs.
After completing the basket, press it carefully using steam appropriate for your chosen fabrics. Shape the bottom and corners with your hands while the material is still warm. Avoid crushing thick batting or foam with excessive pressure.
The completed Organizer Basket Tutorial can be adapted far beyond the kitchen. Make a pastel version for nursery supplies, a bright scrap-fabric basket for children’s art materials, a sophisticated neutral basket for a home office, or a highly organized sewing basket with differently sized pockets for scissors, rulers, thread, and marking tools.
Frequently Asked Questions About the Organizer Basket Tutorial
Is this Organizer Basket Tutorial suitable for beginners?
Yes. A confident beginner who can sew straight seams and basic quilted layers can complete the project. The boxed corners and binding may require a little extra attention.
What is the approximate finished size?
The suggested organizer is approximately 9 × 9 × 5½ inches (23 × 23 × 14 cm). You can enlarge or reduce the pattern according to your storage needs.
What fabric works best?
Good-quality 100% quilting cotton is an excellent choice because it is easy to cut, press, quilt, and sew.
Do I need batting?
Some type of stabilizer is strongly recommended. Without batting, fleece, interfacing, or foam, the basket may collapse when empty.
What creates the firmest organizer?
Sew-in foam or fusible foam generally provides more structure than ordinary cotton batting.
Can I use fabric scraps?
Absolutely. This is an excellent scrap quilting project, particularly for the pockets, appliqués, binding, and decorative sections.
How wide should the pockets be?
Approximately 3–4 inches (7.5–10 cm) is useful for many small items, but the compartments can be customized.
Can I make deeper pockets?
Yes. Increase the height of the pocket fabric or add small pleats at the lower edge to create more capacity.
What seam allowance should I use?
A consistent ¼-inch (6 mm) seam allowance works well for most construction seams.
How can I keep the basket standing upright?
Use a substantial stabilizer and quilt the exterior panels before assembly. Reinforced binding around the top also helps maintain the shape.
Can the organizer be machine washed?
That depends on the fabric and stabilizer. Cotton fabric with washable batting usually performs well, while some foams and specialty interfacings require different care.
Can I make the organizer reversible?
Yes, although exterior pockets and decorative binding may make one side more practical as the primary exterior.
What can I store inside it?
It can organize tea packets, coffee supplies, sewing notions, craft tools, cosmetics, office supplies, small toys, remote controls, or other lightweight household items.
Can I add handles?
Yes. Fabric handles can be inserted into the upper seam before the lining and exterior are joined.
Can I add more pockets?
Definitely. The pocket layout is one of the easiest parts of the pattern to customize.
Conclusion
The Organizer Basket Tutorial is a useful quilting project that combines storage, traditional sewing techniques, and decorative fabric design. With a structured central compartment and multiple exterior pockets, the finished basket provides convenient organization while still looking like a carefully crafted piece of home décor.
The construction is based on approachable techniques: preparing quilted fabric panels, making folded pockets, stitching compartment dividers, creating boxed corners, adding a lining, and finishing the edges with contrasting binding. Taking time to press each stage and maintain an accurate ¼-inch seam allowance will significantly improve the final shape.
Another advantage of this quilted fabric organizer is how easily the design can be personalized. Floral prints create a traditional cottage look, bright scraps make a cheerful craft-room basket, and neutral fabrics can produce a modern organizer. Decorative appliqués, embroidery, braid, or contrasting binding can make every version unique.
VIDEO PATTERN
Whether it is used beside a sewing machine, on a kitchen table, inside a craft room, or on an office desk, this Organizer Basket Tutorial provides a practical way to turn beautiful quilting fabrics into useful storage. It is also a satisfying project for using coordinated remnants from previous quilts while creating something that can be enjoyed every day.