
The Mini Crochet Bag Tutorial is a charming project for anyone who loves quick, colorful, and practical crochet creations. These tiny bags are worked with simple stitches and require only a small amount of yarn, making them an excellent choice for using leftover yarn from larger projects. With their compact rectangular bodies and rounded handles, the finished bags can become keychain accessories, doll bags, gift-card holders, party favors, ornaments, or miniature decorative pieces.
The design shown in the inspiration image has a wonderfully simple structure. The bag begins with a short foundation chain, the base is worked to establish the width, and the body grows upward with compact crochet stitches. A small amount of shaping around the lower corners creates the softly rounded silhouette. Finally, two small handles are added at the top. Because the construction is uncomplicated, this mini crochet bag pattern is particularly useful for beginners who want to practice working evenly while creating something attractive.
Another advantage of this tiny crochet bag is the freedom to experiment with color and size. Bright yellow, red, turquoise, purple, pink, or multicolored yarn can completely change the personality of the project. Using approximately 20–30 yards (18–27 m) of yarn per bag, you can quickly create an entire collection without purchasing large quantities of material. The instructions below use U.S. crochet terminology and include approximate measurements that can easily be adjusted.
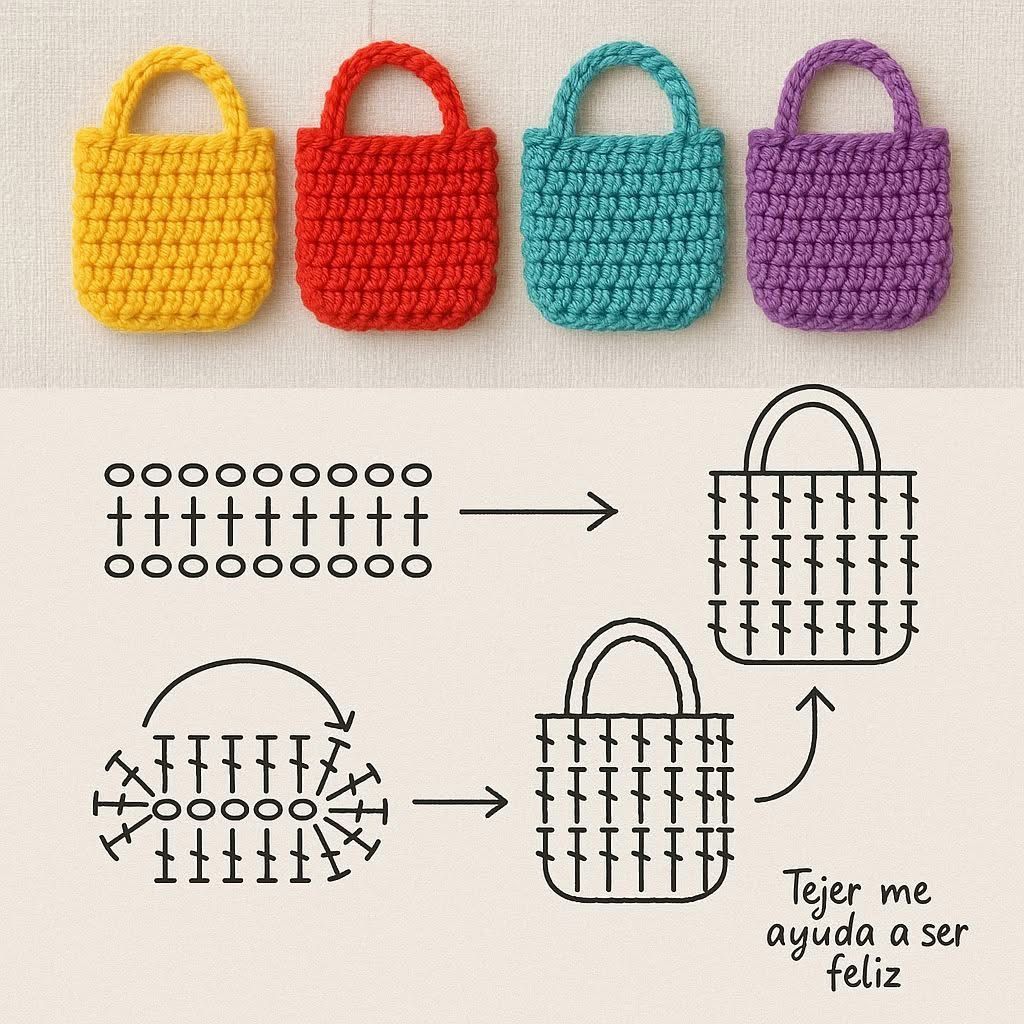
Materials, Crochet Stitches, and Measurements
For a small bag approximately 3½–4 inches (9–10 cm) wide and 3–3½ inches (7.5–9 cm) tall, choose a medium-weight cotton or acrylic yarn. Cotton provides excellent stitch definition and creates a slightly firmer bag, while acrylic produces a softer and more flexible result.
DISCOVER MORE FREE PATTERNS HERE!
A 3.5 mm (E/4) or 4 mm (G/6) crochet hook works well with medium-weight yarn. If your stitches are naturally loose, use the smaller hook because a dense fabric gives the miniature bag better structure.
You will also need scissors, a yarn needle, removable stitch markers, and a measuring tape. Optional additions include a keychain ring, small snap, button, decorative bead, miniature lining, or tiny appliqué.
The principal crochet stitches used in this pattern are chain (ch), slip stitch (sl st), and single crochet (sc). Depending on the appearance you prefer, half double crochet (hdc) can replace single crochet for a slightly taller stitch.
The abbreviations used throughout the tutorial are: ch = chain, sc = single crochet, hdc = half double crochet, sl st = slip stitch, st = stitch, sts = stitches, and rnd = round. All terminology follows standard U.S. crochet conventions.
Gauge is not critical for a decorative miniature bag. However, approximately 5–6 single crochet stitches per inch (2.5 cm) will produce a compact fabric similar to the inspiration. What matters most is maintaining consistent tension throughout the project.
How to Crochet the Base and Body of the Mini Bag
Start with ch 11. This foundation chain establishes the approximate width of the bag. If you want a wider version, simply add chains. For a smaller miniature bag, reduce the number while keeping enough stitches to create a recognizable rectangular shape.
For the first round, insert the hook into the second chain from the hook and work 1 sc in each chain across. When you reach the final chain, work additional single crochet stitches into that same chain to turn around the end.
Continue working along the opposite side of the foundation chain. Place 1 sc into each remaining loop until you return to the beginning. This method creates an oval foundation and eliminates the need to sew a separate bottom seam.
For the next round, work 1 sc in each stitch around. At the two ends, distribute a small number of increases if necessary to keep the base smooth. Avoid adding too many stitches because excessive increases will make the bag flare outward.
Once the base has reached approximately 3½ inches (9 cm) wide, stop increasing. Continue crocheting 1 sc in each stitch around. The fabric will naturally begin rising vertically, forming the walls of the bag.
Continue until the body measures approximately 2¾–3 inches (7–7.5 cm) from the bottom. You can make the bag deeper by adding more rounds. Finish the final body round with a sl st, cut the yarn, and weave in the end unless you plan to continue directly into the handle.
Creating the Mini Crochet Bag Handles and Finishing the Shape
Before crocheting the handles, flatten the bag and identify its front and back sections. Mark approximately the center 4–5 stitches on each side. Keeping the handles centered is important because even a small difference becomes noticeable on a miniature project.
Attach the yarn near the first marked position. Work approximately ch 12–15, depending on how tall you want the handle. A shorter chain creates a compact rounded handle, while additional chains produce a larger loop.
Bring the chain back toward the bag and attach it at the second marked position with a sl st. Check that the chain is not twisted. The handle should form a smooth arch over the top edge.
For a stronger handle, turn and work 1 sl st or 1 sc into each chain. Single crochet creates a thicker handle, while slip stitches produce a slimmer cord-like appearance. Fasten off and carefully weave the yarn ends into the interior.
Repeat exactly the same process on the opposite side. Count the number of chains used for the first handle and duplicate that number so both handles are identical.
To create an even sturdier handle, crochet a foundation chain and then work one additional row of sc before attaching it. Another option is to crochet the handles separately and sew them securely to the inside of the bag.
Finish by gently shaping the corners with your fingers. Cotton crochet can also be lightly blocked. Avoid overstretching because the attractive appearance of the mini crochet purse comes from its compact proportions and dense stitches.
Customizing Your Mini Crochet Bag Pattern
One of the easiest ways to personalize this Mini Crochet Bag Tutorial is through color. A single bold shade produces a modern appearance, while contrasting handles, striped rounds, or color-blocked sections create more playful versions.
For a keychain, attach a small metal ring securely through one of the upper corners or handles. Make sure the crocheted stitches around the attachment point are dense and reinforced if the bag will be carried frequently.
You can also add a small closure. Sew a tiny button to the front and crochet a short chain loop on the opposite side. A miniature snap can be hand-sewn inside the upper edge for a cleaner exterior appearance.
For a more decorative version, add a crochet flower, heart, star, bow, or small embroidered motif. Because the bag is tiny, even a simple embellishment becomes an important visual feature.
A lightweight fabric lining can be added when the bag will hold coins, jewelry, or other small objects. Cut two pieces of fabric slightly smaller than the finished bag, sew them together around three sides, turn the upper edge inward, and hand-stitch the lining inside.
Once you understand the basic construction, experiment with dimensions. A 2-inch (5 cm) bag can become a doll accessory or ornament, while a 5–6-inch (13–15 cm) version can work as a small pouch for everyday essentials.
Frequently Asked Questions About the Mini Crochet Bag Tutorial
Is this Mini Crochet Bag Tutorial suitable for beginners?
Yes. The project primarily uses chain stitches, single crochet, and slip stitches, making it suitable for beginners who already understand basic crochet.
What yarn is best for a mini crochet bag?
Cotton yarn is particularly effective because it produces clear stitches and good structure. Acrylic can also be used successfully.
What crochet hook should I use?
A 3.5–4 mm hook is a good starting point for medium-weight yarn. Always match the hook to your yarn and desired fabric density.
How much yarn does one mini bag require?
Approximately 20–30 yards (18–27 m) should be sufficient for most miniature versions, although the exact amount depends on yarn weight, dimensions, and handle style.
What is the finished size?
The tutorial produces a bag approximately 3½–4 inches (9–10 cm) wide and 3–3½ inches (7.5–9 cm) tall, excluding the handles.
Can I make the bag larger?
Yes. Increase the foundation chain to establish a wider base and crochet additional rounds for greater height.
How do I make the bag smaller?
Begin with fewer chains and work fewer body rounds. Using thinner yarn and a smaller hook will also create a more miniature result.
Why is my bag becoming wider as I crochet?
You may accidentally be adding stitches. Once the base is complete, count your stitches and maintain the same number in every body round.
Why are the sides curling inward?
Your tension may be too tight or your hook may be too small. Moving up one hook size can help.
Can I use half double crochet instead of single crochet?
Yes. Half double crochet (hdc) creates taller stitches and allows the bag to grow more quickly, although the fabric will look slightly different.
Can the handles be crocheted directly onto the bag?
Yes. This is often the simplest method because it minimizes sewing.
How can I make the handles stronger?
Work single crochet back across the handle chain or make a narrow crocheted strap instead of using a simple chain.
Can I turn this into a keychain?
Absolutely. These miniature bags work especially well as crochet keychain accessories.
Can leftover yarn be used?
Yes. This is an excellent scrap yarn crochet project because each bag requires only a small amount.
Should the finished bag be blocked?
Blocking is optional, but gentle blocking can improve the shape and make the stitches appear more even.
Conclusion
The Mini Crochet Bag Tutorial offers a simple way to transform a small amount of yarn into an adorable handmade accessory. Its straightforward construction makes it approachable for beginners while still giving experienced crocheters plenty of opportunities for customization.
The project begins with a short foundation chain, continues around both sides to form a seamless base, and then grows upward through repeated rounds of single crochet. Once the body reaches the desired height, small crocheted handles complete the recognizable miniature tote shape.
Color is one of the most enjoyable parts of this mini crochet bag pattern. Bright yellow, vivid red, turquoise, purple, pink, pastel combinations, or leftover multicolored yarn can all produce completely different results. Making several bags together is also an effective way to practice consistent tension and experiment with different yarns.
PATTERN VIDEO
Whether you use the finished piece as a keychain, doll accessory, tiny gift holder, ornament, party favor, or decorative miniature, this easy crochet bag pattern is a quick and satisfying project. Once the basic technique is mastered, changing the foundation-chain length, body height, handle size, and embellishments makes it possible to create an entire collection of unique little crochet bags.