
The Half Log Cabin Pattern is a beautiful variation of the traditional Log Cabin quilt block, using fabric strips arranged around only part of a starting square or rectangle to create a strong geometric movement. Instead of growing evenly around all four sides, the design develops primarily in one direction, producing the distinctive stepped or nested appearance that makes this block so interesting. It is an excellent quilt pattern for beginners because most of the construction relies on straight cutting, accurate seam allowances, pressing, and simple strip piecing.
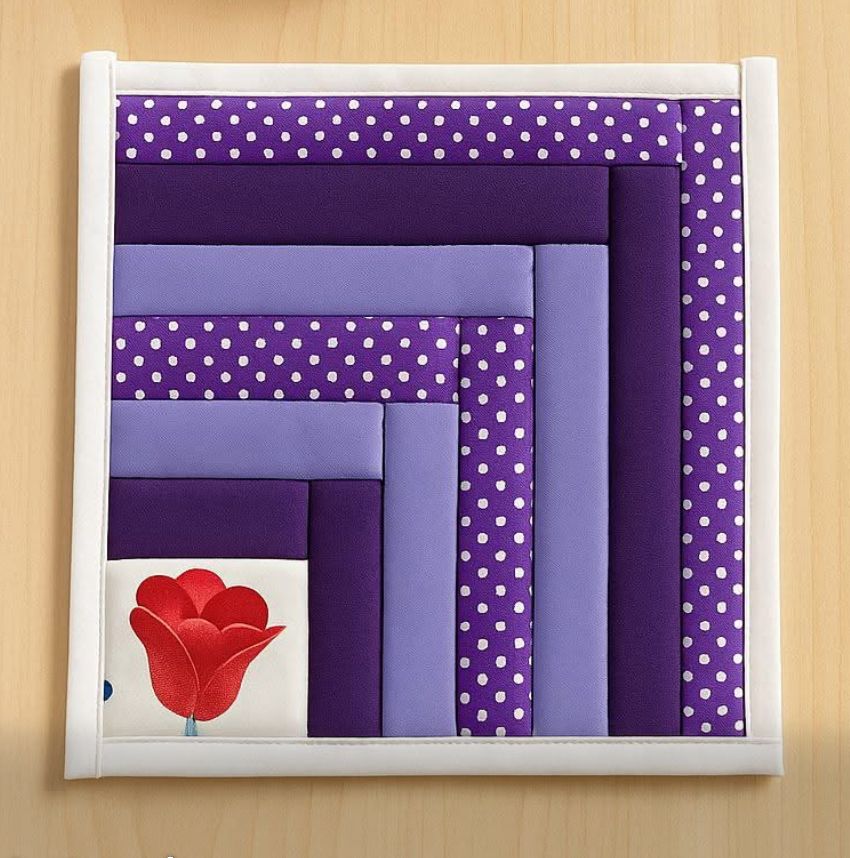
The block shown in the inspiration image demonstrates how effective this technique can be with only a few coordinated fabrics. Deep purple, violet, lavender, and a playful polka-dot print form the main structure, while a small floral accent adds personality near one corner. The surrounding light border gives the design definition and allows the colorful strips to stand out. You can reproduce this general arrangement or use the Half Log Cabin quilt block as a foundation for your own color combinations.
Another advantage of this pattern is its versatility. A single block can become a potholder, mini quilt, placemat, cushion front, or wall hanging, while multiple blocks can be rotated and joined to create larger quilts with completely different secondary patterns. This tutorial explains the construction from fabric selection through final quilting and binding, with measurements in both inches and centimeters so the project can be easily adapted.
Materials, Fabric Selection, Measurements, and Cutting
For a beginner-friendly practice block, plan for a finished Half Log Cabin Pattern measuring approximately 12 × 12 inches (30.5 × 30.5 cm). The exact dimensions can be adjusted, but keeping all strips the same width makes the construction much easier.
DISCOVER MORE FREE PATTERNS HERE!
Use good-quality quilting cotton because it presses cleanly and remains stable during repeated piecing. For a block inspired by the photograph, select four coordinating fabrics: a dark purple, a medium purple, a light lavender, and a purple print. Add a small contrasting floral or novelty fabric if you want an accent corner.
Cut the main strips approximately 2 inches (5 cm) wide. This provides a finished strip width of about 1½ inches (3.8 cm) after accounting for two ¼-inch seam allowances. If you prefer a finer design, 1½-inch (3.8 cm) strips can also be used.
A practical cutting approach is to cut several long strips from each fabric rather than calculating every individual length beforehand. Sew a strip into position, trim it flush with the growing block, and then add the next strip. This sew-and-trim method is particularly convenient for beginners and reduces measurement errors.
For the starting section, cut approximately a 3½ × 3½-inch (9 × 9 cm) square. This can be plain, floral, or another contrasting print. If you want an accent similar to the flower section visible in the example, choose a print containing one recognizable motif and carefully position the template over it before cutting. This technique is often called fussy cutting.
You will also need coordinating cotton thread, a sewing machine, rotary cutter, acrylic quilting ruler, self-healing cutting mat, iron, ironing surface, quilting pins or clips, backing fabric, batting, and binding fabric. A ¼-inch presser foot is especially useful because accurate seams determine whether the finished block remains square.
For a small wall hanging or potholder made from one block, approximately one fat quarter of each major fabric will usually provide more than enough material. Larger quilts require additional yardage depending on the number of blocks and the final layout.
How to Sew the Half Log Cabin Quilt Block
Begin by placing the center or accent square right side up. Position your first fabric strip along one edge with right sides together. Align the raw edges carefully and sew using an accurate ¼-inch (6 mm) seam allowance.
Press the seam before continuing. First set the seam by briefly pressing it as sewn, then open the strip and press the seam allowance toward the darker fabric whenever practical. Avoid dragging the iron back and forth because this can distort the straight edges of the block.
Trim the first strip so its ends are perfectly aligned with the center section. Rotate the work and place the second strip along the adjacent edge. Sew it with the same ¼-inch seam allowance, press it open, and trim the excess.
Continue building outward using this sequence. Unlike a conventional Log Cabin block where strips surround the center symmetrically, the Half Log Cabin block construction concentrates the strips around selected sides. This causes the starting square to remain visually close to a corner while the colorful “logs” expand outward.
Alternate your fabrics as the block grows. A sequence such as dark purple, lavender, printed purple, medium purple, and dark purple creates clear separation between neighboring strips. Repeating the print at regular intervals helps unify the overall design.
Check the block with a quilting ruler after every few strips. Each new strip should remain perpendicular to the previous one, and the outer edges should stay straight. Small inaccuracies accumulate quickly in Log Cabin construction, so correcting them early produces a much cleaner finished block.
Continue adding strips until the pieced section reaches approximately 12½ × 12½ inches (31.75 × 31.75 cm) unfinished. After the block is sewn into a project with a ¼-inch seam allowance around its perimeter, it will finish at approximately 12 × 12 inches (30.5 × 30.5 cm).
If your design requires a white outer frame like the inspiration piece, add narrow light-colored strips around the completed block. Sew opposite sides first, press, and then attach the remaining two borders. Square the block carefully after adding the frame.
Quilting, Assembly, and Creating Different Layouts
Once the quilt top is complete, prepare the quilt sandwich. Cut backing fabric and batting approximately 1–2 inches (2.5–5 cm) larger than the quilt top on every side. Place the backing wrong side up, batting in the middle, and pieced block right side up.
Smooth all three layers carefully. Secure them using quilting safety pins, temporary basting spray, or another preferred basting technique. The layers should lie flat without wrinkles, particularly around the raised seam allowances created during strip piecing.
For simple quilting, stitch in the ditch along the major seams. This means quilting very close to the seam line where two fabrics meet. It emphasizes the geometric Half Log Cabin design without competing with the colorful fabric arrangement.
Another option is straight-line quilting approximately ¼–½ inch (6–13 mm) away from selected seams. Parallel quilting lines reinforce the architectural appearance of the logs and are relatively easy to sew with a walking foot.
After quilting, trim the batting and backing even with the quilt top. Use a large square ruler whenever possible to ensure that every corner remains at 90 degrees. Accurate trimming makes the final binding substantially easier.
For binding, cut strips approximately 2½ inches (6.35 cm) wide. Join them end to end, press the long strip in half lengthwise, and attach it around the perimeter using your preferred machine or hand-binding technique.
A single block works beautifully as a mini quilt, mug rug, potholder, table mat, or wall decoration. For heat-related projects, choose batting specifically intended for that purpose rather than assuming ordinary polyester batting provides adequate heat protection.
Multiple blocks open up many more possibilities. Rotate alternating blocks by 90, 180, or 270 degrees before joining them. The lines created by the strips can form diamonds, stair steps, zigzags, large concentric shapes, or unexpected geometric pathways across the finished quilt.
Tips for Accurate Piecing, Color Placement, and Customization
Accuracy begins with cutting. Use a sharp rotary cutter and place the ruler directly over the measurement line rather than estimating. Consistent quilting strips are far more important than cutting every strip to its final length before sewing.
Maintain the same ¼-inch seam allowance throughout the project. If some seams are wider than others, the visible width of the logs will vary and the block may gradually lean to one side.
Press after every seam. Log Cabin blocks contain many seams packed into a relatively small area, so skipping the pressing stage can make the block bulky and difficult to square. Good pressing also creates the crisp geometric appearance associated with professionally made blocks.
Color value is equally important. Try arranging light, medium, and dark fabrics before sewing. Strong contrast makes the Half Log Cabin structure easier to recognize from a distance. Purple and lavender are beautiful together, but blue and white, red and cream, green and gold, or even a rainbow scrap arrangement can work equally well.
Printed fabrics add personality, but balance them with solids or subtle tone-on-tone fabrics. If every strip contains a busy print, the geometric structure may become difficult to see. A mixture of solid quilting cotton and printed fabric usually gives the clearest result.
Do not discard narrow scraps. One of the advantages of a scrap-friendly quilt pattern is that relatively small pieces can become additional logs. Sorting leftover strips by width and color makes future blocks faster to assemble.
Before joining multiple blocks, place them on the floor or a design wall and experiment with rotation. Take photographs of several arrangements. Comparing photographs often makes secondary geometric patterns easier to recognize than looking at the blocks directly.
Finally, remember that the dimensions are flexible. The same construction can produce a tiny 6-inch block, a standard 12-inch block, or a much larger decorative panel. The essential principle remains the same: begin with a focal section and progressively add rectangular fabric strips to create the characteristic offset growth.
FAQ – Half Log Cabin Pattern
What is a Half Log Cabin quilt block?
A Half Log Cabin quilt block is a variation of the classic Log Cabin design in which fabric strips are added around selected sides of a starting square instead of developing equally around all four sides. This creates an offset, stepped appearance.
Is the Half Log Cabin Pattern suitable for beginners?
Yes. It is an excellent project for learning strip piecing, accurate cutting, pressing, and ¼-inch seams. The construction uses mostly straight seams.
What strip width should I use?
For the example in this tutorial, 2-inch (5 cm) strips are a comfortable choice. After seam allowances, approximately 1½ inches (3.8 cm) of each strip remains visible.
What size should the finished block be?
A convenient size is approximately 12 × 12 inches (30.5 × 30.5 cm) finished. However, the pattern can be resized simply by changing the starting square, strip width, or number of strips.
Can I make this quilt with fabric scraps?
Yes. The pattern is particularly well suited to scrap quilting because many of the logs require relatively small pieces.
Do all the strips need to be the same width?
No, but consistent widths create a cleaner traditional appearance and are easier for beginners. Intentionally mixing widths can produce a more improvisational modern quilt.
Should I press seams open or to one side?
For this project, pressing toward the darker fabric is generally convenient. However, bulky intersections sometimes benefit from adjusting the pressing direction.
Why is my Log Cabin block becoming crooked?
The most common causes are inconsistent seam allowances, inaccurate cutting, stretching during pressing, or failing to trim each strip flush before attaching the next one.
Can I add appliqué to the block?
Yes. A floral appliqué, heart, animal silhouette, or other decorative motif can create an attractive focal point in the starting corner, similar to the flower accent seen in the inspiration design.
Can I use jelly roll strips?
Absolutely. Standard jelly roll strips are typically about 2½ inches wide and work very well for larger Half Log Cabin quilt patterns. Just remember that changing the strip width changes the final block dimensions.
How many blocks do I need for a quilt?
That depends on block and quilt size. For example, a layout of 4 × 5 twelve-inch finished blocks produces a pieced area of approximately 48 × 60 inches (122 × 152 cm) before additional borders.
What fabrics work best?
Quilting cotton is the easiest option because it is stable, easy to cut, and presses well. Coordinating solids, small prints, florals, dots, and tone-on-tone fabrics can all produce excellent results.
Conclusion
The Half Log Cabin Pattern proves that simple fabric strips can create an impressive geometric quilt design. By starting with a small focal square and gradually adding accurately cut logs around selected sides, you can build a block with movement, depth, and endless possibilities for color placement.
Careful cutting, consistent ¼-inch seams, pressing after every step, and regular squaring are the keys to professional-looking results. The construction is repetitive enough to be relaxing while still offering plenty of opportunities to experiment with fabrics and layouts.
PATTERN VIDEO:
Whether you make one block as a decorative mini quilt or combine dozens into a full-size Half Log Cabin quilt, this pattern is an excellent addition to a quilter’s collection. Purple and lavender can create an elegant version like the inspiration design, while scraps, seasonal colors, modern solids, or treasured prints can transform the same basic technique into a completely different handmade project.