
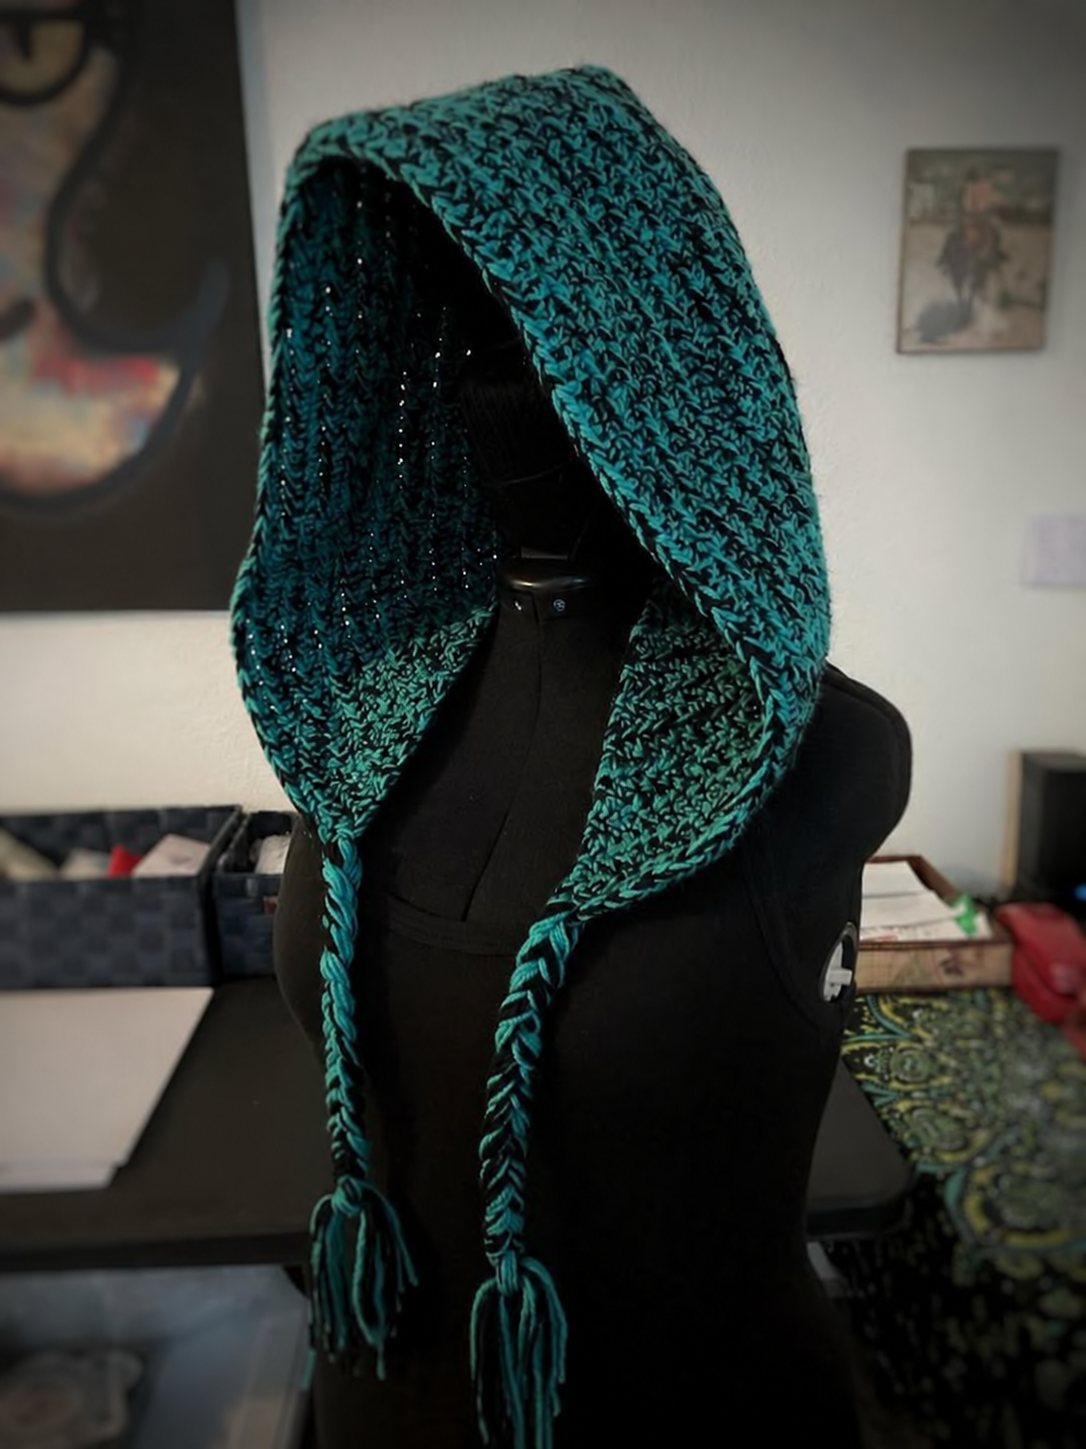
The Crochet Hood Pattern for Beginners is a comfortable and stylish project designed for anyone who wants to make a practical cold-weather accessory while practicing essential crochet techniques. Inspired by the hood shown in the photo, this design features a generously shaped hood, a textured crochet fabric, a wide opening around the face, and two long braided ties finished with tassels. The result combines the warmth of a hood with the relaxed appearance of a handmade scarf, making it an attractive project for fall and winter.
One of the best things about this beginner crochet hood is that you do not need advanced garment-making experience to create it. Instead of complicated shaping, the hood can be constructed from a simple rectangular panel that is folded and seamed at the back. A decorative border gives the opening a finished appearance, while braided cords extend from the lower corners. Once you understand basic chain stitches, single crochet, half double crochet, and slip stitches, most of the construction becomes repetitive and relaxing.
The color combination can also make this pattern especially beautiful. The inspiration uses a deep teal or turquoise mixed with a darker shade, producing a subtle marled effect that emphasizes the crochet texture. You can reproduce this appearance by holding two thinner yarns together or by selecting a variegated yarn. Solid cream, burgundy, charcoal, forest green, navy, or dusty rose would also work wonderfully for this easy crochet hood pattern.
Materials, Yarn, Hook Size, and Crochet Measurements
For an adult-size Crochet Hood Pattern for Beginners, approximately 350–500 yards (320–460 m) of medium or bulky yarn is a useful starting amount. The exact yardage depends on yarn thickness, hood dimensions, stitch choice, and whether you add long braids and tassels.
DISCOVER MORE FREE PATTERNS HERE!
A worsted-weight #4 yarn held double can create the dense, marled appearance visible in the inspiration. Alternatively, use a single strand of bulky #5 yarn. Choose something soft because the finished hood will rest directly against the neck, forehead, and sides of the face.
For worsted yarn held double, try a 6–7 mm crochet hook. A 6.5 mm hook is an excellent starting point. If using a single strand of bulky yarn, check the manufacturer’s suggested hook range and make a small swatch before beginning.
You will also need scissors, a yarn needle, stitch markers, measuring tape, and a piece of cardboard if you want evenly sized tassels. No buttons, zippers, or complicated closures are necessary for this basic version.
A practical adult finished size is approximately 12–13 inches (30.5–33 cm) deep and 14–16 inches (35.5–40.5 cm) high when the hood is lying flat. The face opening should remain loose enough to frame the head without pulling backward.
This tutorial uses U.S. crochet terminology. The main abbreviations are ch = chain, sc = single crochet, hdc = half double crochet, dc = double crochet, sl st = slip stitch, st = stitch, sts = stitches. The primary fabric can be worked almost entirely in half double crochet.
How to Crochet the Main Hood for Beginners
Begin by making a foundation chain long enough to measure approximately 14–16 inches (35.5–40.5 cm). With a medium-to-bulky combination, this may be around 45–55 chains, but measuring is more reliable than depending on an exact stitch count because yarn thickness varies.
For Row 1, work 1 hdc in the second or third chain from the hook, depending on your preferred turning-chain method, and continue with 1 hdc in each chain across. Chain 1 or 2 and turn.
For Row 2, work 1 hdc in every stitch across. If you want more pronounced texture, insert the hook through the back loop only (BLO) of each stitch. This produces subtle horizontal ridges and gives the fabric more visual depth.
Continue repeating Row 2 until the rectangle measures approximately 24–26 inches (61–66 cm) in length. Try wrapping the panel loosely over your head occasionally. It should comfortably travel from one lower side of the face, over the head, and toward the opposite side.
Once the rectangle reaches the desired size, fasten off while leaving a long yarn tail. Fold the rectangle in half so the two shorter edges align. One folded edge will become the top/back portion of the hood, while the open sides form the face and neck areas.
Using the long tail and a yarn needle, seam approximately 10–12 inches (25.5–30.5 cm) along the back edge. A mattress stitch or whipstitch works well. Turn the hood right side out and check the shape before weaving in the yarn end.
Creating the Face Border and Comfortable Neck Opening
After assembling the basic crochet hood, the next step is refining the opening. Join the yarn near one lower front corner and work evenly around the entire face opening.
For the first border round, work single crochet stitches around the opening. Along row ends, distribute the stitches carefully so the edge does not ripple or become too tight. The goal is a smooth border that follows the natural shape of the hood.
For the second round, work 1 hdc in each stitch. If you want a wider border like the one visible in the inspiration, repeat this round two or three more times. A contrasting yarn can make this section especially attractive.
You can also alternate teal and black yarn or hold both colors together throughout the project. This creates the two-tone crochet texture visible in the photographed hood without requiring frequent color changes.
At the lower neck edge, work another row of sc to stabilize the fabric. If you want the hood to sit closer around the neck, make a few evenly spaced decreases. Avoid excessive decreases because the accessory should remain easy to pull over the head.
Try the hood on again before finishing. The crown should have enough room that it does not flatten the hair excessively, while the face opening should fall naturally along the forehead and cheeks. Adjust the border with another round if additional coverage is desired.
Making the Braided Ties, Tassels, and Final Details
The long braided ties are one of the defining elements of this Crochet Hood Pattern for Beginners. Cut several strands of yarn approximately 30–36 inches (76–91 cm) long. Remember that braiding shortens the final length.
Divide the strands into three equal groups. Secure them through one lower corner of the hood and create a firm three-strand braid. Stop when the finished braid measures approximately 16–20 inches (40.5–51 cm).
Repeat on the opposite side, making sure both braids are approximately the same length. Matching ties make the finished hood look more balanced and professional.
To create a tassel, wrap yarn around a piece of cardboard approximately 3–4 inches (7.5–10 cm) wide. Wrap it 20–30 times, depending on the thickness of your yarn and how full you want the tassel.
Tie the wrapped strands securely at one end, remove them from the cardboard, and cut through the loops at the opposite end. Wrap another yarn strand around the upper portion to create the tassel neck. Trim the ends until they are even.
Attach one tassel securely to each braided cord. Weave in all remaining ends, check the seams, and gently shape the hood. If your yarn can be blocked according to its care instructions, light blocking can help relax the stitches and improve the drape.
FAQ About the Crochet Hood Pattern for Beginners
Is this Crochet Hood Pattern suitable for complete beginners?
Yes. The basic construction uses a rectangle, a simple seam, a border, and braided ties. Beginners who know chain and half double crochet can practice the remaining techniques while making the project.
What yarn is best for a crochet hood?
Soft worsted #4 or bulky #5 yarn works particularly well. Acrylic, wool blends, and other soft fibers can all be suitable depending on the warmth and care requirements you prefer.
How much yarn do I need?
Approximately 350–500 yards (320–460 m) is a reasonable estimate for an adult hood with long ties. Larger hoods and oversized tassels will require more.
What hook size should I use?
A 6–7 mm hook works well for many medium yarns held double or bulky yarns, but always adjust according to your yarn and tension.
How can I reproduce the two-color effect?
Hold one strand of teal yarn and one strand of black or charcoal yarn together. Crochet them as though they were one thicker strand.
Can I make the hood in one solid color?
Absolutely. Cream, black, gray, burgundy, navy, forest green, teal, and earthy neutrals can all create attractive versions.
How do I make a larger hood?
Increase both the width and length of the starting rectangle. Add approximately 1–2 inches (2.5–5 cm) at a time and test the fit before seaming.
Can I make the hood smaller?
Yes. Reduce the starting chain and crochet fewer rows. This is preferable to simply using a smaller hook because you can control the actual finished dimensions.
What stitch is easiest for this hood?
Half double crochet (hdc) provides an excellent balance between speed, warmth, flexibility, and stitch definition.
How can I make the fabric more textured?
Work hdc stitches in the back loop only or alternate standard hdc rows with BLO rows.
Are the braided cords necessary?
No. The hood can be worn without them. However, the braids add decorative detail and allow the lower edges to be gently positioned around the neck.
How long should the braids be?
Approximately 16–20 inches (40.5–51 cm) after braiding works well for an adult version. Make them shorter or longer according to your preferred style.
Can I add a lining?
Yes. An experienced sewer could add a lightweight fleece or fabric lining for additional warmth, although this is optional and not necessary for the basic crochet construction.
How should I wash the finished hood?
Follow the care instructions printed on your yarn label. Gentle washing and flat drying are often useful for preserving the shape of handmade crochet accessories, but the yarn manufacturer’s instructions should take priority.
Conclusion
The Crochet Hood Pattern for Beginners is an approachable way to make a cozy accessory while learning useful crochet skills. A straightforward rectangular construction eliminates complicated garment shaping, while the textured stitches, generous hood opening, long braided cords, and tassels give the finished project a much more detailed appearance.
The pattern is also highly customizable. You can recreate the striking teal-and-dark combination from the inspiration, hold two colors together for a marled appearance, or choose a single favorite shade. Adjusting the rectangle measurements makes it possible to create a more fitted hood or an oversized, relaxed version.
VIDEO PATTERN:
With basic half double crochet stitches, a simple back seam, an even face border, and two handmade braids, you can turn yarn into a comfortable winter accessory that looks polished without requiring advanced techniques. For anyone searching for an easy crochet hood, a beginner hooded scarf project, or a practical handmade gift, this Crochet Hood Pattern offers a simple foundation with plenty of room for creativity.