
Fabric Christmas Tree Pattern is a charming sewing and quilting project that transforms small pieces of fabric, lace, ribbon, and simple embellishments into a beautiful handmade Christmas decoration. Inspired by the layered tree in the reference image, this design combines ruffled fabric tiers, traditional red-and-white prints, rustic neutral textures, stars, bows, and festive accents. The finished tree has a warm farmhouse appearance that works beautifully as a centerpiece, shelf decoration, mantel accent, or handmade holiday gift.
One of the most attractive features of this Fabric Christmas Tree Pattern is the opportunity to use fabric scraps. The individual ruffles require relatively narrow strips, so leftover quilting cotton from previous projects can easily become part of the design. Red solids, gingham, tiny Christmas prints, cream cotton, muslin, burlap-style fabric, and lace can all be combined. Instead of requiring perfectly matching fabrics, the project becomes more interesting when several coordinating textures and prints are layered together.
The construction is also highly customizable. The tutorial below creates a freestanding tree approximately 14–16 inches (35.5–40.5 cm) tall, but the measurements can be scaled for smaller ornaments or larger tabletop decorations. The basic technique is to make a firm cone-shaped foundation and then cover it gradually with gathered or pleated fabric tiers. Because this is primarily a decorative sewing project rather than a traditional pieced quilt block, quilting techniques such as fabric selection, layering, topstitching, and scrap coordination are combined with simple dimensional construction.
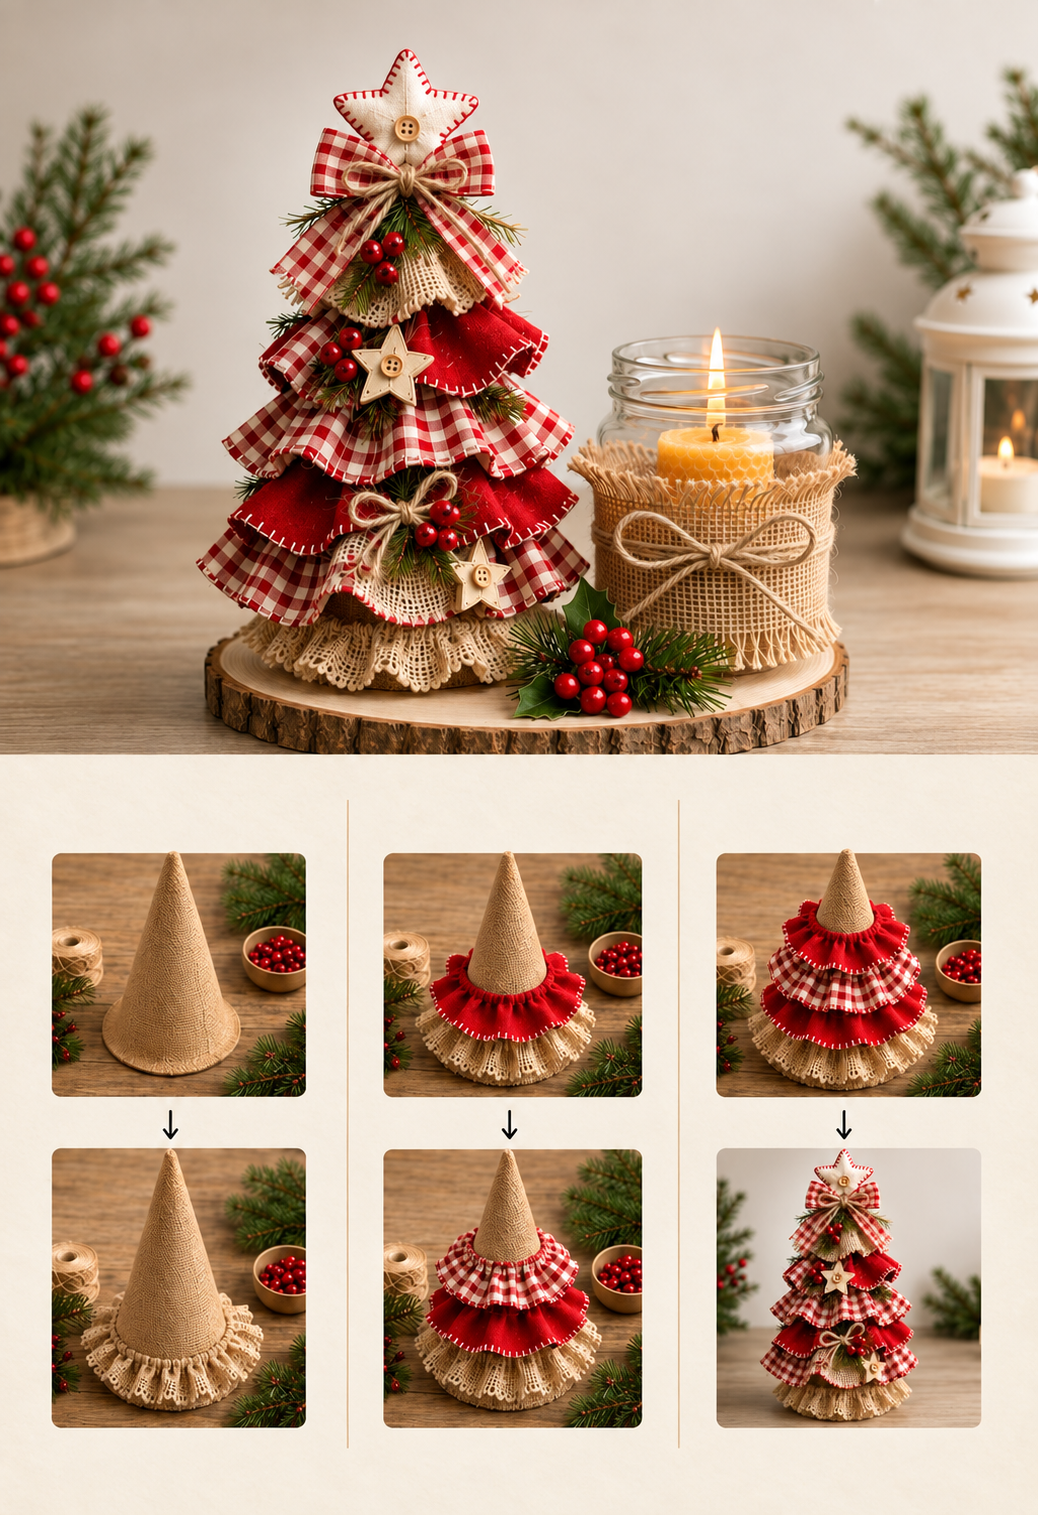
Materials, Measurements and Preparing the Tree Foundation
For one medium Fabric Christmas Tree Pattern, prepare approximately ½ yard (46 cm) of assorted red fabrics, ¼–½ yard (23–46 cm) of cream or neutral fabrics, and several smaller scraps of gingham or Christmas prints. Exact yardage depends on how full you make the ruffles.
DISCOVER MORE FREE PATTERNS HERE!
Choose primarily 100% quilting cotton for the gathered tiers. Quilting cotton is easy to press, gathers evenly, and holds its shape without becoming excessively bulky. Lightweight linen-look cotton can be incorporated for additional rustic texture.
You will also need medium- to heavyweight interfacing or stabilizer for the cone, coordinating sewing thread, scissors or a rotary cutter, cutting mat, ruler, pins or clips, hand-sewing needle, iron, and sewing machine. Decorative lace approximately 1–2 inches (2.5–5 cm) wide can be incorporated between several layers.
For a tree approximately 15 inches (38 cm) tall, create a cone foundation with a base diameter of approximately 7–8 inches (18–20 cm). A flexible paper template can be used first so you can test the proportions before cutting fabric and stabilizer.
Cut two cone pieces if you want a fabric-covered structure: one from the main neutral fabric and one from firm stabilizer. Use approximately a ¼-inch (6 mm) seam allowance unless your preferred construction method requires something different.
If you want a completely soft tree, sew the cone from fabric, turn it right side out, and fill it firmly with polyester fiberfill. A circular fabric base can then be hand-sewn to the bottom. For a more rigid tabletop version, use heavy interfacing or another sewing-appropriate internal stabilizer.
Before adding the ruffles, mark horizontal placement lines around the cone approximately 1½–2 inches (4–5 cm) apart. These marks act as guides and help prevent the finished tiers from drifting upward or downward as you work.
Cutting and Sewing the Layered Fabric Ruffles
The ruffles are the defining feature of this quilted Christmas tree decoration. For the bottom tier, cut a strip approximately 3½–4 inches (9–10 cm) wide. The strip should measure roughly 1.5 to 2 times the circumference of the cone at its attachment point.
For example, if the cone measures 20 inches (51 cm) around near the base, prepare approximately 30–40 inches (76–102 cm) of fabric for a generously gathered ruffle. Join multiple scrap strips if necessary.
Finish the lower edge before gathering. You can make a narrow double-fold hem, use a decorative machine stitch, or add lace underneath. The inspiration piece uses visible contrasting details, so white blanket-style topstitching along a red edge can produce an especially charming handmade appearance.
Sew two parallel rows of long machine basting stitches approximately ⅛ and ¼ inch (3 and 6 mm) from the upper raw edge. Do not backstitch. Pull the bobbin threads gradually to gather the strip until it fits comfortably around the cone.
Position the first ruffle near the bottom. The hemmed portion should extend slightly beyond the base to soften the silhouette. Pin or clip it carefully, distributing the gathers evenly around the entire circumference.
Stitch the upper edge securely to the fabric foundation. If your cone contains very rigid stabilizer that cannot comfortably pass through a sewing machine, prepare the ruffle as a complete circular band first and attach it with strong hand stitches.
For the second tier, use another fabric—perhaps cream lace, red gingham, or a small Christmas print. Cut it slightly narrower than the first tier. As the tree becomes narrower toward the top, each subsequent ruffle requires less fabric.
Continue alternating colors and textures. A particularly effective sequence is cream lace, solid red, red-and-white gingham, solid red, cream, and gingham. Avoid repeating every tier identically; subtle variation gives the tree a handcrafted patchwork character.
Building the Tree and Adding Patchwork Christmas Details
After the first two tiers are secured, continue upward following the horizontal guide marks. Each new ruffle should overlap the attachment seam of the tier beneath it. This creates the full, layered silhouette seen in the Fabric Christmas Tree Pattern.
The overlap can be approximately ½–1 inch (1.3–2.5 cm). Too little overlap exposes the cone foundation, while excessive overlap hides too much of the decorative fabric.
As you reach the middle of the tree, reduce the ruffle width to approximately 2½–3 inches (6.5–7.5 cm). Near the upper section, strips measuring approximately 2 inches (5 cm) wide usually create better proportions.
You can introduce small patchwork sections by joining several different fabrics before gathering a strip. For example, sew a 6-inch (15 cm) section of gingham to a 6-inch section of red floral fabric and then to cream fabric. Press the seams before gathering.
For the rustic handmade effect, add narrow jute-colored ribbon, cotton lace, or decorative twine bows between selected tiers. Keep the embellishments relatively small so they complement rather than cover the patchwork fabrics.
Small stuffed stars make excellent decorations. Draw or print a simple five-point star approximately 2½–3 inches (6.5–7.5 cm) across. Cut two fabric pieces, place right sides together, and sew around the shape while leaving a small turning opening.
Clip carefully around the inner corners without cutting the stitching. Turn the star right side out, lightly fill it with polyester fiberfill, and close the opening by hand. Decorative blanket stitching can then be worked around the outside edge using contrasting red embroidery thread.
Create several smaller stars for the body of the tree and one larger tree topper star approximately 3½–4 inches (9–10 cm) across. A wooden-look or neutral button sewn at the center adds another farmhouse-style detail.
Red berry decorations can be added in small clusters. For a completely textile-based version, make tiny stuffed fabric berries or small felt circles rather than using hard decorative pieces. Add short pieces of artificial greenery only when the tree is intended strictly as interior decoration.
Final Assembly, Finishing and Christmas Tree Variations
When all ruffles are attached, inspect the tree from every side. The fabric Christmas tree should appear full and balanced rather than heavily decorated on only the front. Rotate the tree as you position each embellishment.
Attach the largest star securely at the top. Immediately below it, add a gingham bow approximately 4–5 inches (10–13 cm) across. A smaller twine bow layered over the fabric bow can create additional texture.
Place small stars, berries, bows, and greenery at irregular intervals. A slightly asymmetrical arrangement generally looks more natural than placing one decoration in exactly the same position on every tier.
For the base, cut a circle approximately ½ inch (1.3 cm) larger than the bottom opening. Turn the seam allowance inward and hand-sew the circle neatly to the cone. If the tree needs extra stability, a fabric-covered rigid insert can be incorporated into the base during construction.
A finished medium tree can measure approximately 15 inches (38 cm) high and 8 inches (20 cm) wide. A miniature version can be made at 8–10 inches (20–25 cm), while a dramatic tabletop centerpiece might measure 20–24 inches (51–61 cm).
For a traditional Christmas tree, use deep red, forest green, cream, and gold. For farmhouse decor, combine red gingham, natural linen, cream lace, and muted greenery. A winter version can use white, silver-gray, icy blue, and navy.
You can also create an entire set in graduated sizes. Three trees approximately 9, 13, and 17 inches (23, 33, and 43 cm) tall make an attractive grouped centerpiece. Use the same fabric collection but change the order of the ruffles on each tree.
If the tree will be displayed near a candle, fireplace, or other heat source, keep appropriate distance and use only according to the safety requirements of the surrounding products. Fabric, fiberfill, ribbon, and decorative greenery are combustible materials. Battery-operated decorative lights are generally more appropriate for incorporating directly into textile displays than open flames.
FAQ – Fabric Christmas Tree Pattern
Is the Fabric Christmas Tree Pattern suitable for beginners?
Yes. The main skills are straight sewing, gathering fabric, basic hand stitching, and simple dimensional assembly.
What fabric works best?
100% quilting cotton is an excellent choice because it is easy to cut, sew, gather, and press.
How much fabric do I need?
Approximately ½ yard (46 cm) of assorted red fabrics and ¼–½ yard (23–46 cm) of neutral fabrics is generally enough for a medium tree, although very full ruffles require more.
How tall is the finished Christmas tree?
The example measurements create a tree approximately 14–16 inches (35.5–40.5 cm) tall.
How wide should the base be?
A base approximately 7–8 inches (18–20 cm) across creates attractive proportions for a 15-inch tree.
What seam allowance should I use?
A ¼-inch (6 mm) seam allowance works well for most parts of this decorative project.
How long should the ruffle strips be?
Use approximately 1.5–2 times the circumference of the cone at the point where each ruffle will be attached.
How wide should the bottom ruffle be?
Approximately 3½–4 inches (9–10 cm) is a useful starting measurement.
Should the upper ruffles be smaller?
Yes. Gradually reduce both the width and length as you move toward the top.
Can I use fabric scraps?
Absolutely. This is an excellent Christmas scrap fabric project because individual ruffles can be pieced from several coordinating scraps.
Can I use lace?
Yes. Cotton lace adds beautiful texture when layered beneath red or gingham fabric.
How do I make the ruffles?
Sew two rows of long basting stitches along the upper edge and gently pull the bobbin threads until the strip reaches the required circumference.
Can I make the cone completely from fabric?
Yes. Use firm interfacing and stuffing to help the tree retain its shape.
How do I make the star topper?
Cut two matching star shapes, sew them together, turn, lightly stuff, and close the opening. Decorative blanket stitching can be added around the perimeter.
Can I make the tree without stuffing?
Yes. A sufficiently firm internal stabilizer can support the cone without fiberfill.
What colors look good for this pattern?
Classic combinations include red and cream, red and green, burgundy and beige, white and gold, or blue and silver.
Can I make several trees in different sizes?
Yes. Scaling the cone template and adjusting the ruffle measurements makes it easy to create a coordinated set.
Can I wash the finished tree?
Because the project may contain interfacing, lace, buttons, bows, and decorative elements, spot cleaning is usually more practical. Always consider the care requirements of every material used.
Conclusion
The Fabric Christmas Tree Pattern is a wonderful way to combine quilting cotton, fabric scraps, lace, gingham, and traditional Christmas colors in a dimensional holiday decoration. The cone foundation provides the structure, while progressively smaller gathered fabric ruffles create the recognizable layered Christmas-tree silhouette.
This project is particularly useful for leftover materials. Even relatively small pieces of red fabric, cream cotton, Christmas prints, gingham, and lace can become individual tiers, stars, bows, or decorative details. That makes every finished tree slightly different.
The design is also easy to personalize. A rustic farmhouse tree can feature red gingham and natural linen, while an elegant version can combine ivory, gold, and velvet-inspired fabrics. Traditional green and red can create a classic Christmas appearance, and icy blue with white offers a winter-themed alternative.
With careful gathering, consistent spacing, secure stitching, and thoughtful embellishment placement, this Fabric Christmas Tree Pattern becomes an impressive handmade centerpiece that looks much more elaborate than its basic construction suggests. It is a beautiful seasonal sewing project for using favorite fabrics and creating a reusable Christmas decoration that can return to your holiday display year after year.