
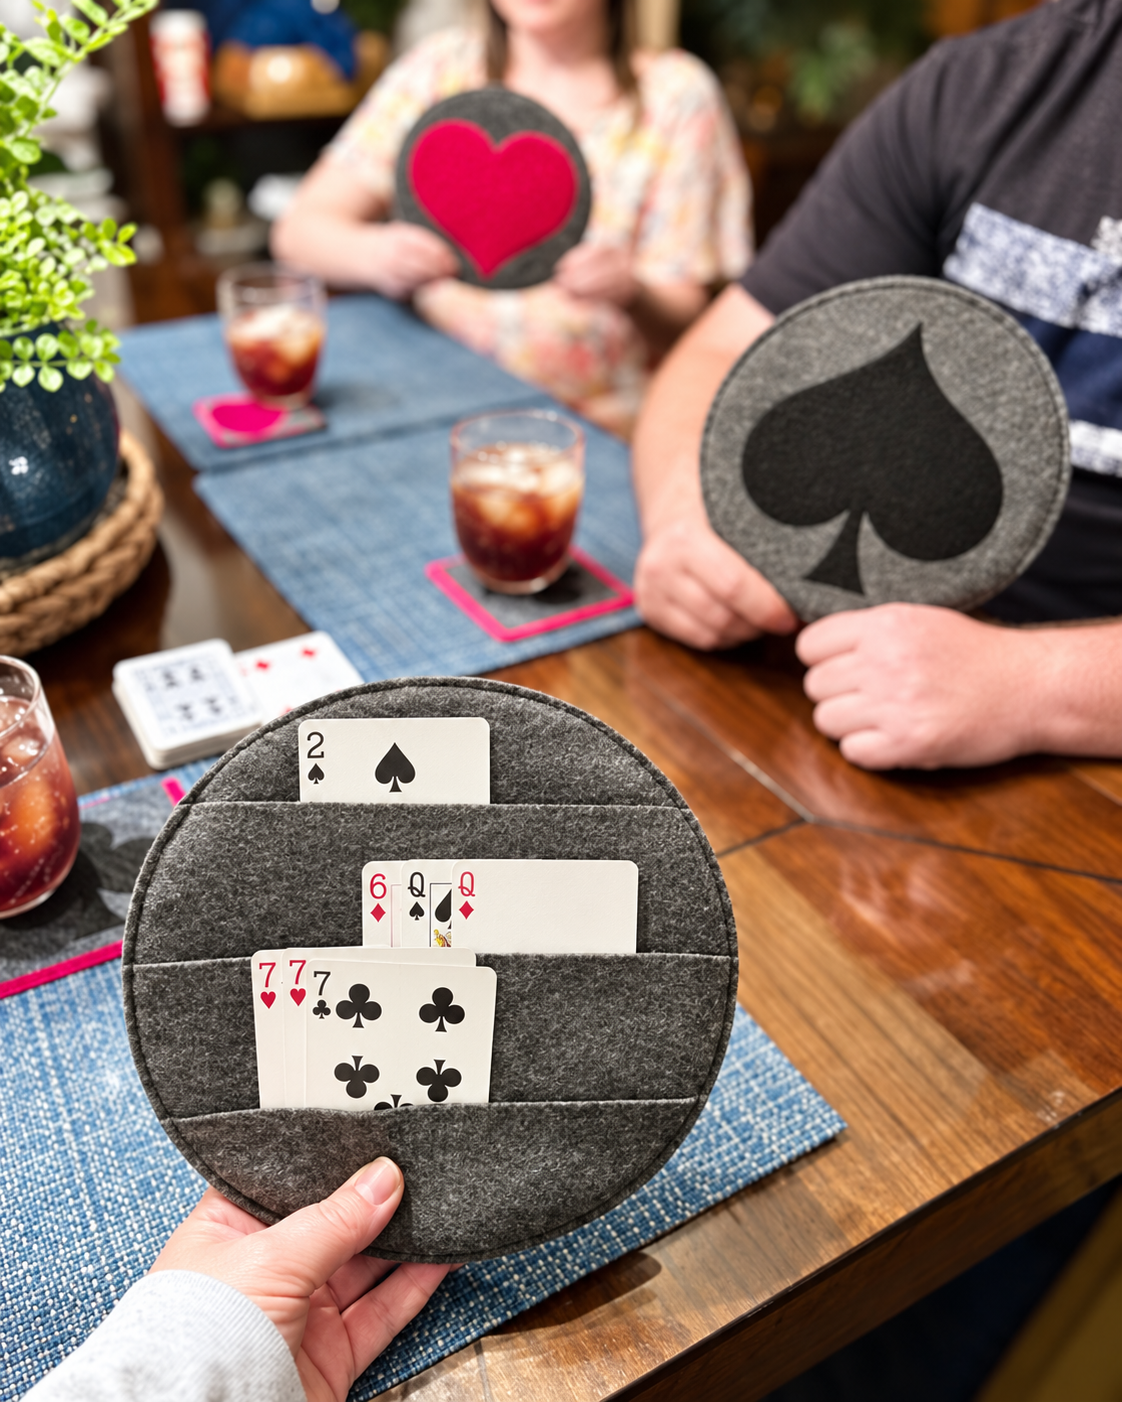
Card Support Pattern is a practical and attractive sewing project designed to make card games easier and more comfortable. Inspired by the round fabric card holder shown in the reference, this project uses a firm circular base with several horizontal fabric pockets that hold playing cards upright and clearly visible. It is especially useful when a player wants to keep several cards organized without continuously holding an entire hand.
A handmade Card Support Pattern is also a wonderful scrap-friendly project. The design can be made from quilting cotton, felt, denim, canvas, or coordinated fabric remnants. A padded or stabilized center gives the holder enough structure to remain upright, while layered pockets across the front create separate rows for sorting cards. Decorative appliqués on the reverse side—such as hearts, spades, clubs, or diamonds—can give each holder a personalized playing-card theme.
Although the finished project looks polished, its construction is approachable for anyone comfortable with basic machine sewing. The circular shape is created from simple layers, while the card pockets are essentially folded strips attached at different heights. This tutorial uses a finished diameter of approximately 11 inches (28 cm), but the dimensions can easily be enlarged or reduced. Seam allowances, interfacing, quilting, binding, and careful topstitching help turn a simple fabric project into a durable quilted playing card holder.
Materials, Measurements and Preparing the Circular Base
For one Card Support Pattern, begin with approximately ¼ yard (23 cm) of main fabric and several coordinating scraps for the pockets and optional appliqués. If you want a monochromatic version similar to the inspiration, dark gray, charcoal, navy, or burgundy can create an elegant finished holder.
DISCOVER MORE FREE PATTERNS HERE!
You will also need batting or fusible fleece and a firm stabilizer. Medium- to heavyweight interfacing is particularly helpful because the finished circle needs enough body to support several playing cards without folding forward.
For a finished holder approximately 11 inches (28 cm) in diameter, cut two circles approximately 11½ inches (29 cm) in diameter. One will become the front foundation and the other the back.
Cut one batting circle and one stabilizer circle approximately the same size. Depending on the thickness of your materials, you may trim the batting slightly smaller to reduce bulk around the outer seam.
For the pocket section, prepare three strips approximately 11½ inches (29 cm) wide. Suggested cut heights are approximately 4½ inches (11.5 cm), 5 inches (12.7 cm), and 5½ inches (14 cm). Each strip will be folded, so the visible pocket will be considerably shorter.
Use a standard ¼-inch (6 mm) seam allowance for piecing unless another measurement is specified. Around the final perimeter, a ⅜-inch (1 cm) allowance provides additional control when several layers are being joined.
Fuse the stabilizer to the wrong side of the front or back fabric according to the manufacturer’s directions. Place the batting against the opposite circle.
If desired, lightly quilt the back panel. Simple straight lines, concentric circles, or a subtle crosshatch pattern will provide stability without distracting from the design.
The reverse side is an excellent place for decorative appliqué. Cut a heart, spade, club, or diamond from contrasting fabric and position it in the center.
Use fusible web to secure the appliqué temporarily, then stitch around the perimeter using a narrow zigzag, blanket stitch, or straight appliqué stitch.
For a set of four holders, consider making one for each playing-card suit. This creates a coordinated card game sewing project that also makes an attractive handmade gift.
Press every piece before assembly. Accurate pressing is particularly important because wrinkles trapped inside the stabilized circle are difficult to remove later.
Place an actual playing card against your pocket strips before sewing. Standard poker cards measure approximately 2½ × 3½ inches (6.4 × 8.9 cm), so each pocket needs enough depth to hold the lower portion of a card while leaving the rank and suit visible.
Sewing the Layered Playing Card Pockets
The most important feature of this Card Support Pattern is the series of horizontal pockets across the front.
Take the first fabric strip and fold it in half lengthwise with wrong sides together. Press firmly.
Topstitch approximately ⅛ inch (3 mm) from the folded edge. This creates a crisp, reinforced pocket opening.
Repeat the process with the remaining pocket strips.
Position the lowest pocket first. Its folded opening should sit approximately 3–3½ inches (7.5–9 cm) above the bottom edge of the circle.
Temporarily pin or clip it in place.
Position the middle pocket approximately 2–2½ inches (5–6.5 cm) above the first pocket opening.
Add the upper pocket in the same manner, checking that each row remains accessible.
Before stitching anything permanently, insert several playing cards into the temporary pockets.
The cards should overlap slightly while still showing enough of their upper corners to identify them easily.
If too much of a card disappears, reduce the pocket depth. If the cards feel unstable, make the pocket slightly deeper.
Once satisfied with the placement, baste each pocket to the front foundation along the curved outer edges.
The lower raw portions of the upper pockets can be concealed behind the pocket beneath them, producing the clean layered appearance visible in the inspiration.
Keep the horizontal openings parallel.
A quilting ruler can help ensure that the pocket lines do not gradually tilt.
You may also divide a long pocket into sections with short vertical seams. However, leaving each row completely open provides more freedom for arranging different numbers of cards.
After all pockets have been basted, place the front panel on a flat surface and check for puckering.
Trim the excess pocket fabric to match the circumference of the front circle.
Machine-baste around the entire outer edge approximately ⅛ inch (3 mm) from the raw edge. This secures all pocket layers before final assembly.
For extra reinforcement, topstitch the lower visible edge of each pocket where practical.
Do not make the pockets excessively tight. Remember that several cards may overlap within the same row.
At this stage, the front should already function as a fabric playing card holder even though the backing has not yet been attached.
Assembling and Quilting the Round Card Support
Place the completed front section and back circle with right sides facing.
If using a separate batting layer rather than fused fleece, position it on the wrong side of one fabric circle.
Pin or clip around the entire circumference.
Because the project contains multiple layers, clips may be easier than pins around the thick pocket sections.
Sew around the circle using approximately a ⅜-inch (1 cm) seam allowance, leaving a 3–4 inch (7.5–10 cm) opening for turning.
Sew slowly when crossing the pocket edges because those sections contain additional layers.
Backstitch at both sides of the turning opening.
Trim the seam allowance slightly and clip small notches around the curve without cutting through the stitching.
These notches allow the circular edge to spread smoothly after turning.
Turn the Card Support Pattern right side out through the opening.
Use a blunt turning tool to gently push out the entire circumference.
Avoid using scissors or another sharp object because it can puncture the fabric.
Press the project carefully, paying special attention to the outer circle.
Fold the raw edges of the turning opening inward so that they align with the sewn edge.
Topstitch around the entire circumference approximately ⅛–¼ inch (3–6 mm) from the edge. This closes the opening and gives the holder a neat finished border.
For a more traditional quilted appearance, you can finish the perimeter with bias binding instead.
Cut or prepare binding approximately 2¼ inches (5.7 cm) wide.
Because the project is circular, true bias binding works much better than straight-grain binding. Bias fabric naturally follows curves without creating excessive wrinkles.
Attach the binding to one side, fold it over the raw edge, and secure it to the opposite side.
Hand stitching the final binding edge can produce an especially clean finish.
Once the perimeter is complete, insert cards into every row and test the holder.
If the front collapses when heavily loaded, you can use firmer stabilizer in future versions.
The completed holder should be firm enough to rest comfortably against the player’s body, lap, or table edge while keeping the cards organized.
Customizing, Finishing and Using the Card Support Pattern
One advantage of this Card Support Pattern is that it can be adapted to suit different players.
For someone who regularly plays games requiring large hands of cards, enlarge the circle to approximately 12–14 inches (30–35.5 cm).
You can also add a fourth pocket row.
For children, a smaller holder approximately 8–9 inches (20–23 cm) in diameter may be easier to manage.
Bright fabrics can make the project more playful, while neutral fabrics produce a sophisticated version suitable for an adult game room.
Felt is another excellent material because it does not fray and provides natural structure.
If using felt, some construction steps can be simplified because raw edges do not necessarily need to be enclosed.
Quilting cotton offers far more print choices. Card suits, checkerboards, florals, novelty prints, geometric patterns, and scrap combinations can all create distinctive holders.
For a classic card-table look, try charcoal gray with red accents.
Create a red heart or diamond on one holder and a black spade or club on another.
Personalized initials can also be appliquéd onto the back.
Another useful addition is a small hanging loop at the top. Insert a folded fabric or ribbon loop between the front and back layers before sewing the perimeter.
The holder can then be stored on a hook when not in use.
If you frequently transport card games, make a matching drawstring pouch for the holder and deck.
A complete handmade set could include four quilted card holders, matching coasters, and a storage bag.
When sewing several holders, create a cardboard or reusable plastic template for the circle. This makes repeated cutting much faster and ensures that every piece is identical.
For the cleanest finish, keep the pocket openings perfectly straight and the outer circumference smooth.
Pressing after every stage is one of the easiest ways to achieve a professional appearance.
Also consider the contrast between the cards and fabric. Very busy pocket fabric can make card values harder to see.
Solid or subtly textured fabrics usually provide the best visual background.
After completion, give the holder a final press according to the fabric and stabilizer requirements.
Your finished Card Support Pattern should now provide multiple stable rows where cards can be organized without needing to be continuously gripped by hand.
FAQ – Card Support Pattern
What is a Card Support Pattern?
It is a sewing pattern for creating a fabric holder that keeps playing cards arranged in visible rows.
What size should I make it?
A circle approximately 11 inches (28 cm) in finished diameter is a practical starting size.
How many pockets should it have?
Three horizontal pockets work well for many card games. You can add a fourth row for games requiring larger hands.
Can beginners make this project?
Yes. The primary skills are cutting, straight stitching, sewing curves, topstitching, and basic layering.
What fabric works best?
Quilting cotton, canvas, denim, and felt are all suitable. Quilting cotton usually benefits from additional stabilizer.
Do I need batting?
Batting is recommended if you want a softly padded, quilted appearance.
Do I also need interfacing?
For quilting cotton, interfacing or another firm stabilizer is highly recommended because it prevents the holder from collapsing.
What seam allowance should I use?
Use approximately ¼ inch (6 mm) for basic piecing and around ⅜ inch (1 cm) when assembling the outer circle.
How deep should the card pockets be?
Approximately 2–2½ inches (5–6.5 cm) of visible pocket depth generally works well for standard playing cards.
Can I make it from fabric scraps?
Absolutely. This is an excellent scrap fabric sewing project.
Can I use felt?
Yes. Felt is especially convenient because it has natural body and does not fray easily.
Can the back be decorated?
Yes. Hearts, diamonds, clubs, spades, initials, or other appliqués can personalize the reverse side.
Can I make a set of four?
Yes. Making four coordinating holders is ideal for family card games or gifting.
How can I make the circle more professional?
Clip the curved seam allowance carefully, press thoroughly, and topstitch evenly around the circumference.
Can I use bias binding instead of turning the project?
Yes. Bias binding is an excellent finish for a circular holder because it follows the curved perimeter.
How do I prevent the pockets from sagging?
Use interfacing, topstitch the pocket folds, and secure the pocket edges firmly into the perimeter seam.
Can the holder accommodate oversized cards?
Yes. Measure the cards first and adjust the pocket depth and overall circle accordingly.
Is this project washable?
It can be if all chosen fabrics, batting, interfacing, and embellishments are washable. Follow the care instructions for the specific materials used.
Conclusion
The Card Support Pattern turns a few simple fabric pieces into an extremely useful accessory for card-game enthusiasts. Its circular quilted foundation provides structure, while several horizontal pockets allow cards to remain visible and organized without requiring the player to hold an entire hand continuously.
The construction is also highly customizable. You can make a sophisticated charcoal version similar to the inspiration, a colorful scrap-quilt version, or a coordinated set decorated with heart, diamond, club, and spade appliqués. Adjusting the circle diameter and number of pocket rows makes it easy to adapt the project for different games and users.
For the best results, focus on structure and accuracy. Use a firm stabilizer, press the pocket folds carefully, test their depth with real playing cards before sewing, and keep each row parallel. These small details make a significant difference to the usability of the finished quilted playing card holder.
Whether made for family game nights, a handmade gift, or simply as a creative way to use leftover quilting fabrics, this Card Support Pattern is a practical project that combines quilting, appliqué, simple pocket construction, and useful everyday design in one compact sewing tutorial.