
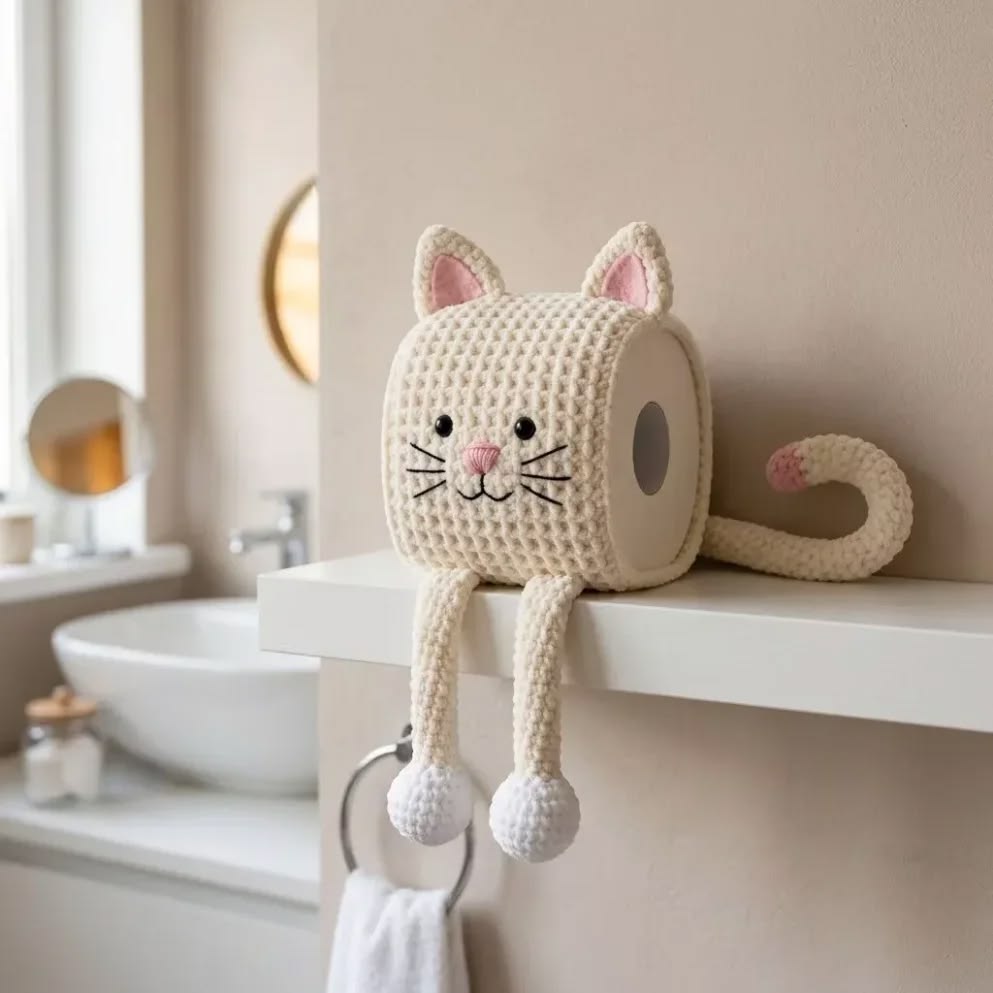
Crochet Cat Holder Pattern is a playful and practical crochet project that transforms an ordinary toilet paper roll into an adorable handmade cat decoration. Inspired by the image, this design features a soft cream crocheted body fitted around the roll, pointed cat ears with pink centers, an embroidered face, a curved tail, and two long dangling legs. The result is a charming crochet toilet paper holder that can bring a cozy handmade touch to a bathroom, powder room, craft room, or guest space.
The beauty of this Crochet Cat Holder Pattern is that it combines decorative amigurumi techniques with a genuinely functional household accessory. Instead of crocheting a fully stuffed cat, the main body is constructed as a removable cover that fits around a standard toilet paper roll. The roll remains accessible from the side, while the crochet exterior creates the square, rounded appearance of the cat. This construction also makes it easier to remove the cover whenever the roll needs to be replaced.
Although the finished project looks detailed, most of the work uses beginner-friendly stitches. Single crochet, increases, decreases, chains, and slip stitches form almost every component. The face can be embroidered rather than created with separate pieces, while the ears, tail, and legs are crocheted individually and sewn securely to the main cover. With careful measurements and consistent tension, this project can be customized for different roll sizes and color schemes.
Materials, Measurements and Crochet Preparation
For the Crochet Cat Holder Pattern, a medium-weight cotton or cotton-blend yarn is an excellent choice. Cotton gives the holder enough structure to maintain its shape while producing clearly defined stitches.
DISCOVER MORE FREE PATTERNS HERE!
Choose worsted weight #4 yarn in cream, ivory, white, beige, or another main color. Approximately 150–220 yards (137–201 m) should be sufficient for most standard-size versions, although yarn requirements will vary with gauge and roll dimensions.
You will also need a small amount of soft pink yarn for the inner ears, nose, and tail tip. Black embroidery thread or thin black yarn can be used for the eyes, mouth, and whiskers.
A 4.0 mm (G-6) crochet hook is a useful starting point with worsted yarn. If your crochet fabric feels loose, move down to 3.5 mm. The holder should have firm stitches so it maintains its shape.
Additional supplies include scissors, a yarn needle, stitch markers, measuring tape, removable pins, and a small amount of polyester fiberfill for the paws and optional tail shaping.
The holder shown in the inspiration appears designed around a standard toilet paper roll. A useful starting measurement is approximately 4½–5 inches (11.5–13 cm) across the front and approximately the same height.
However, toilet paper roll dimensions vary considerably. Measure the actual roll you plan to use before establishing your final stitch count.
The central opening should remain large enough for the cardboard tube and roll to be removed without stretching the crochet excessively.
The primary U.S. crochet abbreviations are ch = chain, sl st = slip stitch, sc = single crochet, hdc = half double crochet, inc = increase, dec = decrease, MR = magic ring, st = stitch, sts = stitches, rnd = round.
An increase means placing 2 sc in one stitch. A decrease combines two stitches into one.
Gauge is less important than finished dimensions. Crochet a small swatch first and measure your stitches per inch.
The fabric should be dense but flexible.
Avoid extremely tight tension because the main cover needs enough elasticity to slide over the roll.
For a removable household holder, washable yarn is particularly convenient.
How to Crochet the Main Cat Toilet Paper Holder
Begin by measuring the circumference of your toilet paper roll.
The main body can be worked as one rectangular panel that wraps around the roll, leaving the circular sides accessible.
For a standard roll, begin with a foundation chain approximately 4½–5 inches (11.5–13 cm) long.
Chain one additional stitch for turning.
Work sc across the foundation chain.
Chain 1 and turn.
Continue working rows of sc until the rectangle is long enough to wrap completely around the outside circumference of the roll.
Do not rely only on a fixed number of rows because yarn, tension, and toilet paper brands vary.
Wrap the crocheted rectangle around the roll periodically while working.
The ends should meet comfortably without being stretched aggressively.
Once the rectangle reaches the required length, fasten off with a long yarn tail.
Bring the two short ends together.
Use a mattress stitch or whip stitch to create a neat seam.
Turn the seam toward the back or underside of the holder.
You now have a crocheted tube.
Slide the tube over the toilet paper roll.
Check the fit.
The fabric should remain smooth without compressing the roll.
If the cover is too loose, remove a few rows before seaming.
If it is too tight, add additional rows.
To create the softly rounded square appearance shown in the inspiration, gently shape the crochet around the roll rather than pulling it tightly against the circular surface.
You can add narrow crocheted side borders around the circular openings.
Join yarn near one opening.
Work sc evenly around the entire edge.
Join with a slip stitch.
Repeat on the opposite side.
These finishing rounds stabilize the holder and prevent the edges from stretching.
If desired, work one additional round of reverse single crochet for a decorative corded finish.
The roll should still slide in and out through either side.
Avoid permanently crocheting over the side openings if you want the holder to remain functional.
Once the basic cover fits correctly, mark the location of the face.
The eyes should sit slightly above the horizontal center of the front panel.
Place temporary markers where the ears, legs, and tail will eventually be attached.
Checking all proportions before sewing prevents the finished cat from looking unbalanced.
Crochet the Cat Ears, Face, Legs, Paws and Tail
The crochet cat ears are small triangular pieces positioned at the upper corners.
Using cream yarn, chain approximately 7 stitches.
Work sc across.
On subsequent rows, decrease at both ends gradually until only one or two stitches remain.
Fasten off.
Make a second identical triangle.
For each inner ear, use pink yarn to crochet a slightly smaller triangle.
Sew each pink piece onto the center of a cream ear.
Leave a visible cream border around the pink section.
Position the completed ears near the upper corners of the holder.
Angle them slightly outward for a friendly expression.
Sew the lower edge of each ear securely to the main cover.
Next, create the face.
For a decorative piece intended for adults, small black safety eyes can reproduce the appearance of the inspiration. However, embroidered eyes eliminate detachable components and are preferable when the item may be accessible to young children.
Position the eyes evenly.
Embroider a small triangular or oval pink nose in the center.
From the bottom of the nose, embroider a short vertical black line.
Add two small curved lines to create the mouth.
Embroider approximately three whiskers on each side.
Keep the whiskers symmetrical but slightly angled.
The expression should remain simple because the minimalist face is part of the charm of this design.
Now make the dangling legs.
With cream yarn, create a magic ring and work approximately 6 sc into it.
Continue working in continuous rounds without increasing.
The leg should form a long narrow tube.
Continue until it measures approximately 6–8 inches (15–20 cm).
Do not heavily stuff the leg. Leaving it mostly unstuffed allows it to hang naturally.
Make a second matching leg.
For each paw, increase around the final portion of the leg to create a small rounded shape.
For example, increase from approximately 6 stitches to 12 stitches.
Work two or three rounds evenly.
Stuff the paw lightly.
Decrease until closed.
Fasten off securely.
Repeat for the second leg.
Position both legs along the lower front edge of the cat body.
They should hang freely over the shelf just like the inspiration.
Sew each leg securely through several stitches.
For the tail, start with cream yarn and a magic ring.
Work approximately 6 sc into the ring.
Continue working a narrow tube in continuous rounds.
Make the tail approximately 8–12 inches (20–30 cm) long.
Stuff it very lightly as you work, or leave it unstuffed for a softer tail.
Switch to pink yarn for the final 1–1½ inches (2.5–4 cm) if you want the contrasting tip shown in the inspiration.
To produce the curved shape, sew a few small hidden stitches along the inside curve of the tail.
Do not pull excessively.
The goal is a soft upward curl.
Attach the tail to the lower back or side of the holder.
Secure it well enough that the tail retains its position when the holder is moved.
Assembly, Custom Sizing and Professional Finishing
Before permanently completing your Crochet Cat Holder Pattern, place every component on the body and evaluate the proportions.
Check the project from the front.
The ears should appear approximately symmetrical.
The eyes should be level.
The nose should sit centrally between and below them.
The dangling legs should be separated slightly rather than touching.
Turn the holder sideways and check the tail placement.
It should emerge naturally from the rear rather than appearing attached to the front edge.
Use a yarn needle and matching yarn for assembly.
Whenever possible, sew through the crochet stitches rather than piercing individual yarn strands.
This creates stronger attachment points.
After sewing each component, weave the yarn tail through several stitches on the inside.
Change direction and weave through another section before trimming.
For an especially neat finish, hide all yarn ends on the inside of the cover.
Insert the toilet paper roll again after assembly.
The holder may change shape slightly once the ears and legs are attached.
Use your hands to reshape the corners gently.
If your roll is significantly larger than the suggested dimensions, customize the pattern mathematically.
Measure the width of the roll from one circular side to the other.
That measurement determines the approximate width of your starting chain.
Next, measure the circumference around the outside of the roll.
That determines the approximate length of the rectangular panel.
For example, if your roll is 5 inches wide and 16 inches around, crochet a rectangle close to 5 × 16 inches (12.7 × 40.6 cm) before seaming.
Remember that crochet stretches.
Make the finished panel slightly snug rather than excessively loose.
A holder that is too large will sag once the legs and tail are attached.
You can also adapt the same construction to different animals.
Use brown yarn and rounded ears for a bear.
Add long ears for a bunny.
Use orange yarn and triangular ears for a fox.
Black, gray, ginger, calico-inspired, and tuxedo-cat color combinations can all create attractive variations.
For a more decorative cat, add a small crocheted bow around one ear.
A tiny flower can also be sewn near the ear.
Another variation is to crochet a collar around the lower portion of the face.
Keep embellishments lightweight so they do not distort the cover.
When the entire project is finished, lightly steam or block individual components if your yarn allows it.
Do not press acrylic yarn directly with a hot iron.
Insert a fresh roll and shape the holder by hand.
The finished project should sit securely on a shelf while the crocheted cat legs hang over the edge and the curved tail remains visible behind it.
FAQ – Crochet Cat Holder Pattern
What is a Crochet Cat Holder Pattern?
It is a decorative crochet pattern that turns a practical household holder into a cat-inspired accessory using crocheted ears, facial details, legs, paws, and a tail.
Is this pattern suitable for beginners?
Yes. A beginner who understands chains, single crochet, increases, decreases, and basic sewing should be able to complete it.
What yarn should I use?
Worsted weight #4 cotton or cotton-blend yarn is an excellent option because it provides structure while remaining washable.
What hook size is recommended?
Start with a 4.0 mm crochet hook and adjust according to your yarn and tension.
How much yarn will I need?
Approximately 150–220 yards of the main color should be sufficient for many standard versions, plus small amounts of pink and black.
How large should the holder be?
Measure your actual toilet paper roll. Many standard versions will be around 4½–5 inches (11.5–13 cm) wide.
Can I use acrylic yarn?
Yes. Acrylic can work well, although cotton generally provides slightly more structure.
Should the body be stuffed?
No. The toilet paper roll itself provides the main body shape.
Are the legs stuffed?
The narrow sections can remain unstuffed. Lightly stuffing only the paws gives them a rounded appearance.
How long should the legs be?
Approximately 6–8 inches (15–20 cm) creates a noticeable dangling effect.
How long should the tail be?
Approximately 8–12 inches (20–30 cm) works well, but the length is completely customizable.
How do I make the tail curl?
Use a few concealed stitches along one side of the finished tail to pull it gently into a curved shape.
Can the toilet paper roll be removed?
Yes. The main cover should be constructed so the roll slides through one of the side openings.
Can I wash the holder?
If you use washable yarn and embroidered details, the crochet cover can generally be gently hand washed after removing the toilet paper roll.
Can I make the cat in another color?
Absolutely. White, cream, gray, black, ginger, brown, pastel colors, or multicolored scrap yarn can all work.
Can I make matching bathroom accessories?
Yes. The same yarn can be used for a small basket, washcloth edging, tissue holder, or decorative storage cover.
Can I use safety eyes?
For decorative adult use, they can be used. If young children may access the item, embroidered eyes avoid detachable small parts.
Why is my holder sagging?
The cover may be too large or your crochet tension may be too loose. Try a smaller hook or reduce the panel dimensions.
Conclusion
The Crochet Cat Holder Pattern is a fun example of how crochet can turn an everyday household item into something warm, decorative, and full of personality. The simple cream body provides a clean foundation, while pink ears, an embroidered cat face, long dangling legs, rounded paws, and a curled tail create the charming character seen in the inspiration.
Construction is also highly adaptable. Because the main piece is essentially a fitted crochet cover, you can adjust it to the exact dimensions of the toilet paper rolls available in your home. Measuring before crocheting is the most reliable way to achieve a snug, professional fit.
The finishing details make the greatest difference. Take time to position both ears evenly, center the facial features, make the two legs equal in length, and curve the tail naturally. Small adjustments during assembly can transform a simple crochet cover into an expressive handmade cat.
Once you have completed the first Crochet Cat Holder Pattern, experiment with different cat colors and personalities. A gray cat with white paws, an orange tabby-inspired version, a black-and-white tuxedo cat, or a pastel version can all be created from the same basic construction. It is a practical, customizable crochet project that combines home décor, amigurumi techniques, and functional handmade design in one adorable finished piece.