
Jacob’s Ladder Block Pattern is a timeless patchwork design built from simple geometric units that create an impressive diagonal movement across the finished quilt block. With a combination of four-patch units, half-square triangles, and contrasting fabric squares, this traditional quilt pattern is an excellent project for quilters who want to practice accurate piecing while producing a block that looks much more intricate than its individual components.
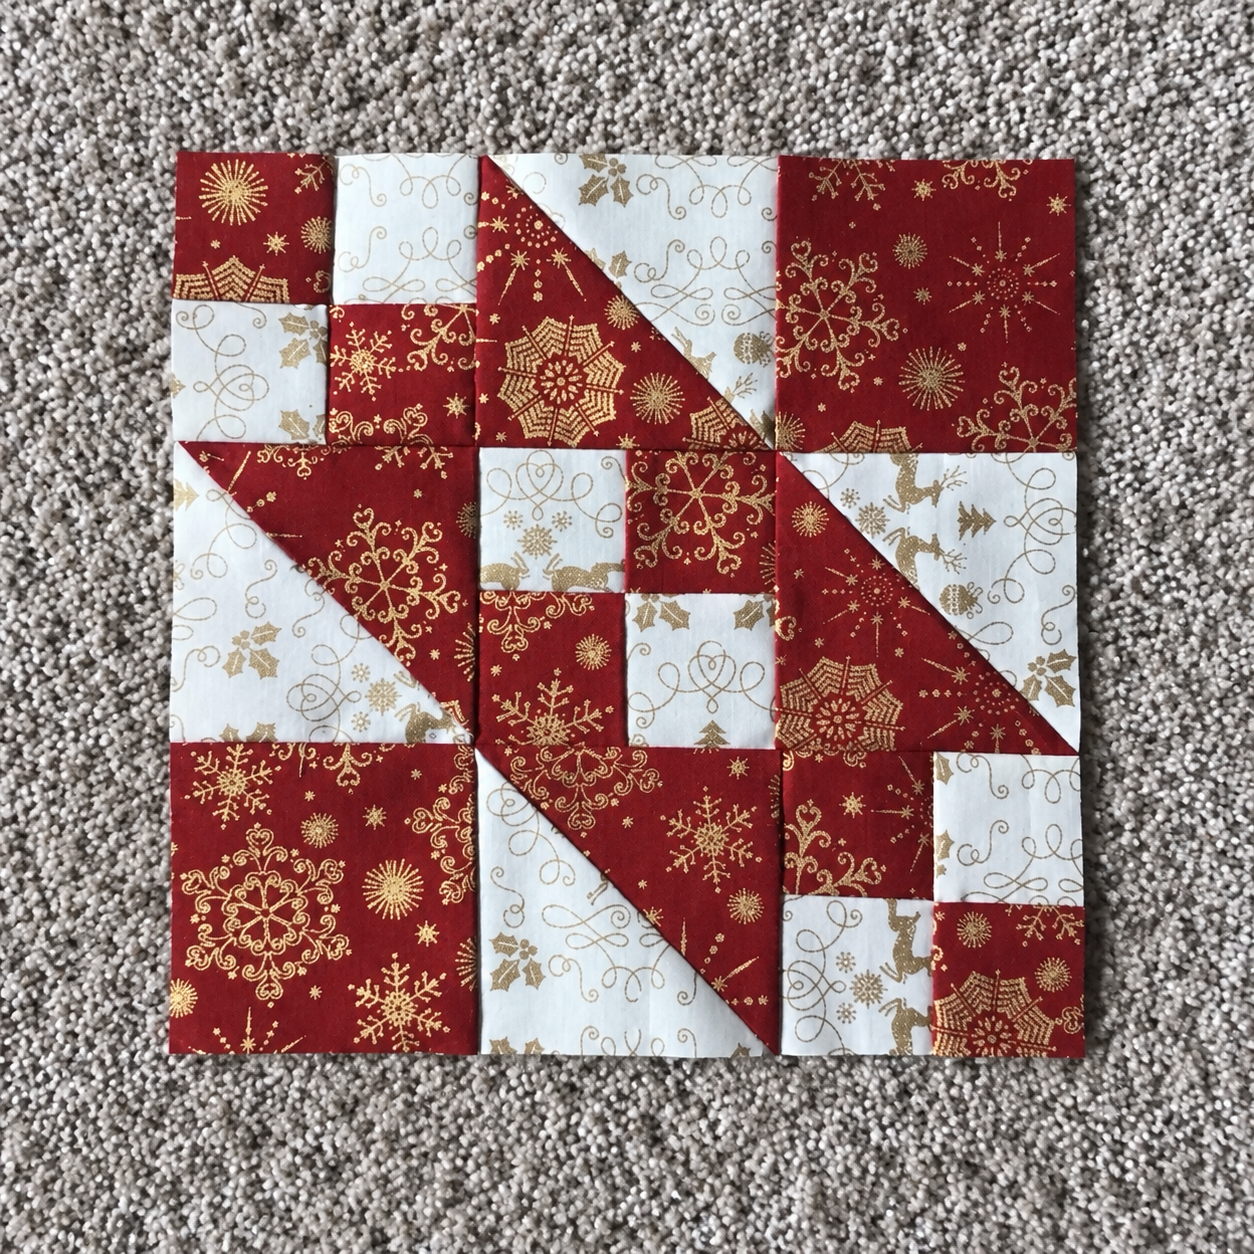
The block shown in the inspiration uses a beautiful Christmas palette of deep red, creamy white, and metallic gold prints. The strong contrast makes the characteristic diagonal “ladder” effect easy to see, while the seasonal snowflakes, holly, reindeer, and ornamental motifs add warmth and personality. However, the Jacob’s Ladder quilt block is not limited to holiday quilting. The same construction works beautifully with solids, florals, reproduction fabrics, batiks, scraps, or modern low-volume prints.
One of the reasons the Jacob’s Ladder Block Pattern has remained popular is its versatility. A single block can become a pillow front, table topper, wall hanging, or tote panel, while multiple blocks can be rotated and repeated to form larger secondary patterns across a quilt. This tutorial explains the essential cutting, piecing, pressing, trimming, and assembly techniques needed to recreate the visual style of the block while keeping seams accurate and the finished block flat.
Materials, Fabric Selection and Cutting Preparation
For this Jacob’s Ladder Block Pattern, the most important design decision is contrast. Choose two fabrics that are clearly different when viewed from several feet away. The inspiration uses deep Christmas red as the dark fabric and cream/white with gold details as the light fabric.
DISCOVER MORE FREE PATTERNS HERE!
Quilting cotton is the easiest material to work with. Look for good-quality 100% cotton quilting fabric because it presses cleanly, holds accurate seams, and is stable enough for small patchwork units.
For one practice block, two fat quarters provide more than enough material. If you plan to make several matching blocks, calculate yardage after deciding the finished quilt dimensions and number of blocks required.
You will also need a sewing machine, neutral cotton thread, rotary cutter, self-healing cutting mat, acrylic quilting ruler, quilting pins or clips, seam ripper, and an iron with an ironing surface.
Use a consistent ¼-inch (6 mm) seam allowance throughout the block. Accurate quarter-inch seams are particularly important because several small units must eventually align with larger half-square-triangle sections.
Before cutting, press the fabric carefully. Remove folds and wrinkles without stretching the grain.
For a beginner-friendly version, aim for a finished block of approximately 12 inches (30.5 cm). A 12-inch format makes the individual units large enough to handle comfortably.
The design can be understood as a grid of contrasting patchwork sections. Small four-patch units provide the checkerboard effect, while larger half-square triangle (HST) units produce the dramatic diagonal sections.
When preparing the small squares, cut several identical squares from both the light and dark fabrics. A practical starting size for four-patch construction is 2½-inch squares, although your exact cutting dimensions can be adjusted according to the block size you want.
For the HST sections, cut matching larger squares from each fabric. Cutting them slightly oversized is helpful because you can trim the completed HST units to precise dimensions afterward.
Before sewing anything, arrange the cut pieces on your work surface.
Separate the red pieces from the cream pieces.
Create small stacks for four-patch construction and another stack for the half-square triangles.
This simple organization prevents accidentally using a large HST square where a smaller four-patch square was intended.
If you are using directional Christmas prints, consider orientation before stitching. Snowflakes generally work in any direction, but reindeer, trees, text, stripes, or other directional motifs may look better when deliberately positioned.
A useful design test is to photograph the unsewn layout with your phone.
Looking at a small photograph often makes contrast problems easier to identify.
The goal is to preserve the clear dark-and-light rhythm that gives the Jacob’s Ladder quilt pattern its distinctive appearance.
Making the Four-Patch and Half-Square Triangle Units
Begin with the four-patch units.
Take one light square and one dark square.
Place them right sides together.
Sew along one edge using your exact ¼-inch seam allowance.
Repeat with enough pairs to create the required four-patch sections.
Press the seam allowances toward the darker fabric.
This keeps the darker seam from showing through the light fabric and also helps neighboring seams nest together.
Take two pieced pairs.
Rotate one so the dark square sits opposite the dark square of the other pair.
Place the units right sides together.
The center seams should nest naturally because their seam allowances were pressed in opposite directions.
Pin or clip at the central intersection.
Sew across using a ¼-inch seam.
Open the unit and press.
You should now have a clean checkerboard consisting of two light and two dark squares.
The center intersection is important.
Ideally, all four corners should meet at one point.
If the intersection is slightly inaccurate, check your seam allowance before continuing with the remaining units.
Make the other four-patch units in exactly the same manner.
Measure each completed unit.
They should all be identical.
Next, construct the half-square triangles.
Take one large light square and one matching dark square.
Place them right sides together.
Using a removable fabric marker, draw a diagonal line from one corner to the opposite corner on the wrong side of the lighter square.
Sew one seam ¼ inch to each side of the drawn diagonal line.
Do not sew directly on the marked line.
After stitching both seams, cut along the original diagonal marking.
One pair of squares now produces two HST units.
Open each triangle and gently press the seam allowance toward the darker fabric.
Avoid dragging the iron sideways because diagonal fabric edges contain bias and can stretch easily.
Once pressed, place an acrylic ruler over the unit.
Align the ruler’s 45-degree marking with the diagonal seam.
Trim the unit to its required unfinished dimensions.
Repeat this process for all remaining HST units.
Accurate trimming makes final assembly dramatically easier.
The diagonal seam should run exactly from corner to corner after trimming.
When the four-patches and HST units are placed together, the design begins to emerge.
This is the point where you should compare the arrangement with the inspiration.
Notice how the red and cream sections alternate and how the large diagonal triangles create visual pathways through the block.
Do not rush to sew the final rows.
Rotation matters.
Turning a single HST unit incorrectly can interrupt the entire Jacob’s Ladder design.
Assembling the Jacob’s Ladder Quilt Block Step by Step
Lay every completed unit on a flat surface before final assembly.
Arrange them into the characteristic Jacob’s Ladder Block Pattern, alternating four-patch units with HST sections so the dark fabrics form a continuous diagonal rhythm.
Step back from the layout.
The red fabric should visually travel through the block rather than appearing randomly scattered.
If the pattern looks interrupted, rotate the HST units until the diagonal lines connect correctly.
Once satisfied, take a photograph of the complete layout.
This becomes your assembly reference.
Start with the top row.
Pick up the first two units while maintaining their orientation.
Place them right sides together.
Pin at important seam intersections.
Sew with a ¼-inch seam allowance.
Add the next unit in the same manner.
Continue until the first row is complete.
Return the finished row to the layout.
Then construct the second row.
Repeat the same procedure for every remaining row.
Keeping completed rows in their original positions prevents accidental rotation.
Press the row seams strategically.
Press the seams of the first row in one direction.
Press the seams of the neighboring row in the opposite direction.
Alternating seam direction allows the intersections to nest when the rows are joined.
Now place the first two rows right sides together.
Feel the seam intersections with your fingers.
The seam allowances should lock against one another.
Pin each major intersection before sewing.
Sew slowly across the entire row.
Avoid pulling the fabric behind the presser foot.
Allow the feed dogs to move the patchwork naturally.
Open the rows and inspect the intersections.
If one important point is noticeably misaligned, removing a short section of stitching and resewing it is usually worthwhile.
Continue joining rows until the complete block has been assembled.
Give the finished block a careful press.
Press rather than aggressively sliding the iron.
Check the diagonal lines again.
The geometric movement should now be clearly visible.
Measure the block vertically and horizontally.
Also measure diagonally from corner to corner.
If the block is slightly distorted, gentle pressing can often correct minor inconsistencies.
Do not force a badly distorted block into shape because this can stretch the outer edges.
Use a large square ruler to trim only what is necessary.
Preserve at least ¼ inch beyond any triangle points located near the block perimeter.
That allowance protects the points when the block is eventually sewn into a quilt.
At this stage, your Jacob’s Ladder quilt block can be used individually or repeated.
A single block makes an attractive seasonal pillow.
Four blocks can form a table topper.
A longer arrangement works beautifully as a Christmas table runner.
Multiple blocks can produce a full bed quilt with impressive secondary designs.
Finishing the Block and Turning It Into a Quilt
The real visual power of the Jacob’s Ladder Block Pattern becomes apparent when multiple blocks are placed together.
Make several identical blocks and arrange them on a design wall, floor, or large table.
Try placing every block in the same direction first.
This creates an orderly repeating pattern.
Next, rotate alternating blocks by 90 degrees.
You may discover new diamonds, diagonal chains, or larger geometric shapes forming between neighboring blocks.
This phenomenon is known as a secondary pattern.
It is one of the reasons traditional quilt blocks can produce such sophisticated quilts from relatively simple piecing.
For a Christmas quilt inspired by the photograph, continue using rich red, cream, white, and metallic gold fabrics.
You can keep every block identical or introduce different prints while maintaining the same two-value color arrangement.
Scrappy blocks are another excellent option.
Instead of using one red print, combine several red fabrics.
Replace the single cream print with several low-volume white and cream fabrics.
As long as the value contrast remains strong, the Jacob’s Ladder structure will still be recognizable.
Once you have produced enough blocks, square each one to the same measurement.
Join the blocks into horizontal rows.
Then join those rows together.
Press carefully after each stage.
Borders are optional.
A narrow cream inner border followed by a wider red outer border would complement the Christmas version particularly well.
After completing the quilt top, prepare the three quilt layers: quilt top, batting, and backing.
The backing should extend several inches beyond the quilt top on every side.
The batting should also be slightly larger than the top.
Baste the three layers using your preferred method.
Safety pins, temporary basting spray, or thread basting can all work.
Choose quilting lines that complement rather than compete with the patchwork.
Stitch-in-the-ditch quilting along major seams is approachable for beginners.
Straight-line quilting can emphasize the geometric construction.
Diagonal quilting can reinforce the ladder effect.
Free-motion quilting offers another possibility for experienced quilters.
Snowflakes, stars, loops, or gentle swirls would coordinate beautifully with a Christmas interpretation.
Once quilting is complete, trim the excess batting and backing.
Prepare double-fold binding.
Sew the binding around the perimeter, carefully mitering each corner.
Join the binding ends neatly.
Finish the binding by machine or hand.
Give the completed quilt a final gentle press.
Your original block has now become part of a finished handmade piece with the classic geometry and visual movement associated with Jacob’s Ladder quilting.
FAQ – Jacob’s Ladder Block Pattern
What is a Jacob’s Ladder quilt block?
It is a traditional patchwork block constructed from contrasting geometric units, commonly including four-patches and half-square triangles, arranged to create strong diagonal movement.
Is Jacob’s Ladder suitable for beginner quilters?
Yes. It is especially useful for practicing accurate ¼-inch seams, four-patch construction, HST trimming, nesting seams, and matching intersections.
What fabrics work best?
Good-quality 100% quilting cotton is recommended because it is stable, easy to cut accurately, and presses well.
How many colors do I need?
Only two contrasting fabric groups are necessary. You can use two individual fabrics or create scrappy dark and light groups.
Why is contrast important?
Strong contrast makes the ladder-like diagonal structure visible. Fabrics that are too similar in value may cause the design to disappear.
Can I make this as a Christmas quilt?
Absolutely. Red, cream, white, green, and metallic gold prints work beautifully for seasonal versions.
What seam allowance should I use?
Use a consistent ¼-inch (approximately 6 mm) quilting seam.
What is an HST?
HST means half-square triangle. It is a square patchwork unit divided diagonally into two fabric triangles.
Why should I make HST units oversized?
Sewing slightly oversized HSTs allows you to trim them precisely afterward, improving accuracy.
How do I keep the center of a four-patch aligned?
Press neighboring seam allowances in opposite directions and nest the seams before stitching.
Why are my blocks different sizes?
Inconsistent seam allowances, inaccurate cutting, stretched bias edges, or insufficient HST trimming are common causes.
Should I press seams open or to one side?
Either technique can work, but pressing toward the darker fabric and alternating row directions makes nesting intersections easier.
Can I use scraps?
Yes. A scrappy Jacob’s Ladder quilt can be beautiful as long as the light and dark values remain distinguishable.
Can I make a table runner instead of a quilt?
Yes. Three or four blocks arranged in a row can create an attractive table runner.
What other projects can use this block?
It works well for pillows, placemats, wall hangings, tote bags, table toppers, and bed quilts.
Do all blocks need to face the same direction?
No. Rotating blocks creates different secondary patterns and can dramatically change the overall quilt design.
How can I avoid losing triangle points?
Maintain an accurate seam allowance and preserve approximately ¼ inch between the triangle point and the raw edge before joining blocks.
Conclusion
The Jacob’s Ladder Block Pattern demonstrates why traditional patchwork remains so appealing. Simple squares and triangles are transformed through careful placement into a block filled with movement, contrast, and visual complexity. The red, cream, and gold Christmas interpretation shown in the inspiration is especially striking because the strong color contrast emphasizes every diagonal line.
Accuracy matters more than speed with this project. Carefully cut the pieces, maintain a consistent ¼-inch seam allowance, trim every half-square triangle, and nest intersections whenever possible. These small habits make a significant difference in the finished block.
Once the construction becomes familiar, the pattern is easy to personalize. Use Christmas fabrics for a seasonal quilt, soft florals for a romantic version, navy and white for a classic look, or assorted scraps for a colorful scrap quilt. The underlying geometry remains effective across countless fabric combinations.
PATTERN VIDEO:
Whether you make one block for a pillow or dozens for a full-size quilt, the Jacob’s Ladder Block Pattern offers an enjoyable way to practice essential quilting techniques while creating a timeless patchwork design that can be adapted to nearly any style or season.