
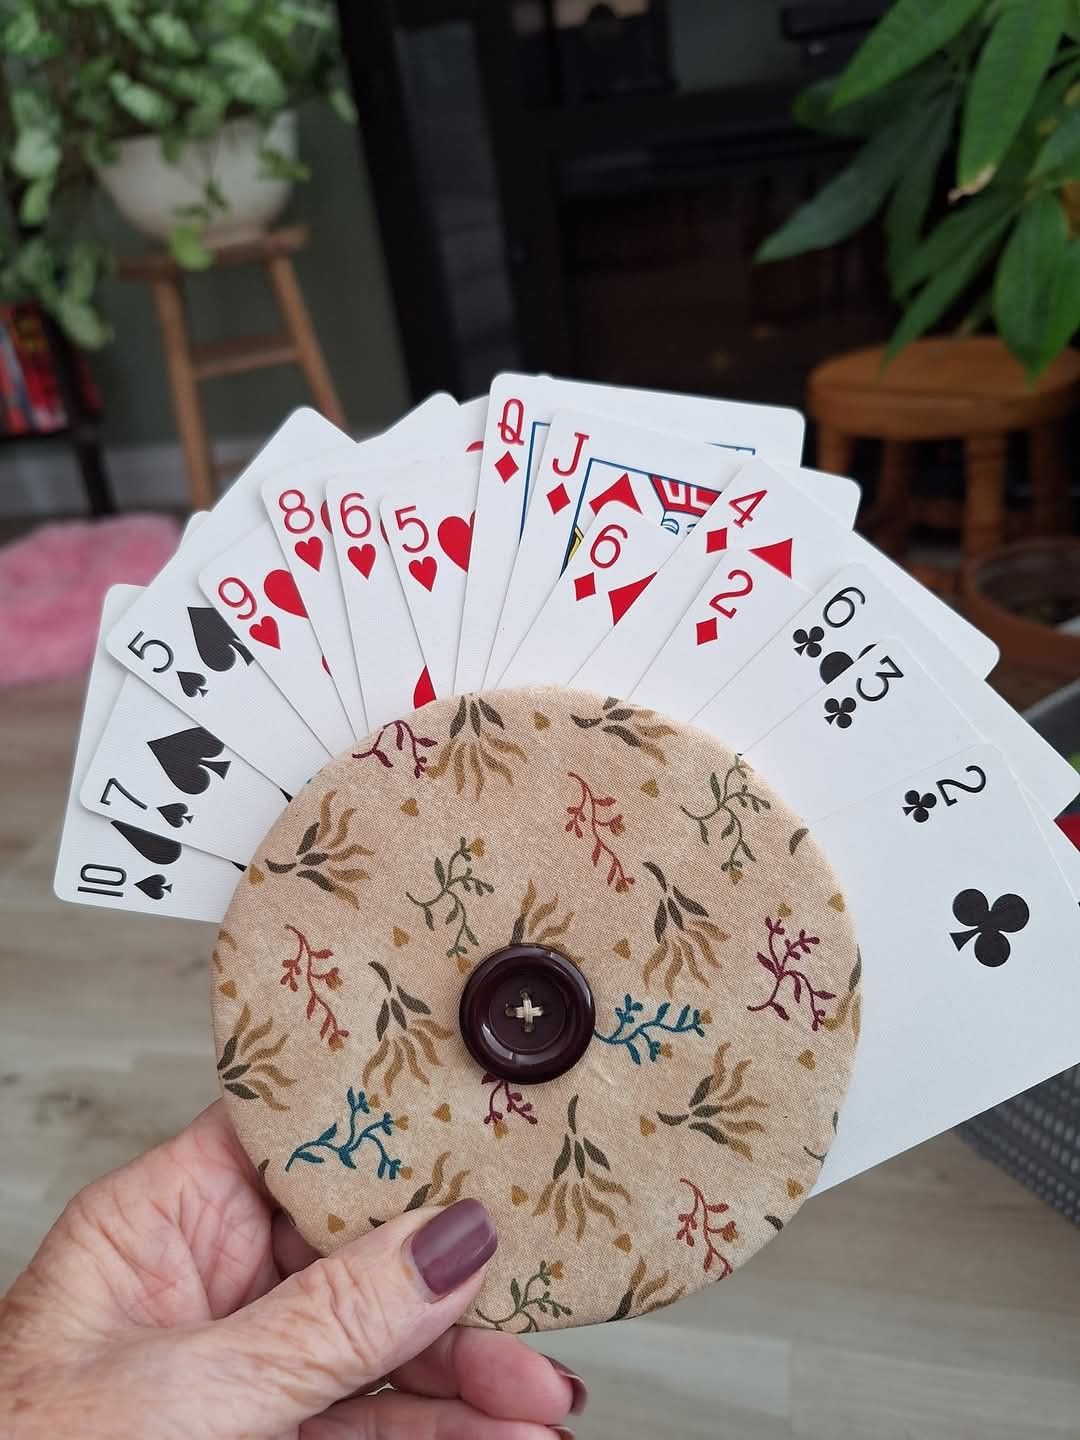
Playing Card Holders Pattern is a practical and charming sewing project designed to make card games more comfortable and enjoyable. Inspired by the round fabric holder shown in the photo, this project uses a circular quilted base with a center button and layered construction that allows playing cards to spread around the edge in a wide fan. It is especially useful for anyone who finds it uncomfortable to hold a large hand of cards for long periods.
Unlike a traditional card rack that sits on a table, this fabric playing card holder can be held naturally in one hand. The circular shape distributes the cards around the perimeter, making the numbers and suits easier to see while keeping the hand organized. Because the holder is made primarily from fabric, batting, and a button, it is lightweight, soft, portable, and easy to customize with leftover quilting cotton.
This project is also an excellent scrap fabric sewing idea. A small floral print creates the cozy vintage appearance seen in the inspiration, but the design can easily be made with bright patchwork prints, solids, holiday fabrics, novelty prints, or coordinated quilting collections. Below you will learn how to choose materials, calculate the circular pieces, add structure, create the card-holding area, assemble the layers, and finish your own Playing Card Holders Pattern neatly.
Materials and Measurements for the Playing Card Holders Pattern
The most suitable fabric for this project is 100% quilting cotton. It is easy to cut, holds its shape well, and comes in thousands of prints. Medium or small-scale prints are particularly attractive because most of the design remains visible on the relatively small circular holder.
DISCOVER MORE FREE PATTERNS HERE!
For one holder, you need only a small amount of fabric. A fat quarter is more than enough, making this a convenient project for leftover material from previous quilts. You can use the same fabric on both sides or combine two coordinating prints for a reversible appearance.
You will also need fusible fleece or thin batting. This internal layer gives the circle enough body to remain stable while still allowing it to flex comfortably in your hand. Avoid extremely thick batting because excessive bulk can make the center difficult to assemble.
A finished diameter of approximately 7 to 8 inches (18 to 20 cm) works well for a standard-size playing-card holder. For larger hands or for games in which players frequently hold many cards, you can increase the diameter to approximately 9 inches (23 cm).
Prepare a circular template before cutting. A compass, dinner plate, quilting circle ruler, or printable circle template can be used. Accuracy matters because the front and back circles need to align when sewn together.
For an approximately 8-inch finished holder, cut the circles slightly larger to accommodate the seam allowance. If you use a ¼-inch (6 mm) seam allowance, remember that approximately ½ inch will disappear from the total diameter after both sides are sewn.
You will need fabric for the front and back, batting or fusible fleece, coordinating thread, fabric scissors or a rotary cutter, pins or sewing clips, a hand-sewing needle, an iron, and a sewing machine.
The large center button is both decorative and functional. A button measuring approximately 1 to 1½ inches (2.5 to 4 cm) works nicely. Choose one without sharp edges because your fingers may rest against it while holding the finished piece.
If the holder will be frequently used, choose a sturdy button and strong polyester or cotton-wrapped polyester thread for attaching it.
A removable fabric marker is useful for marking the center point of each circle.
For additional stability, lightweight woven fusible interfacing can be added along with the batting. This is optional, but it can help very soft quilting cotton maintain a cleaner circular shape.
Before cutting, press all fabric pieces thoroughly.
Do not stretch the fabric while ironing because sections of a circle are cut on the bias and can distort more easily than straight-grain rectangles.
Once your materials are prepared, you can begin constructing the main circular body.
Cutting and Sewing the Quilted Circular Holder
Start by tracing your circle onto the wrong side of the fabric.
Cut two identical fabric circles: one for the front and one for the back.
Then cut one circle from thin batting or fusible fleece.
If using fusible fleece, follow the manufacturer’s instructions to attach it to the wrong side of one fabric circle. Make sure the adhesive side is facing the fabric before pressing.
For regular batting, simply place it against the wrong side of the fabric.
If you want a lightly quilted appearance, quilt the fabric and batting together before final assembly. Simple concentric circles, diagonal lines, or a small crosshatch design will provide stability without distracting from the print.
Keep quilting relatively light.
Too many quilting lines can make a small project unnecessarily stiff.
Next, place the two fabric circles right sides together.
The batting should remain on the outside of the fabric sandwich.
Pin or clip around the circumference.
Because you are sewing a curved edge, use more clips than you normally would for a straight seam.
Leave an opening of approximately 2½ to 3 inches (6.5 to 7.5 cm) for turning.
Sew around the circumference using a consistent ¼-inch seam allowance.
Move slowly and rotate the fabric gradually as you sew.
Shortening the stitch length slightly can help create a smoother curve.
After sewing, carefully trim the seam allowance if necessary.
Clip small notches around the curved seam without cutting through the stitching.
These clips allow the seam allowance to spread when the circle is turned right side out, reducing puckering.
Turn the entire piece through the opening.
Use a blunt turning tool to gently shape the circular edge.
Do not use scissors or another sharp object because it can puncture the fabric.
Roll the seam between your fingers until the circle looks even.
Press carefully.
Fold the raw edges of the turning opening inward so they follow the curve.
Topstitch approximately ⅛ inch (3 mm) from the outer edge.
The topstitching closes the opening while giving the holder a clean, professional finish.
If desired, add another decorative stitching line approximately ¼ inch inside the first.
At this point, you should have a neat padded fabric circle.
The next stage transforms that simple quilted circle into a functional playing card holder.
Creating the Card-Holding System and Center Button
The distinctive feature of this Playing Card Holders Pattern is the way the cards fan outward from behind the circular fabric section.
The cards need enough friction and support to remain separated without sliding out easily.
One practical construction method uses two padded circular layers joined securely at the center.
The rear circle supports the cards while the front circle covers their lower portion.
If you want a fuller version, make a second padded circle using the same process described above.
Place both finished circles together.
Mark their exact center.
Using strong thread, sew through the center of both layers several times.
Do not pull so tightly that the fabric puckers severely.
The goal is to anchor the circles while leaving enough flexibility around the circumference for cards to slide between them.
Now position your decorative button directly over the center.
Sew through the button, both circular layers, and back again several times.
A secure center connection is essential because this point receives much of the stress when cards are inserted and removed.
Test the holder with a few standard playing cards.
Slide the bottom portion of each card between the fabric layers.
Arrange them around the circle like the spokes of a wheel.
Continue adding cards until you achieve a comfortable fan.
The numbers and suits should remain visible above the fabric edge.
If the cards slide too easily, increase the center tension slightly.
If they are difficult to insert, the center may be too tight or the batting may be too thick.
Adjust before permanently securing the thread.
Another construction option is to create an internal circular pocket rather than two fully independent padded circles. The visual result can be similar, but the double-circle approach is generally straightforward for beginners.
The button can coordinate with the fabric or provide contrast.
A dark brown button creates a beautiful vintage effect with beige floral fabric.
Wooden buttons work especially well for rustic designs.
Bright plastic buttons can make children’s or family-game versions more playful.
For safety, remember that small buttons can present a choking hazard. If making the holder for environments where very young children may have access to it, consider replacing the removable button with securely sewn fabric-covered reinforcement.
After attaching the button, hide the thread ends between the fabric layers.
Give the holder one final press, avoiding direct high heat on plastic buttons.
Insert a complete hand of cards and test the finished piece.
The cards should spread naturally around the circle while the quilted fabric card holder remains comfortable in your hand.
Customizing and Finishing Your Playing Card Holder
Once you understand the basic Playing Card Holders Pattern, there are many ways to customize it.
A floral fabric similar to the inspiration creates a soft cottage-style appearance.
For a traditional game-room aesthetic, try deep green, burgundy, navy, or gold prints.
Playing-card fabric featuring hearts, diamonds, clubs, and spades can make the project’s purpose immediately recognizable.
You could also make four coordinated holders representing the four suits.
Use red for hearts, red-and-white for diamonds, black for spades, and charcoal for clubs.
Patchwork offers another creative possibility.
Instead of cutting the front circle from one piece of fabric, sew several scraps together first.
Press the patchwork panel flat, add batting, and then cut the circular shape from the completed panel.
This creates a unique scrap quilt card holder while using very little material.
Personalized versions can also make thoughtful handmade gifts.
Add embroidered initials before assembly, use a favorite color, or select novelty fabric representing the recipient’s hobbies.
Making several holders at once is efficient.
Create templates first, cut all the circles together, fuse the batting in batches, and then chain-piece or sew each construction stage consecutively.
A coordinated set of four can be stored with a deck of cards inside a handmade drawstring bag.
This creates a complete handmade game-night gift set.
For older adults or people with reduced hand mobility, consider making the holder slightly larger.
A larger diameter spreads the cards more widely and can reduce the amount of finger pressure needed to keep a hand organized.
The holder can be particularly helpful during games that require many cards.
However, it should still be lightweight enough to hold comfortably.
If portability is important, use thin fusible fleece rather than dense foam stabilizer.
To clean the holder, spot cleaning is generally preferable, particularly when a wooden or decorative button is used.
If you want the item to be machine washable, select washable fabrics, batting, thread, and buttons from the beginning.
Inspect the center button periodically.
If it becomes loose after frequent use, reinforce it with several passes of strong thread.
A small handmade project like this is also excellent for practicing curved sewing, topstitching, quilting, interfacing, and precision finishing without committing to a large quilt.
After making your first holder, experiment with different diameters and batting thicknesses until you find the combination that feels most comfortable in your hand.
FAQ – Playing Card Holders Pattern
What is a fabric playing card holder?
It is a handmade fabric accessory designed to organize a hand of playing cards. The cards can be arranged around the holder so their values remain visible without requiring the player to grip every card individually.
What size should I make the holder?
Approximately 7–8 inches (18–20 cm) in diameter is a useful starting point. You can enlarge the pattern if you prefer a wider card fan.
What fabric is best?
Medium-weight 100% quilting cotton is an excellent choice because it is stable, washable, easy to sew, and available in many prints.
Do I need batting?
Batting or thin fusible fleece is recommended. It adds structure and gives the finished holder a pleasant padded feel.
Can I use leftover quilt fabric?
Yes. This is an excellent fabric scrap project because each holder requires only a small amount of material.
What seam allowance should I use?
A ¼-inch (6 mm) seam allowance works well for the circular construction.
Why do I need to clip the curved seam?
Clipping helps the seam allowance spread after turning, allowing the outer circumference to form a smooth circle rather than bunching.
Can I quilt the circles?
Yes. Light quilting adds texture and helps keep the batting securely positioned.
What size button should I use?
A button around 1–1½ inches (2.5–4 cm) creates a proportion similar to the inspiration.
Can I make the center button from fabric?
Yes. A fabric-covered button can coordinate perfectly with the rest of the holder.
Can beginners make this project?
Yes. It is a manageable beginner sewing project, although slowly stitching the curved perimeter will produce better results.
How many cards can it hold?
Capacity depends on the diameter, fabric thickness, and center tension. A larger holder can accommodate a wider fan of cards.
Can I make several as gifts?
Absolutely. Because the pieces are small and construction is repetitive, this pattern is suitable for making coordinated sets.
Can I use denim or canvas?
Lightweight versions may work, but heavy fabrics can become bulky when layered. Quilting cotton is easier for the first version.
Is this the same as a tabletop card rack?
Not exactly. This design is intended to be held comfortably while keeping cards spread and organized.
Can the dimensions be enlarged?
Yes. Simply enlarge both circular pieces equally while maintaining consistent seam allowances and center placement.
Conclusion
The Playing Card Holders Pattern turns a few basic quilting materials into a useful accessory for family game nights, card clubs, travel, and handmade gifts. Its circular construction is simple enough for beginners while still providing opportunities to practice curved seams, accurate cutting, batting, topstitching, and neat hand finishing.
The floral holder shown in the inspiration demonstrates how attractive such a practical object can be. A warm neutral print and contrasting center button create a classic handmade appearance, while the cards form a colorful fan around the outside.
For the cleanest result, concentrate on three details: cut both circles accurately, sew the curved perimeter slowly, and reinforce the center button securely. Those small steps will help the finished holder maintain its shape and function comfortably.
PATTERN VIDEO
Best of all, this quilted playing card holder can be customized endlessly. Use floral scraps for a cottage-inspired version, bold patchwork for a colorful design, seasonal prints for holiday gifts, or coordinated fabrics for an entire game-night set. It is a small, useful project that transforms leftover quilting fabric into something attractive, practical, and enjoyable to use.