
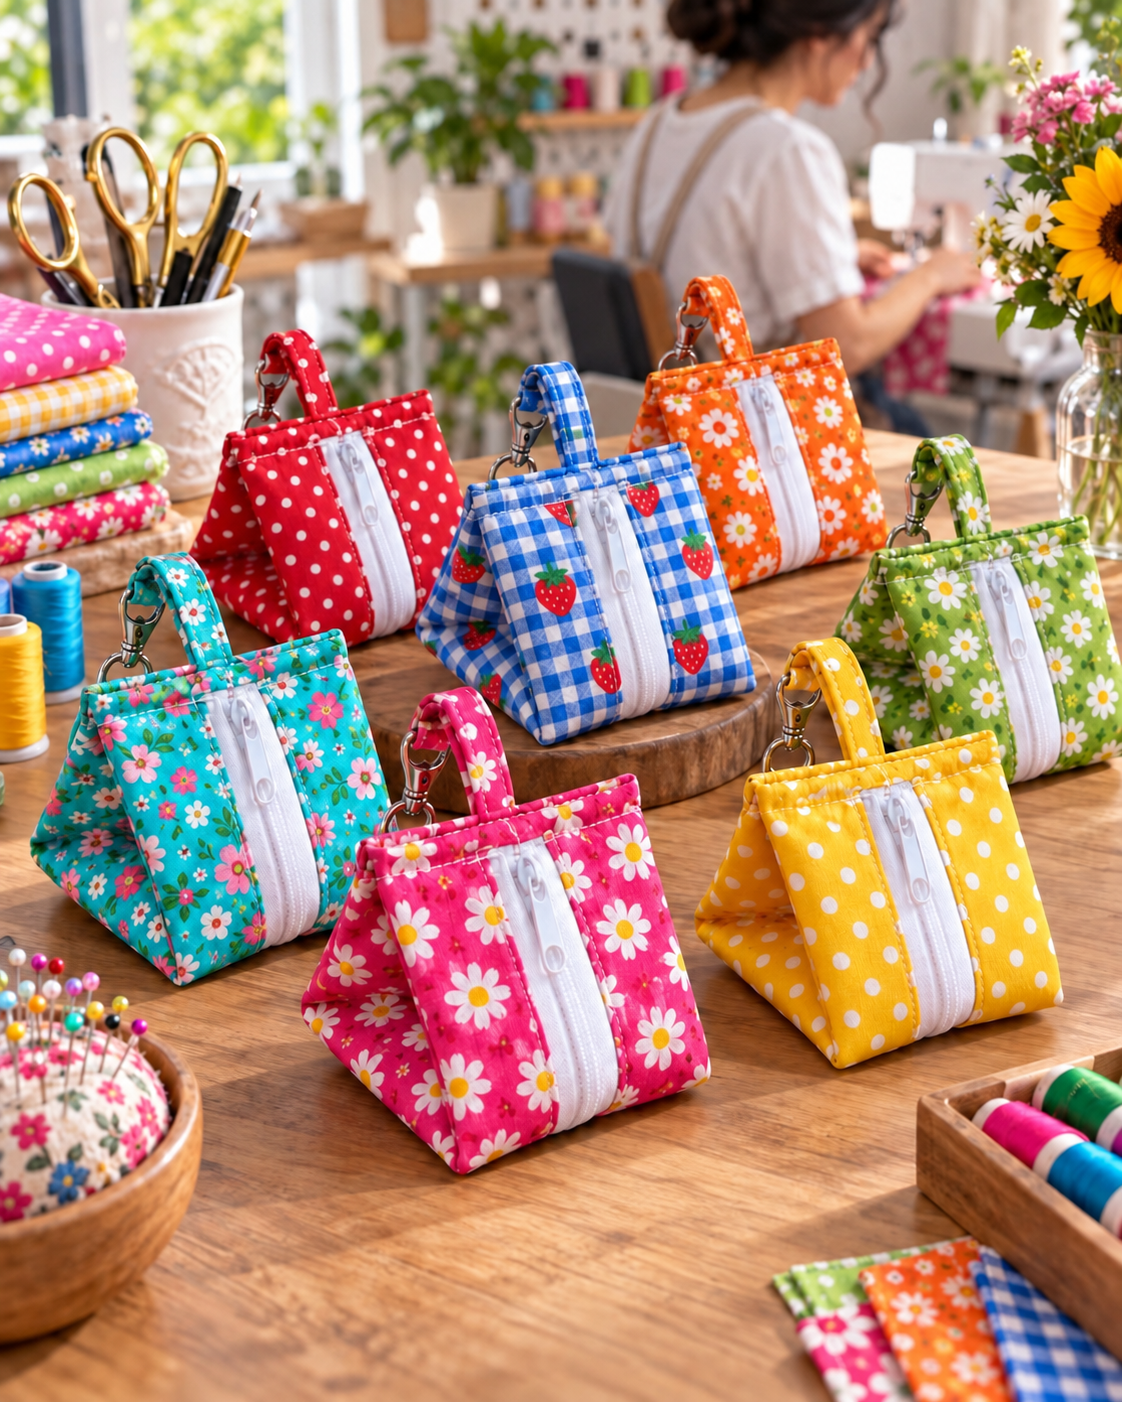
Quilted Mini Zip Pouch Pattern is a cheerful and practical sewing project that transforms small pieces of cotton fabric, batting, a zipper, and a few simple notions into a compact three-dimensional pouch. Inspired by the colorful mini pouches shown in the reference image, this design combines a softly quilted body, a prominent center zipper, boxed sides, a small carrying loop, and optional swivel-hook hardware. The result is a useful little organizer that is ideal for sewing notions, coins, earbuds, small accessories, clips, cosmetics, or other lightweight everyday items.
This mini quilted zipper pouch is also an excellent project for using fabric scraps and coordinating fat-quarter remnants. Florals, gingham, polka dots, strawberries, daisies, and other cheerful prints all work beautifully because the small size allows even bold fabrics to become the main feature. Quilting adds structure to the pouch while also protecting the contents and giving the finished project a more polished handmade appearance.
Another advantage of the Quilted Mini Zip Pouch Pattern is that the basic construction can easily be customized. You can make the pouch taller, wider, or deeper; add a wrist strap; attach a swivel clasp; use contrasting zipper tape; or create matching sets in several colors. The instructions below use practical measurements and standard sewing techniques to recreate the general style of the pictured pouches while keeping the project accessible to confident beginners.
Materials, Measurements and Preparing the Quilted Pieces
For one Quilted Mini Zip Pouch, choose a medium-weight quilting cotton for the exterior. Cotton is easy to cut accurately, presses well, and is available in countless prints. For the lining, use quilting cotton in either a coordinating color or a simple solid.
DISCOVER MORE FREE PATTERNS HERE!
A practical finished size for this project is approximately 5½ inches wide × 4½ inches high × 3 inches deep (14 × 11.5 × 7.5 cm). Because the design is flexible, a difference of ½ inch or 1–2 cm will not significantly affect the construction.
For the exterior, cut two rectangles approximately 8 × 7 inches (20.5 × 18 cm). Cut two lining rectangles to the same dimensions. You will also need two pieces of lightweight batting or fusible fleece measuring approximately 8 × 7 inches.
Choose a zipper approximately 8 inches (20 cm) long. A zipper that is slightly longer than the final opening is usually easier to install because the zipper pull can be moved away from the sewing area.
For the handle, cut one strip approximately 2 × 8 inches (5 × 20 cm). If you want a shorter loop, reduce the length to about 6 inches (15 cm). A small swivel clasp or D-ring can be added if desired.
You will also need coordinating thread, fabric scissors or a rotary cutter, quilting ruler, cutting mat, pins or sewing clips, sewing machine, zipper foot, iron, hand-sewing needle, and marking tool.
Throughout the project, use approximately a ¼-inch (6 mm) seam allowance unless another measurement is specified. Consistency is more important than choosing an unusually precise seam width.
Place each exterior fabric piece over one piece of batting with the right side facing upward.
Quilt the layers together before assembling the pouch.
Straight-line quilting is the easiest option. Stitch parallel lines approximately ½–1 inch (1.3–2.5 cm) apart.
Diagonal quilting can create a traditional diamond pattern. Mark the first diagonal line carefully and use the previous stitched line as a guide for the remaining rows.
If you prefer the softer appearance seen in many modern quilted accessories, keep the quilting relatively simple. The colorful printed fabric should remain the visual focus.
After quilting both exterior panels, trim them back to exactly the same size.
Accurate trimming at this stage makes zipper installation and side assembly much easier.
Prepare the lining pieces in the same final dimensions, but do not quilt them.
The lining should remain lightweight so the pouch does not become unnecessarily bulky.
How to Install the Zipper and Create the Main Pouch
Place one quilted exterior panel right side up on your work surface.
Position the zipper along one edge with the zipper teeth facing toward the center of the fabric and the zipper tape aligned with the raw edge.
Place one lining panel over the zipper with its right side facing the exterior fabric.
The zipper is now sandwiched between the exterior and lining.
Clip the three layers together.
Attach a zipper foot to your sewing machine.
Sew along the zipper tape, keeping the stitching reasonably close to the zipper teeth without allowing the needle to strike them.
Fold the exterior and lining away from the zipper.
Press carefully.
Topstitch approximately ⅛ inch (3 mm) from the folded fabric edge.
This topstitching keeps the lining away from the zipper teeth and gives the pouch a crisp professional finish.
Repeat the process with the opposite side.
Place the second exterior panel right side up.
Align the remaining zipper edge with it.
Add the second lining piece.
Clip and stitch.
Open the layers and topstitch again.
At this point, the zipper should sit neatly between two quilted exterior sections with the lining attached underneath.
Before continuing, open the zipper halfway.
This is extremely important because the partially opened zipper provides a way to turn the pouch right side out later.
Arrange the exterior fabrics with right sides together.
Place the lining pieces right sides together on the opposite side.
Match all corresponding edges carefully.
Clip around the perimeter.
Leave an opening approximately 3–4 inches (7.5–10 cm) along the bottom of the lining.
This opening will be used for turning.
Sew around the perimeter using the selected seam allowance.
Backstitch near both sides of the lining opening.
Take extra care when sewing across the zipper ends.
Move slowly and avoid stitching directly over heavy metal zipper stops.
If the zipper extends beyond the fabric, trim the excess only after the seams have been secured.
Now the project will resemble a flat zipper pouch, but the distinctive shape comes from creating depth at the corners.
Boxed Corners, Handle and Three-Dimensional Shape
The pictured mini pouches have a charming boxy or triangular profile that allows them to stand upright. This is created by boxing the lower corners and controlling the depth near the zipper.
Take one exterior bottom corner and separate the two fabric layers.
Flatten the corner so the side seam aligns directly over the bottom seam.
The corner should form a triangle.
Measure approximately 1½ inches (3.8 cm) inward from the tip and mark a line perpendicular to the seam.
For a deeper pouch, use approximately 2 inches (5 cm).
Sew across the marked line.
Backstitch at both ends.
Trim the triangular excess, leaving approximately a ¼-inch (6 mm) seam allowance.
Repeat on the opposite exterior corner.
Box the corresponding lining corners using exactly the same measurement.
Matching the exterior and lining depth is important because an oversized lining can bunch inside the finished pouch.
The upper area can also be gently shaped so the pouch narrows toward the zipper, producing the attractive trapezoidal appearance seen in the inspiration.
Do not make this taper too dramatic. A subtle angle generally produces a more useful interior.
Now prepare the carrying loop.
Fold the long handle strip in half lengthwise with wrong sides together and press.
Open it again.
Fold each long raw edge toward the center crease.
Press.
Fold the entire strip in half again.
You now have a narrow strap with all raw edges enclosed.
Topstitch along both long sides.
If using a swivel hook, slide the hardware onto the strap.
Fold the strap in half.
Place the raw ends together and baste them securely.
Insert the loop into the appropriate side seam before closing the pouch, keeping the loop itself inside the project and the raw ends extending slightly beyond the seam allowance.
Stitch over this area more than once for additional strength.
The handle is decorative and useful for carrying lightweight contents, but it should not be treated as a heavy-load strap.
Once all corners and the strap are completed, reach through the opening in the lining.
Carefully pull the pouch through the opening.
Then pull the exterior through the partially opened zipper.
Use your fingers or a blunt turning tool to gently shape the corners.
Avoid pushing aggressively because this can puncture the fabric or damage the seam.
Fold the lining opening inward by approximately ¼ inch (6 mm).
Press.
Close the opening with a narrow machine stitch or an invisible ladder stitch by hand.
Push the lining into the pouch.
Manipulate the boxed corners until the entire pouch sits evenly.
Finishing, Quilting Tips and Creative Variations
Give the completed Quilted Mini Zip Pouch Pattern a light final pressing.
Be cautious around plastic zippers and synthetic batting because excessive heat may cause damage.
Check the zipper several times.
It should move smoothly without catching the lining.
If the lining approaches the zipper teeth, add another line of topstitching slightly farther from the zipper.
Inspect the handle attachment.
For a pouch that will frequently hang from a bag or hook, reinforce the handle seam with several rows of stitching.
A small metal swivel clasp makes the project especially practical.
The pouch can then be attached to a larger craft tote, backpack, handbag, sewing organizer, or storage hook.
You can also replace the short handle with a wrist strap.
For a wristlet, cut the strap approximately 12–14 inches (30–35.5 cm) long before folding.
The project is particularly useful for scrap quilting.
Because each pouch requires relatively small fabric pieces, leftover quilting cotton from larger projects can easily be transformed into matching organizers.
Consider creating a coordinated collection.
For example, make one pouch for sewing clips, another for needles and thimbles, another for measuring tapes, and another for small embroidery supplies.
Bright colors work particularly well for organizing because each pouch can represent a different category.
A red polka-dot pouch might hold clips, while a blue gingham pouch stores marking tools and a floral pouch holds embroidery notions.
You can also experiment with different quilting patterns.
Diagonal diamonds create a classic quilted appearance.
Vertical channels produce a cleaner contemporary look.
Crosshatching provides additional firmness.
Free-motion quilting allows the pouch to become a miniature showcase for decorative stitching.
For additional structure, replace standard batting with fusible fleece.
For a softer pouch, use thin cotton batting.
For a lightweight foldable version, use only interfacing.
Small appliqués can also be added before construction.
Flowers, hearts, initials, strawberries, butterflies, or simple geometric shapes can personalize the exterior.
Always complete appliqué and decorative quilting before installing the zipper.
If you are making several pouches as gifts, use the same construction method but change the fabric.
This creates a coordinated handmade collection while keeping production efficient.
FAQ – Quilted Mini Zip Pouch Pattern
Is the Quilted Mini Zip Pouch Pattern suitable for beginners?
Yes. A confident beginner who can sew straight seams and use a zipper foot should be able to complete the project.
What is a good finished size?
Approximately 5½ × 4½ × 3 inches (14 × 11.5 × 7.5 cm) is a useful starting size.
What fabric should I use?
Standard 100% cotton quilting fabric is an excellent choice.
Do I need batting?
Batting is recommended because it creates the padded quilted appearance and gives the pouch more body.
Can I use fusible fleece instead?
Yes. Fusible fleece provides excellent structure and simplifies layering.
What zipper length should I use?
An 8-inch (20 cm) zipper is convenient for the suggested dimensions.
Can I use a longer zipper?
Yes. A longer zipper can be trimmed after it is securely sewn into the project.
Should I quilt the lining?
Usually no. Quilting only the exterior keeps the interior from becoming too bulky.
What seam allowance should I use?
Approximately ¼ inch (6 mm) works well for this project.
How do I make the pouch stand upright?
Create boxed corners at the bottom. Increasing the boxed-corner measurement increases the depth.
Why should I open the zipper before sewing the pouch together?
A partially opened zipper provides access for turning the completed project right side out.
Can I make this pouch without hardware?
Absolutely. Make a simple fabric loop without adding a swivel clasp.
Can I add a wrist strap?
Yes. Lengthen the fabric handle to approximately 12–14 inches (30–35.5 cm).
What can I store inside?
The pouch works well for sewing notions, small craft supplies, coins, earbuds, lightweight cosmetics, clips, and other small accessories.
Can I use fabric scraps?
Yes. This is an excellent fabric scrap project.
Can I make the pouch larger?
Yes. Increase the exterior, batting, and lining pieces proportionally and choose a longer zipper.
How can I make the pouch more structured?
Use fusible fleece or add medium-weight interfacing to the lining.
Can I wash the finished pouch?
That depends on the fabric, batting, zipper, and hardware selected. Cotton versions without delicate hardware can generally be gently washed and air-dried.
Conclusion
The Quilted Mini Zip Pouch Pattern is a wonderful way to combine practical sewing with colorful quilting. With only a few pieces of cotton fabric, batting, lining, a zipper, and an optional clasp, you can create a compact three-dimensional organizer that looks polished while remaining straightforward to construct.
The most important stages are accurate cutting, even quilting, careful zipper installation, consistent boxed corners, and secure attachment of the carrying loop. Taking a little extra time with pressing and topstitching makes a noticeable difference in the finished result.
This project is also highly adaptable. Florals create a cheerful cottage-inspired pouch, gingham gives it a classic handmade appearance, polka dots add playful color, and coordinated scraps can turn the design into a true patchwork mini pouch. Changing the dimensions, strap, hardware, quilting lines, and zipper colors provides almost unlimited possibilities.
Whether used as a small sewing notions pouch, travel organizer, craft accessory, gift, or scrap-busting project, this Quilted Mini Zip Pouch Pattern offers a satisfying way to turn favorite fabrics into something both beautiful and useful.