
Star Hobo Bag Pattern is a creative sewing and quilting project that transforms a simple shoulder bag into a striking star-shaped accessory with a relaxed handmade character. Inspired by the reference image, this design combines a sculptural five-point star body with long integrated handles and a softly structured silhouette. The result is a roomy fabric bag that can be used for everyday errands, craft supplies, books, light shopping, or casual outings. Although the unusual shape makes the project look advanced, the construction becomes much easier when it is divided into clear stages: preparing the star template, cutting the outer fabric and lining, adding stabilization, constructing the handles, sewing the star perimeter, and finishing the opening neatly.
The main idea behind this Star Hobo Bag Pattern is to create two matching star-shaped panels and connect them so the points form the characteristic body of the bag. The upper portion extends into long shoulder straps, while a curved opening between those straps provides access to the interior. The warm rust-colored bag in the photograph has a minimalist appearance, but the same construction works beautifully with linen, canvas, denim, cotton, patchwork, or lightly quilted fabric. Quilters can make the project especially interesting by piecing scraps before cutting the star panels, adding simple straight-line quilting, or using contrasting fabric for the lining. These options make every finished quilted hobo bag look completely unique.
One of the advantages of sewing your own fabric star bag is being able to customize every dimension. A medium version can measure approximately 17 to 19 inches (43 to 48 cm) across the widest points and around 15 to 17 inches (38 to 43 cm) from the upper body to the lowest star point, excluding the handles. Finished handles of approximately 22 to 26 inches (56 to 66 cm) are comfortable for shoulder carrying, although the ideal length depends on personal preference. The measurements below can therefore be treated as a practical starting point rather than an exact commercial template. Always make a paper pattern first, check the scale visually, and remember to include a consistent seam allowance around every piece before cutting your final fabric.
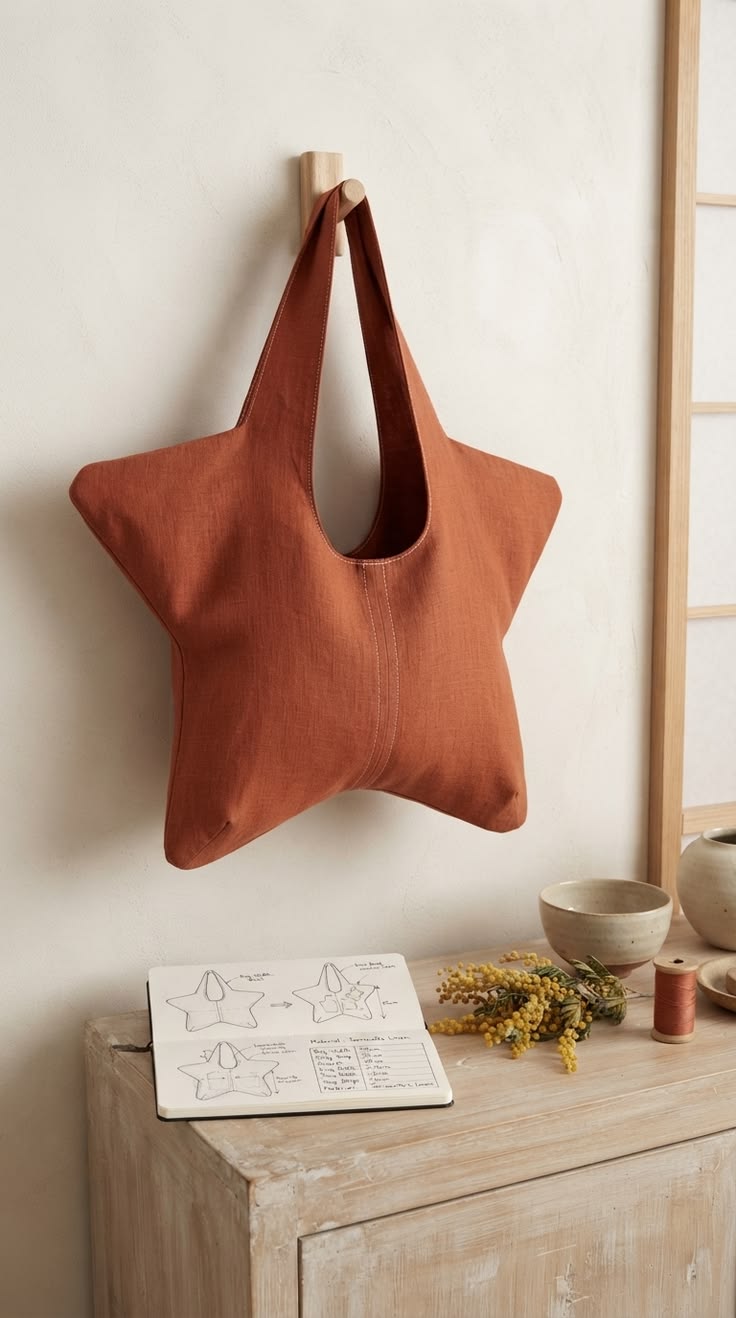
Materials, Measurements, and Preparing the Star Hobo Bag Pattern
For this Star Hobo Bag Pattern, choose an outer fabric with enough body to preserve the star silhouette without becoming excessively stiff. Medium-weight cotton, linen blend, cotton canvas, lightweight denim, or upholstery-weight cotton are excellent options. For the lining, use quilting cotton or another smooth woven fabric. A contrasting lining adds a small decorative detail whenever the bag opens, while a matching lining gives the project a clean and understated appearance.
DISCOVER MORE FREE PATTERNS HERE!
A medium bag will generally require about 1 yard (0.9 m) of outer fabric and approximately the same amount of lining. You may also need 1 yard of lightweight fusible interfacing, fusible fleece, or thin batting. If you plan to quilt the panels, choose low-loft batting so the star points remain manageable when sewing. Gather coordinating thread, pins or sewing clips, fabric scissors or a rotary cutter, a cutting mat, a ruler, an iron, and a sewing machine fitted with a universal or quilting needle appropriate for your fabric.
Begin by drafting the main star bag template on large paper. Draw a symmetrical five-point star approximately 18 inches (46 cm) from side to side. The lower three points create the body shape, while the upper left and upper right sections transition into the handles. Instead of ending the two upper points sharply, extend them upward into long straps approximately 3 to 3½ inches (7.5 to 9 cm) wide. Curve the inner edges smoothly so they create a generous U-shaped opening between the handles.
For a comfortable shoulder version, extend each handle approximately 24 inches (61 cm) from the upper bag body before allowing for joining and finishing. If you prefer shorter handles, reduce that measurement. Make sure both sides of the pattern are symmetrical by drafting half of the shape first, folding the paper, and tracing the opposite side. Symmetry is especially important because uneven star points become noticeable after the bag is filled.
Add a ⅜-inch to ½-inch (1 to 1.3 cm) seam allowance around the entire pattern unless your template already includes it. Clearly mark the stitching line near each inward corner of the star. These inner corners are the most important areas to sew accurately because incorrect pivoting can distort the finished shape. Also mark the center bottom, handle centers, and several matching points around the perimeter to help align the layers later.
Once the paper pattern is complete, cut two mirrored outer fabric pieces and two mirrored lining pieces. Cut matching interfacing pieces if desired. If using batting for a quilted Star Hobo Bag, cut the batting slightly larger than each outer panel, quilt the fabric first, and trim it to the final pattern shape afterward. This prevents shrinkage or shifting during quilting from changing the dimensions of the star.
Quilting and Sewing the Main Star-Shaped Bag Body
The next stage of the Star Hobo Bag Pattern focuses on creating enough structure for the star points to remain visible. If you are using fusible interfacing, center it on the wrong side of both outer pieces and fuse it according to the manufacturer’s general heat requirements. Press rather than dragging the iron so the fabric does not stretch or distort. Allow the pieces to cool completely before handling them.
For a true quilted hobo bag, layer each outer panel with thin batting and a lightweight backing fabric or interfacing. Quilt straight vertical lines approximately 1 to 1½ inches (2.5 to 4 cm) apart, or use gentle diagonal lines. The reference style has a clean minimalist appearance, so simple quilting works particularly well. Decorative free-motion quilting can also be used, but avoid extremely dense stitching because it may make the star points too stiff to turn neatly.
Place the two completed outer star panels right sides together. Match every point, inner corner, and side carefully, then secure the layers with clips or pins. Begin sewing near the upper side of the bag and work around the outer perimeter, leaving the handle opening area unsewn according to your chosen construction method. Maintain the same seam allowance throughout the project because inconsistent seams can cause the two sides to shift out of alignment.
When you reach each outer star point, sew almost to the exact marked point, stop with the needle down, lift the presser foot, pivot the fabric, and continue along the next edge. At each inward V-shaped corner, stitch accurately to the pivot mark before changing direction. Moving too far beyond the pivot line can create puckering, while turning too early can round the shape instead of producing a clean inward corner.
Before turning the bag, clip every inner corner close to the stitching without cutting through the seam. Trim excess seam allowance around the outer points, especially at the tips. You can also grade bulky seams by trimming one layer slightly narrower than the other. These small finishing steps make an enormous difference because they allow the fabric to spread naturally when the bag is turned right side out.
Turn the outer bag carefully and use a blunt turning tool to define each star point. Avoid pushing aggressively with scissors because sharp tools can pierce the fabric. Press the seams using moderate heat and shape the points with your fingers. At this stage, the Star Hobo Bag Pattern should already resemble the reference project: a soft dimensional star with enough volume in the center to hold everyday essentials.
Making the Lining, Handles, and Curved Bag Opening
Construct the lining in nearly the same way as the outer bag. Place the two lining pieces right sides together and stitch around the star perimeter, but leave an opening approximately 4 to 5 inches (10 to 13 cm) along one relatively straight lower section. This opening will allow you to turn the entire bag right side out after the lining and exterior are joined.
Clip the lining’s inner corners and trim the outer points just as you did with the main fabric. Press the lining seams gently. Because quilting cotton is usually thinner than the exterior fabric, the lining may naturally feel slightly larger after turning. If necessary, use a slightly deeper seam allowance on the lining—approximately 1⁄16 inch (1 to 2 mm) more—to help it sit smoothly inside the finished bag.
The handles are one of the defining details of this Star Hobo Bag Pattern. If your handles were drafted as extensions of the star body, align the outer fabric and lining around the entire curved opening with right sides together. Match the handle edges carefully and pin or clip them at short intervals. Sew smoothly around the U-shaped inner opening and along any handle edges that need joining.
Clip into the curved seam allowance every ½ inch (1.3 cm) or so, being careful not to cut the stitching. This releases tension and allows the curved opening to lie flat after turning. On concave sections, clipping is particularly important. On convex curves, small notches may be removed instead. Trim any bulky intersections before turning the bag through the opening left in the lining.
Once the bag is turned, gently roll the curved edge between your fingers so the lining stays slightly inside and does not show from the front. Press the entire opening carefully. Topstitch approximately ⅛ inch (3 mm) from the edge using a slightly longer stitch length. The visible topstitching seen in a minimalist bag like the reference version is both decorative and functional because it reinforces the handles and gives the curves a crisp finish.
Close the opening in the lining with a narrow machine stitch or a neat ladder stitch by hand. Push the lining fully into the outer bag and smooth the bottom and star points into position. Give the completed fabric hobo bag a final press, protecting delicate fabrics with a pressing cloth. Check that both handles are equal in length and that the star hangs evenly before adding any optional decorative or practical details.
Customizing and Finishing the Star Hobo Bag Pattern
A simple solid fabric creates the sophisticated appearance seen in the reference image, but the Star Hobo Bag Pattern can also become an excellent scrap-quilting project. Piece several coordinating fabrics into a panel larger than the template, press all seams flat, and then cut the star shape from that pieced fabric. Using warm earth tones, florals, vintage prints, or monochromatic scraps can produce completely different styles while preserving the same construction.
You can also create a patchwork star bag by assigning a separate fabric to each point. Divide the paper template into sections, add seam allowances to the internal divisions, and piece the sections together before assembling the bag. Press seams toward darker fabrics or open them when several intersections become bulky. Once the pieced panel matches the original full-size template, continue with stabilization and construction normally.
An interior pocket is another practical addition. Before sewing the lining panels together, cut a rectangle approximately 8 x 12 inches (20 x 30 cm). Fold it right sides together, stitch around the edges while leaving a turning gap, turn and press it, then topstitch the pocket onto one lining panel. Divide it into smaller compartments if you want dedicated spaces for a phone, keys, glasses, or sewing tools.
For additional security, add a magnetic snap to the lining before joining it to the exterior. Reinforce the snap area with a small square of interfacing. Position the closure several inches below the center opening so the hardware does not interfere with the handle seams. Another option is to sew a small fabric loop and button closure, which can complement a rustic or vintage version of the bag.
The handles can also be strengthened if you plan to carry heavier items. Insert a strip of woven cotton webbing or firm interfacing inside each handle before topstitching. Keep reinforcement away from the final seam allowances to avoid unnecessary bulk. Double rows of topstitching, similar to the detail visible on the reference bag, give the straps a professional appearance while also increasing durability.
Finally, inspect the entire Star Hobo Bag Pattern project for loose threads, uneven corners, or areas that need additional pressing. Shape the star by gently filling the bag with fabric scraps or a towel for several hours if necessary. Once the seams settle, the bag should display its distinctive five-point silhouette while remaining soft enough to function as a comfortable everyday shoulder bag.
FAQ About the Star Hobo Bag Pattern
Is the Star Hobo Bag Pattern suitable for beginners?
A confident beginner can make this project if they are comfortable sewing curves and pivoting at corners. The star points require more attention than a rectangular tote bag, but the actual techniques are straightforward. Practicing one inward and outward corner on scrap fabric before beginning the final bag can make the construction much easier.
What is the best fabric for a Star Hobo Bag?
Medium-weight linen, cotton canvas, denim, twill, and home-decor cotton are excellent choices. Quilting cotton can also work when reinforced with interfacing or batting. Avoid extremely stretchy fabric because the star shape depends on stable edges and accurate seams.
Can I make the bag completely from quilting cotton?
Yes. Use quality quilting cotton for both exterior and lining, but stabilize the outer panels with fusible fleece, batting, or medium-weight interfacing. Quilting the exterior to thin batting gives lightweight cotton greater body while maintaining a soft handmade appearance.
How large should a Star Hobo Bag be?
A practical medium size is approximately 17 to 19 inches (43 to 48 cm) across the widest section. You can enlarge or reduce the paper pattern as long as all pieces are scaled equally. Remember that a very small star may become difficult to turn because the points and inward corners become narrow.
How do I make sharp star points when sewing?
Sew precisely to the marked pivot points, trim the seam allowance around each outer tip, and clip deeply into each inner corner without cutting the stitches. After turning, use a blunt point-turning tool rather than scissors. Proper trimming is usually more important than aggressively pushing the corners outward.
Can I add batting to this Star Hobo Bag Pattern?
Yes. Thin cotton batting or low-loft fusible fleece works especially well. Thick batting can create excessive bulk at the star points and handles, so lighter stabilization generally produces a cleaner result.
Can the Star Hobo Bag have a zipper?
A zipper can be added, but it changes the construction of the curved opening considerably. For a first version, a magnetic snap or simple open-top design is easier. Experienced sewists can create a recessed zipper panel and attach it between the lining sections before final assembly.
How long should the shoulder handles be?
Handles measuring approximately 22 to 26 inches (56 to 66 cm) from attachment point to attachment point work well for many shoulder bags. However, body size and personal preference vary, so test the paper template against your shoulder before cutting the final fabric.
Why does my finished star look uneven?
Uneven points usually result from mismatched panels, inconsistent seam allowances, or inaccurate pivoting. Mark every corner before sewing and match the corresponding points with pins or clips. Pressing the pattern pieces before assembly also helps prevent distortion.
Can I use fabric scraps for this pattern?
Absolutely. A scrap fabric Star Hobo Bag can be especially attractive. Sew scraps together into panels larger than the pattern, quilt or stabilize those panels, and then cut the final star shapes. This method combines traditional patchwork with a modern bag silhouette.
Conclusion
The Star Hobo Bag Pattern is a distinctive project that combines practical bag construction with the visual impact of a large star silhouette. Throughout this tutorial, you learned how to draft the star body, extend the upper sections into comfortable handles, select appropriate outer fabric and lining, calculate practical dimensions, add interfacing or batting, and cut matching pieces accurately.
You also learned the most important construction techniques for this unusual shape: sewing to exact pivot points, clipping inward corners, trimming outer star tips, turning the pieces carefully, and pressing each seam before continuing. These details are what transform a simple fabric shape into a polished handmade hobo bag.
The lining and handle construction are equally important. A smooth lining protects the interior seams, while reinforced and topstitched handles help the bag withstand regular use. Optional additions such as pockets, magnetic closures, extra quilting, patchwork panels, or reinforced straps allow you to adapt the basic project to your own needs.
Another useful lesson from this project is that a quilt bag pattern does not have to follow a traditional square or rectangular structure. Quilting and sewing techniques can be applied to sculptural forms, creating accessories that are both functional and decorative. The star shape is particularly effective because even a simple solid-colored fabric produces an eye-catching finished piece.
Take your time when preparing the paper template and sewing the corners, since accuracy during these early stages determines how symmetrical the finished bag will appear. Once you understand the basic construction, the same Star Hobo Bag Pattern can be recreated in many fabrics, sizes, and quilting styles.
PATTERN VIDEO
If you make this Star Hobo Bag, leave your sincere opinion about the project and share your suggestions. Tell us which part of the tutorial was most helpful, what fabric or color combination you would choose, and what additional sewing or quilting projects you would like to see explained in future tutorials.