
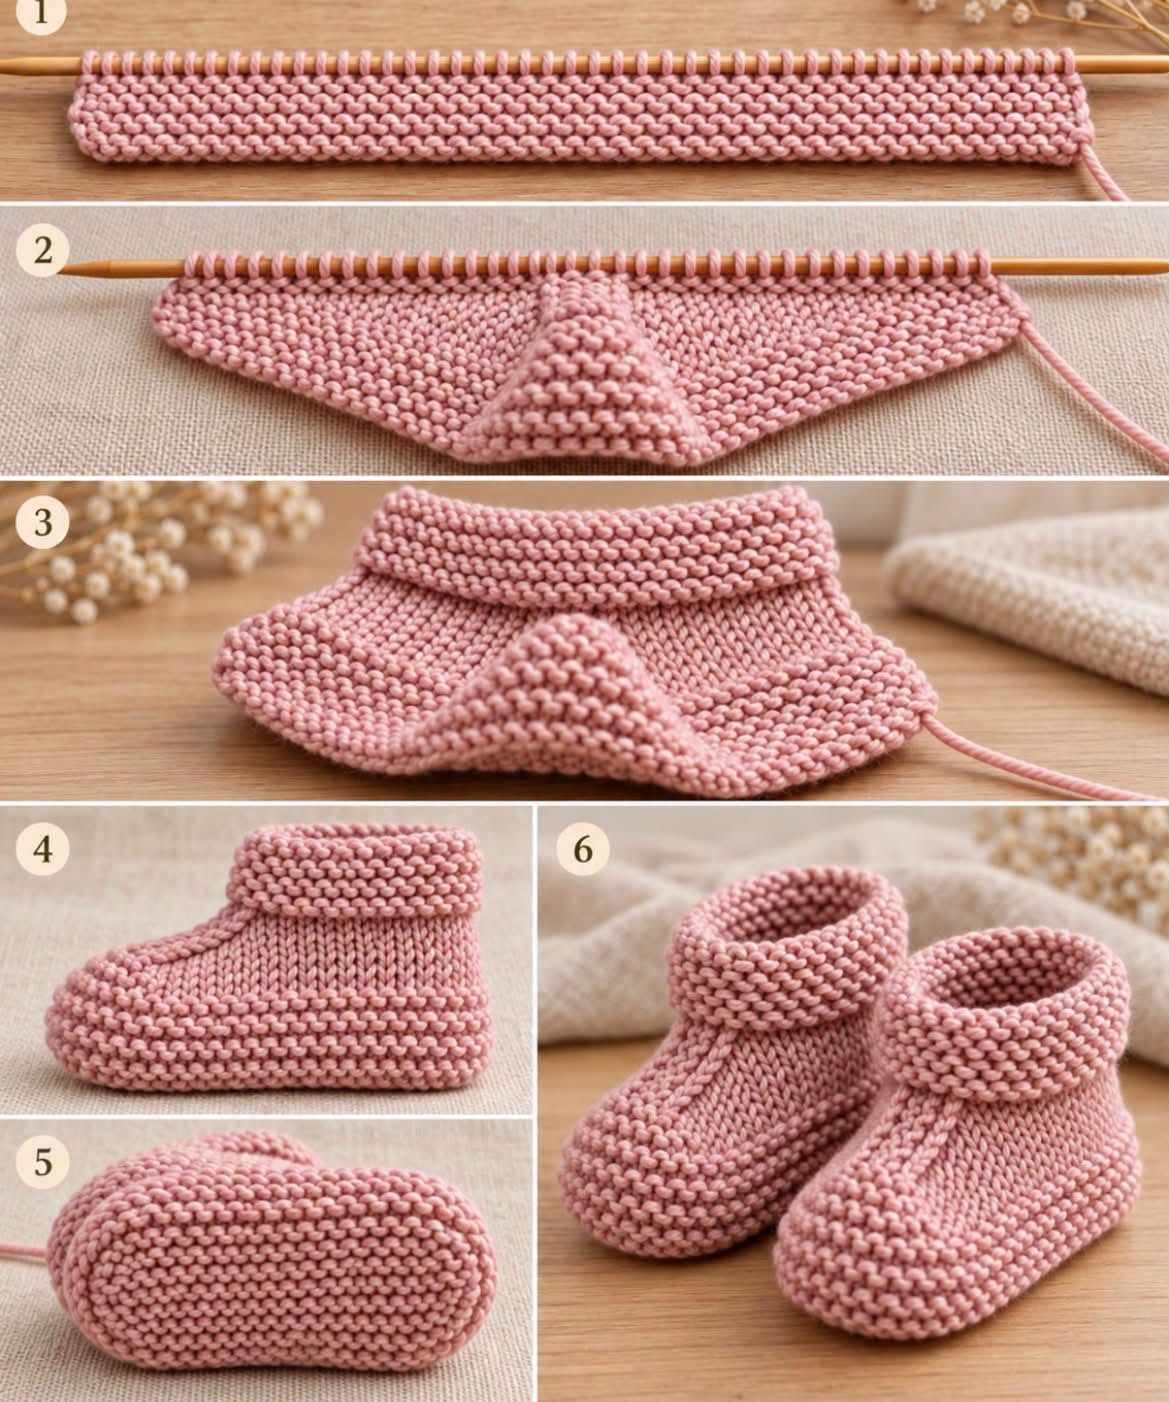
The Knitted Booties Pattern is a delightful handmade knitting project that combines softness, comfort, and timeless charm. These adorable pink baby booties feature a rounded toe, a beautifully textured garter stitch sole, a smooth knitted upper, and a folded ankle cuff that gives them a classic, cozy appearance. Perfect for newborn gifts, baby showers, and handmade keepsakes, this easy baby booties knitting pattern is a wonderful choice for knitters who enjoy creating practical accessories with simple techniques. The delicate design looks sophisticated, yet it can be recreated using basic knitting stitches, careful shaping, and a little patience. Whether you are a beginner or an experienced knitter, making a pair of these charming booties is a satisfying way to transform a small amount of yarn into something meaningful.
One of the most appealing features of this Knitted Booties Pattern is its clever construction. As illustrated in the reference image, the project begins with a flat knitted section that gradually develops into the shape of a small shoe. The combination of garter stitch and stockinette stitch creates a lovely contrast between the textured edges and the smoother center. The rounded toe provides space for little feet, while the folded cuff adds warmth and helps the booties sit comfortably around the ankle. Because the design does not require complicated cables or elaborate lacework, it is approachable for knitters who already know how to cast on, knit, purl, increase, and decrease stitches. Each stage introduces an important technique that can be applied to many other baby knitting projects.
Another reason to love these handmade knitted baby booties is their versatility. Although the reference image features a beautiful dusty pink color, you can easily recreate the design in cream, sage green, baby blue, lavender, beige, or any other soft shade. The booties are also an excellent project for using leftover yarn because they require relatively little material. They can be made in different sizes by adjusting the knitting gauge, stitch count, and length of the sole. In this detailed Knitted Booties Pattern tutorial, you will learn how to select suitable yarn, understand the measurements, knit the foundation, shape the toe, create the folded cuff, assemble the booties, and finish them neatly. The instructions below offer a practical flat-knitted adaptation inspired by the photographed design, rather than a stitch-for-stitch reconstruction of an unseen original pattern.
Materials, Measurements, and Basic Techniques for Knitted Baby Booties
1. Choosing the Right Yarn for Baby Booties
DISCOVER MORE FREE PATTERNS HERE!
Selecting the correct yarn is essential when making a comfortable Knitted Booties Pattern. Baby booties should feel soft against delicate skin while remaining lightweight and flexible. A smooth DK-weight or light worsted-weight yarn is an excellent choice because it provides enough structure to maintain the bootie shape without making the fabric stiff. Baby-friendly cotton blends, soft merino wool, and washable acrylic yarns are popular options. If you want to reproduce the appearance of the reference image, choose a muted dusty pink yarn with a smooth texture and good stitch definition. Avoid excessively fuzzy or loosely spun yarns that shed fibers easily, and always check the manufacturer’s care instructions.
2. Materials and Knitting Supplies
For this easy knitted baby booties pattern, prepare the following materials:
-
Approximately 50–80 yards (46–73 meters) of soft DK-weight baby yarn.
-
US size 5 (3.75 mm) knitting needles, or the size needed to obtain gauge.
-
Tapestry needle for sewing the seams.
-
Small scissors.
-
Measuring tape.
-
Stitch markers.
-
Row counter, optional.
-
Removable stitch holders, optional.
-
A small piece of contrasting yarn for marking the center stitches.
The recommended yarn quantity is generally sufficient for a small pair of baby booties, although larger sizes or different gauges may require additional yarn.
3. Baby Booties Size Chart
The following chart provides approximate measurements for different baby sizes. Baby feet vary considerably, so measuring the baby’s foot is preferable whenever possible.
| Baby age | Approximate foot length | Suggested bootie length |
|---|---|---|
| Newborn | 8–9 cm (3.1–3.5 in) | 9 cm (3.5 in) |
| 0–3 months | 9–10 cm (3.5–3.9 in) | 10 cm (3.9 in) |
| 3–6 months | 10–11 cm (3.9–4.3 in) | 11 cm (4.3 in) |
| 6–12 months | 11–12 cm (4.3–4.7 in) | 12 cm (4.7 in) |
These are approximate finished sole measurements, not exact dimensions from the photograph. Allow enough room for the baby’s toes to move comfortably.
4. Understanding Knitting Gauge
Gauge determines the final dimensions of your knitted baby slippers. For this tutorial, the target gauge is approximately 22 stitches and 30 rows per 4 inches (10 cm) in stockinette stitch. Knit a small swatch before starting and measure it after washing and drying according to the yarn instructions. If you have more stitches than recommended, your knitting is too tight, and you may need larger needles. If you have fewer stitches, try smaller needles. Consistent gauge is especially important when making matching booties because even a small difference in tension can affect their size and appearance.
5. Essential Knitting Abbreviations
Understanding basic knitting terminology will make the instructions easier to follow.
| Abbreviation | Meaning |
|---|---|
| K | Knit |
| P | Purl |
| CO | Cast on |
| BO | Bind off |
| St(s) | Stitch(es) |
| RS | Right side |
| WS | Wrong side |
| K2tog | Knit two stitches together |
| SSK | Slip, slip, knit |
| Rep | Repeat |
| Garter stitch | Knit every row |
| Stockinette stitch | Knit on RS, purl on WS |
This pattern uses U.S. knitting terminology and primarily relies on garter stitch, stockinette stitch, and simple shaping.
6. Understanding the Bootie Construction
The booties in the reference image feature a textured sole and lower edge, a smooth center section, and a thick folded cuff. This tutorial recreates that general appearance using a flat-knitted sole, a separate upper section, and a folded ankle cuff. The pieces are joined with neat seams to create a comfortable three-dimensional shape. Working in separate sections makes it easier to control the dimensions and adjust the fit. It also provides an opportunity to practice essential finishing techniques that are useful in many other knitting projects.
Step-by-Step Instructions for Knitting the Sole and Shaping the Booties
Step 1: Cast On the Foundation Stitches
Begin with your chosen dusty pink yarn and 3.75 mm knitting needles. For the 0–3 month size, cast on 10 stitches using the long-tail cast-on method. This forms the narrow starting edge of the sole. Knit the first row across all stitches. On the second row, knit one stitch, make one increase, knit until one stitch remains, make another increase, and knit the final stitch. You now have 12 stitches. Continue increasing by two stitches on every second row until you have 20 stitches. This creates a gently rounded end for the sole.
Step 2: Knit the Main Sole
Once you have 20 stitches, continue working in garter stitch, knitting every row. Garter stitch produces the textured ridges visible on the underside of the booties in the reference image. Continue until the knitted piece measures approximately 7 cm (2.75 inches) from the cast-on edge. Keep the tension even and avoid pulling the yarn too tightly. The sole should lie relatively flat while remaining flexible. Measure the length regularly because the final size depends on your individual knitting gauge.
Step 3: Shape the Opposite End of the Sole
To complete the rounded sole, begin decreasing stitches gradually. Knit one stitch, work K2tog, knit until three stitches remain, work SSK, and knit the final stitch. Knit the following row without decreases. Repeat these two rows until 10 stitches remain. Bind off loosely. The completed sole should resemble a narrow oval with softly rounded ends. Measure the piece and adjust the straight section if necessary to achieve the intended finished length. Knit a second identical sole and compare both pieces carefully.
Step 4: Knit the Main Upper Section
Cast on 34 stitches using the same yarn. Knit six rows in garter stitch to create the textured lower edge. After completing these rows, begin working in stockinette stitch by knitting the right-side rows and purling the wrong-side rows. Continue until the upper panel measures approximately 5 cm (2 inches) from the cast-on edge. This smooth section forms the main body of the bootie and creates the contrast between the textured border and the center, similar to the design shown in the photograph.
Step 5: Shape the Rounded Toe
To create the raised toe section, divide the 34 stitches into three groups: 12 stitches on the left, 10 stitches in the center, and 12 stitches on the right. Work across the first 12 stitches, then knit the center stitches, using the last center stitch together with the first side stitch to begin shaping. Turn the work and continue shaping the center section back and forth, joining one side stitch at each turn. This technique is similar to short-row shaping and gradually creates a rounded toe. Continue until the side sections have been reduced evenly. Keep the center stitches aligned to prevent twisting or uneven shaping.
Step 6: Join the Upper to the Sole
Place the completed upper over the sole with the right sides facing outward. Align the rounded toe with the front of the sole and secure the pieces using removable stitch markers. Thread a tapestry needle with matching yarn and begin sewing along the toe using mattress stitch or a neat whipstitch. Continue along the sides, easing the fabric gently so the upper follows the sole’s shape. Leave the rear opening available for the heel seam and cuff construction. Repeat the process for the second bootie, ensuring that both pieces have the same dimensions.
How to Knit the Folded Cuff and Complete the Baby Booties
Step 7: Measure the Ankle Opening
The folded cuff is one of the most recognizable details of this Knitted Booties Pattern. Before knitting it, measure the circumference of the ankle opening on the partially assembled bootie. The cuff should be wide enough to allow the baby’s foot to pass through comfortably while remaining secure around the ankle. For a 0–3 month size, the opening may measure approximately 14–16 cm (5.5–6.3 inches), depending on the construction and yarn stretch. Use your actual measurements to determine the required cuff width.
Step 8: Knit the Garter Stitch Cuff
Cast on approximately 34 stitches, adjusting the number to match the ankle opening at your gauge. Knit every row in garter stitch until the piece measures approximately 7 cm (2.75 inches) in height. This creates a soft, flexible strip with clearly defined horizontal ridges. The cuff will be folded outward, so its height should be approximately twice the desired visible folded depth. Bind off loosely to preserve elasticity. If the fabric feels too firm, use needles one size larger for the cuff.
Step 9: Attach the Cuff to the Bootie
Position the cuff around the ankle opening with its lower edge aligned with the upper section of the bootie. Sew the cuff into place using small, even stitches. Join the short ends of the cuff to form a continuous ring, making sure the seam lies neatly at the back. Fold the upper half outward to create the classic rolled appearance shown in the reference image. Adjust the fold until it sits evenly around the opening. The cuff should feel soft and flexible rather than tight or restrictive.
Step 10: Complete the Heel Seam
Turn the bootie inside out and align the back edges carefully. Using matching yarn and a tapestry needle, sew the heel seam with mattress stitch. Work slowly to avoid bulky seams that might rub against the baby’s foot. After completing the seam, weave the yarn tail securely into the knitted fabric. Turn the bootie right side out and gently reshape the heel. Check that the back seam lies flat and that the cuff remains evenly folded.
Step 11: Knit the Second Matching Bootie
Repeat the same instructions to create the second bootie. Use identical stitch counts, row counts, yarn, and needle sizes to maintain consistent dimensions. Compare the two booties after each major stage, especially after knitting the sole and upper sections. If one bootie appears larger, check your tension before continuing. Matching the dimensions during construction is much easier than correcting differences after assembly. Once both booties are complete, place them side by side and examine their overall symmetry.
Step 12: Finish and Shape the Booties
Weave in all remaining yarn ends securely on the inside of the booties. If your yarn is suitable for wet blocking, lightly dampen the finished pieces and reshape them by hand. Allow them to dry completely on a flat surface. Avoid excessive stretching because baby booties should retain their gentle, snug shape. The finished pair should feature rounded toes, textured garter stitch edges, smooth knitted uppers, and soft folded cuffs. Check the inside carefully for loose yarn ends or uncomfortable seams before use.
Finishing Tips, Color Ideas, and Common Knitting Mistakes
1. Achieving a Professional Handmade Finish
A beautiful Knitted Booties Pattern depends on neat stitches and careful assembly. Keep your knitting tension consistent throughout the project, especially when transitioning between garter stitch and stockinette stitch. When sewing the sections together, use small, even stitches and avoid creating bulky seams. Take time to align the toe and heel sections properly before sewing. These finishing details help create a polished appearance and improve comfort. Even a simple design can look elegant when the stitches are uniform and the shape is carefully maintained.
2. Choosing Beautiful Colors for Baby Booties
The dusty pink color shown in the reference image creates a delicate and timeless appearance. However, this baby booties knitting pattern can be adapted to many different color palettes. Soft cream is ideal for a classic neutral look, while sage green creates a natural, modern style. Baby blue, lavender, pale yellow, and warm beige are also lovely options. For a two-tone version, try cream with dusty rose or light gray with soft blue. You can even knit the cuff in a contrasting color to emphasize its folded texture.
3. Adjusting the Pattern for Different Baby Sizes
To resize your Knitted Booties Pattern, begin by measuring the baby’s foot length and comparing it with the size chart. For a smaller size, reduce the sole length and adjust the upper panel accordingly. For larger sizes, increase the length of the sole and add stitches to the upper if necessary. The cuff circumference should also be adjusted to maintain a comfortable fit. Always knit a gauge swatch before changing the stitch counts. Because babies grow quickly, a little extra room in the toe can help extend the usefulness of the booties without making them excessively loose.
4. Avoiding Common Knitting Mistakes
One common mistake when making knitted baby booties is inconsistent stitch tension. If the stitches are too tight, the booties may feel stiff and difficult to put on. If they are too loose, the slippers may lose their shape. Another common problem is uneven toe shaping, which can cause one bootie to look different from the other. Count your stitches carefully and use markers to identify the center section. Also, avoid pulling the yarn too tightly when sewing the seams. Taking time to check each stage will help prevent unnecessary unraveling.
5. Caring for Handmade Baby Booties
Proper care is important for maintaining the softness and shape of your handmade knitted baby booties. Always follow the yarn manufacturer’s washing instructions. Many baby-friendly yarns can be washed gently in cool water, while some wool fibers require hand washing. Avoid using harsh detergents or high temperatures that may damage the fibers. After washing, gently remove excess water with a clean towel and lay the booties flat to dry. Reshape the toes and cuffs while they are still damp. Store the finished booties in a clean, dry place away from direct sunlight.
6. Personalizing Your Knitted Baby Booties
Once you are comfortable with the basic construction, you can experiment with decorative variations. Add a narrow contrasting stripe to the cuff, knit the sole in a different color, or use a subtle textured stitch for the upper. For a vintage-inspired look, choose muted pastel colors and keep the design simple. If the booties are intended for a baby, avoid buttons, beads, pom-poms, long cords, or other detachable decorations that could become choking or entanglement hazards. A clean, securely finished design is both beautiful and practical.
Frequently Asked Questions About the Knitted Booties Pattern
Is this Knitted Booties Pattern suitable for beginners?
Yes. The project is suitable for beginners who already understand basic knit and purl stitches. Some experience with increasing, decreasing, and sewing knitted pieces together will make the process easier.
What is the best yarn for baby booties?
Soft DK-weight baby yarn, washable acrylic, cotton blends, and suitable merino wool blends are excellent choices. Select yarn that feels gentle against the skin and is easy to maintain.
What size knitting needles should I use?
US size 5 (3.75 mm) needles are recommended as a starting point. Adjust the needle size if necessary to achieve the correct gauge.
How much yarn is needed for one pair?
A small pair generally requires approximately 50–80 yards (46–73 meters) of yarn, depending on the size, gauge, and cuff height.
Can I make these booties for newborn babies?
Yes. Adjust the measurements to fit the baby’s feet and ensure that the booties are comfortable without being too tight.
Can I knit these booties using circular needles?
Yes. Circular needles can be used for flat knitting, although the tutorial is written for flat-knitted pieces.
How do I prevent the booties from slipping off?
Make sure the cuff fits comfortably around the ankle and that the upper is not excessively loose. Avoid making the opening too large.
Can I use cotton yarn for this pattern?
Yes. Cotton blends are suitable for lightweight baby booties, although they may have less elasticity than wool or acrylic blends.
How do I make the booties larger?
Increase the sole length, adjust the upper panel, and modify the cuff circumference according to the intended foot measurements.
Can I make the booties in two colors?
Absolutely. A contrasting cuff or sole can create a beautiful two-tone design while highlighting the different knitting textures.
How long does it take to knit a pair of baby booties?
Most knitters can complete a pair in approximately 3–6 hours, depending on experience and knitting speed.
Do these booties require complicated stitches?
No. The main techniques are garter stitch, stockinette stitch, simple increases, decreases, and basic seaming.
Can I wash the finished booties in a washing machine?
That depends on the yarn. Always check the yarn label before machine washing. Delicate hand washing is a safe option for many handmade items.
Are knitted baby booties safe for sleeping?
Booties should be used according to appropriate infant clothing and safe-sleep guidance. Avoid loose accessories during sleep, and always check that the booties fit securely without restricting circulation.
Can I sell handmade booties made from this tutorial?
Generally, handmade items created using these techniques may be sold, provided you follow applicable product safety requirements and respect any relevant pattern rights.
Conclusion
The Knitted Booties Pattern is a charming and rewarding knitting project that combines simplicity, comfort, and beautiful handmade craftsmanship. With their rounded toes, textured garter stitch soles, smooth knitted uppers, and soft folded cuffs, these adorable baby booties are perfect for thoughtful handmade gifts and special keepsakes.
By following this step-by-step baby booties knitting tutorial, you can practice essential knitting techniques while creating a practical accessory. From casting on the first stitches to shaping the toe and assembling the finished pieces, each stage provides an opportunity to improve your knitting skills and develop greater confidence.
The design is also wonderfully versatile. You can experiment with soft pastel colors, classic neutrals, or elegant two-tone combinations to create a pair of handmade knitted baby booties that reflects your personal style.
With careful measurements, consistent tension, and attention to finishing details, you can transform a small amount of yarn into a beautiful pair of cozy booties. Whether you make them for your own family, as a baby shower gift, or simply for the pleasure of knitting, this Knitted Booties Pattern is a lovely way to celebrate the warmth and creativity of handmade projects.