
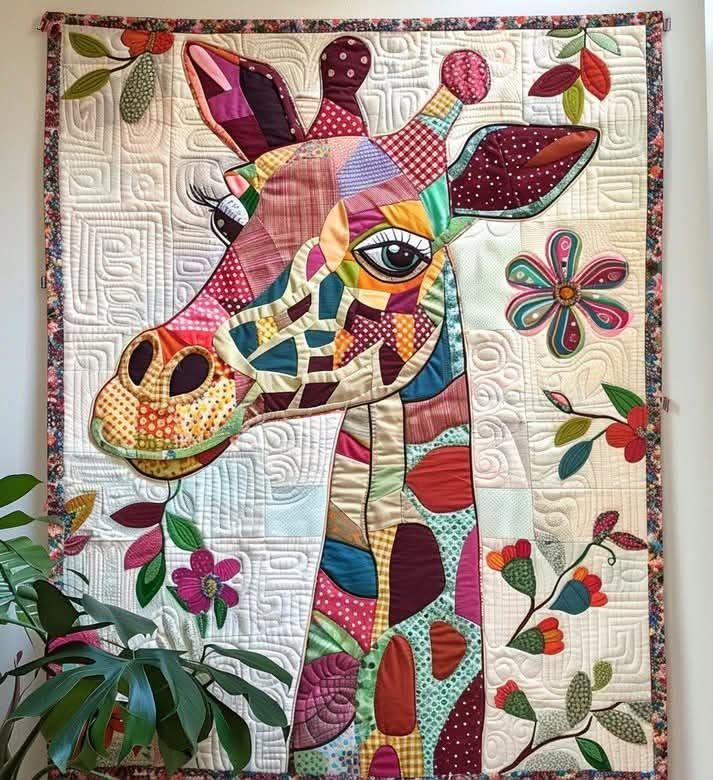
The Giraffe Patchwork Quilt is a beautiful combination of artistic creativity, colorful fabrics, and traditional quilting techniques. Featuring a charming giraffe with an expressive face, long neck, and vibrant patchwork details, this project transforms ordinary fabric scraps into a stunning textile artwork. The design is especially appealing because it combines fabric appliqué, decorative stitching, free-motion quilting, and carefully arranged patchwork pieces to create an impressive animal portrait. Whether displayed in a sewing room, nursery, living room, or creative studio, this handmade quilt can become a delightful focal point that celebrates the beauty of fabric craftsmanship.
One of the most fascinating features of the Giraffe Patchwork Quilt is the way different colors, prints, and textures come together to create depth and personality. Unlike conventional quilts made entirely from repeating geometric blocks, this project uses an artistic appliqué approach in which individual fabric shapes form the giraffe’s head, ears, horns, muzzle, and elongated neck. Small pieces of floral cotton, polka dots, checks, stripes, and abstract prints can be arranged to produce a lively mosaic effect. The light-colored background provides contrast, allowing the giraffe’s colorful silhouette to stand out beautifully. Decorative flowers and leaves surrounding the animal add another layer of charm, giving the quilt a whimsical garden-inspired appearance.
Creating a Giraffe Patchwork Quilt is also a wonderful opportunity to develop essential sewing and quilting skills. The project introduces fabric selection, appliqué preparation, accurate cutting, layered construction, decorative embroidery, machine quilting, and professional binding techniques. Although the finished design appears elaborate, the process becomes much easier when divided into smaller steps. This tutorial explains how to recreate a giraffe-inspired wall hanging similar to the reference image, including recommended measurements, materials, fabric preparation, assembly instructions, and finishing techniques. With careful planning and a little patience, you can transform colorful cotton scraps into a unique handmade giraffe quilt that combines artistic expression with practical quilting methods.
Materials, Fabric Selection, and Measurements for the Giraffe Patchwork Quilt
1. Choosing the Right Fabrics for Your Giraffe Quilt
DISCOVER MORE FREE PATTERNS HERE!
The foundation of a beautiful Giraffe Patchwork Quilt begins with thoughtful fabric selection. Quilting cotton is the recommended material because it is easy to cut, press, sew, and layer. For the giraffe itself, choose a combination of colorful prints that work harmoniously together while maintaining enough contrast to distinguish individual sections. Shades of burgundy, dusty pink, mustard yellow, teal, forest green, cream, rust orange, and deep purple create an attractive vintage-inspired palette. Small floral prints, checks, stripes, and geometric patterns are particularly effective for creating the patchwork mosaic visible in the reference design.
2. Essential Materials and Sewing Supplies
Before beginning your giraffe appliqué quilt, prepare the following materials:
-
Assorted quilting cotton scraps in at least 10–15 coordinating colors.
-
Approximately 1 yard (0.9 m) of cream or off-white background fabric.
-
Approximately 1 yard (0.9 m) of backing fabric.
-
Low-loft cotton or cotton-blend quilt batting.
-
Lightweight fusible appliqué web.
-
Approximately 1/3 yard (0.3 m) of coordinating fabric for binding.
-
Coordinating sewing threads in several colors.
-
Black, white, and brown embroidery thread for facial details.
-
Sewing machine with straight and zigzag stitch options.
-
Optional free-motion quilting foot.
-
Rotary cutter, quilting ruler, and cutting mat.
-
Fabric scissors and small appliqué scissors.
-
Iron and ironing board.
-
Fabric marking pencil or washable marker.
-
Sewing pins or fabric clips.
-
Optional tear-away stabilizer for detailed appliqué.
Using high-quality cotton fabric helps prevent distortion during sewing and produces a smoother finished surface.
3. Recommended Finished Quilt Measurements
The following dimensions are suggested for a medium-sized decorative wall hanging inspired by the photograph.
| Quilt component | Recommended size |
|---|---|
| Finished quilt | 24 × 32 in (61 × 81 cm) |
| Background panel before trimming | 26 × 34 in (66 × 86 cm) |
| Approximate giraffe height | 29 in (74 cm) |
| Giraffe head and muzzle width | 19 in (48 cm) |
| Neck width | 6–9 in (15–23 cm) |
| Decorative flower diameter | 3–5 in (8–13 cm) |
| Batting and backing | 28 × 36 in (71 × 91 cm) |
| Binding strip width | 2.5 in (6.4 cm) |
| Standard piecing seam allowance | 1/4 in (6 mm) |
These are suggested project measurements rather than exact measurements extracted from the photograph. Adjust the design to suit your available fabrics and preferred wall-hanging size.
4. Understanding the Main Giraffe Pattern Pieces
The Giraffe Patchwork Quilt can be divided into several recognizable sections. The head includes the forehead, cheeks, muzzle, ears, eyes, and two short horn-like ossicones. The long neck extends from the head toward the bottom of the quilt and contains multiple colorful patchwork shapes. Each area can be constructed separately before being assembled on the background fabric. To simplify the process, prepare a full-size drawing of the giraffe silhouette and divide it into smaller numbered sections. This makes it easier to organize the fabrics and maintain accurate proportions throughout construction.
5. Preparing the Background and Decorative Elements
A neutral background is ideal for highlighting the colorful giraffe. Cream, ivory, pale beige, or very light gray fabrics work especially well. The reference design includes a textured cream background with decorative quilting patterns and colorful botanical appliqués. To create a similar appearance, prepare a rectangular background panel and lightly mark the approximate position of the giraffe. Leave enough space around the animal for flowers, leaves, and decorative stitching. Avoid placing large floral appliqués too close to the giraffe’s facial features, as this can make the composition appear crowded.
6. Planning the Color Distribution
Successful patchwork animal quilts depend on balanced color placement. Arrange the fabric scraps before sewing and distribute dark, medium, and light colors throughout the giraffe. For example, burgundy and dark purple pieces can define the ears and neck, while yellow and cream fabrics brighten the forehead and muzzle. Teal and green pieces provide contrast, and dusty pink fabrics soften the overall appearance. Try to avoid placing too many fabrics with similar values next to one another. A balanced arrangement creates a lively patchwork design while preserving the recognizable shape of the giraffe.
Step-by-Step Instructions for Creating the Giraffe Patchwork Quilt
Step 1: Prepare the Full-Size Giraffe Template
Begin by drawing or enlarging a giraffe quilt pattern to approximately 29 inches (74 cm) tall. Include the complete head, ears, ossicones, muzzle, and long neck. Trace the main silhouette onto pattern paper, then divide the interior into smaller patchwork sections. Use curved and irregular shapes to create the artistic mosaic appearance shown in the reference image. Number each section and indicate its intended fabric color. For fusible appliqué, remember that the pattern may need to be reversed before transferring the shapes to the adhesive web, especially when the giraffe faces a particular direction.
Step 2: Cut and Arrange the Patchwork Fabrics
Choose the fabrics for each numbered section and cut them according to the prepared templates. If using turned-edge appliqué, include an appropriate seam allowance around each shape. If using raw-edge fusible appliqué, cut the fabric directly to the traced outline after fusing the adhesive web to the wrong side. Arrange all pieces on a flat surface before attaching them. Begin with the largest sections of the giraffe’s neck and forehead, then add smaller shapes around the face, cheeks, and muzzle. Photograph the arrangement if necessary so you can remember the placement while sewing.
Step 3: Construct the Giraffe’s Head
The head is the most expressive part of the Giraffe Patchwork Quilt and deserves careful attention. Begin by positioning the larger forehead and cheek pieces, then add the muzzle and lower jaw. Use curved appliqué shapes to create the rounded contours of the face. The ears should extend outward from the upper head, while the ossicones rise above the forehead. Use darker fabric around the inner ears to provide depth. Once the major shapes are positioned, press them carefully according to the fusible web manufacturer’s instructions and secure the edges with a narrow zigzag or blanket stitch.
Step 4: Add the Eyes, Nose, and Facial Details
The giraffe’s facial features give the quilt its personality. Create the eyes using layered appliqué pieces in white, black, and brown fabric. Add a small highlight to each eye to create a lively expression. The reference image features a large decorative eye with prominent eyelashes, which can be recreated using black embroidery thread or narrow appliqué strips. For the nostrils, cut two oval shapes from dark brown or black fabric and position them on the muzzle. Add subtle curved stitching around the mouth to create a gentle expression. Keep the facial details proportional to the head.
Step 5: Assemble the Long Patchwork Neck
The giraffe’s long neck provides an excellent opportunity to showcase colorful fabric scraps. Divide the neck into irregular geometric sections, including rectangles, curved shapes, and rounded patches. Arrange the pieces vertically, alternating light and dark fabrics to create visual movement. You may join larger sections using traditional patchwork seams or construct the entire neck using fusible appliqué. Once assembled, position the neck beneath the head and check that the transition appears natural. Secure the neck to the background using matching thread and decorative stitching along the edges.
Step 6: Position and Attach the Complete Giraffe
After completing the head and neck sections, place the entire giraffe design on the prepared background panel. Position the animal slightly off-center if you want to leave room for flowers and decorative leaves. Check the overall composition from a distance before permanently attaching the pieces. Once satisfied, fuse or baste the giraffe in place. Stitch around the main silhouette using a narrow zigzag, blanket stitch, or carefully controlled straight stitch. Pay special attention to curved areas around the muzzle, ears, and neck to prevent puckering.
Adding Flowers, Decorative Quilting, and Professional Finishing Details
1. Creating Colorful Floral Appliqués
The decorative flowers surrounding the giraffe add charm and balance to the Giraffe Patchwork Quilt. To recreate this effect, draw several flower templates with five or six petals. Cut the petals from coordinating fabrics such as pink, burgundy, teal, orange, and purple. Use contrasting fabric for the flower centers. Arrange the flowers around the giraffe, leaving enough space between them to preserve the background’s visual texture. Secure the flowers using fusible appliqué and finish their edges with decorative stitching. Different flower sizes help create a natural garden-inspired composition.
2. Adding Leaves and Botanical Branches
Leaves and branches provide movement throughout the quilt and connect the decorative flowers visually. Cut elongated oval leaf shapes from green, olive, teal, and rust-colored fabrics. For greater variety, create some leaves with pointed tips and others with rounded edges. Position the leaves in small groups around the corners and sides of the quilt. Use narrow brown or green stitching to create stems and branches. Decorative embroidery can also be added along the center of each leaf to imitate natural veins.
3. Preparing the Quilt Sandwich
Once the appliqué design is complete, prepare the three layers of the quilt sandwich. Place the backing fabric wrong side up on a clean, flat surface. Position the batting over the backing, smoothing out wrinkles. Finally, place the completed quilt top right side up over the batting. Make sure the backing and batting extend beyond the quilt top on all sides. Secure the layers using safety pins, temporary basting spray, or long basting stitches. Smooth the layers carefully to prevent shifting during quilting.
4. Creating Decorative Free-Motion Quilting
The reference quilt features intricate stitching throughout the cream background, adding texture and depth. To create a similar appearance, use free-motion quilting techniques such as spirals, gentle curves, pebbles, and geometric meandering. Begin by quilting around the giraffe’s silhouette to define its shape. Then fill the background with decorative patterns, working gradually from the center toward the edges. You can also quilt along selected patchwork seams to emphasize the giraffe’s colorful sections. Use a thread color that blends with the background for subtle texture or a slightly contrasting thread for additional visual interest.
5. Finishing the Quilt with Binding
After quilting, trim the batting and backing evenly with the quilt top. Prepare binding strips measuring 2.5 inches (6.4 cm) wide and join them diagonally to create one continuous strip. Fold the binding in half lengthwise, wrong sides together, and press. Sew the binding to the front of the quilt using a 1/4-inch (6 mm) seam allowance, carefully mitering the corners. Fold the binding over the raw edges and secure it to the back using hand stitching or machine stitching. A dark floral binding, similar to the reference image, creates an attractive frame around the finished artwork.
6. Adding a Hanging Sleeve and Quilt Label
If you plan to display the Giraffe Patchwork Quilt as wall art, attach a fabric hanging sleeve to the back. Cut a strip of fabric approximately 4 inches (10 cm) wide and slightly shorter than the quilt’s finished width. Fold and finish the short ends, then create a tube by sewing the long edges together. Attach the sleeve near the upper edge of the quilt, allowing enough space for a hanging rod. You can also add a small quilt label with the project name, completion date, and maker’s initials. These finishing touches give the quilt a professional appearance and make it suitable for gifting or display.
Expert Tips, Creative Variations, and Caring for Your Giraffe Patchwork Quilt
1. Using Fabric Scraps Efficiently
One of the greatest advantages of the Giraffe Patchwork Quilt is its ability to transform leftover fabrics into something beautiful. Small scraps from previous sewing projects can be used for the giraffe’s colorful patches, flowers, leaves, and facial details. Organize your scraps by color and size before beginning. Larger pieces are useful for the neck and forehead, while smaller pieces work well for the eyes, nostrils, and decorative flowers. Using scraps reduces fabric waste and gives the quilt a unique handmade character.
2. Choosing Between Raw-Edge and Turned-Edge Appliqué
Both raw-edge and turned-edge appliqué techniques can be used for this project. Raw-edge appliqué is generally faster and works well with fusible web, making it suitable for detailed shapes and curved sections. The edges can be secured using zigzag or blanket stitches. Turned-edge appliqué produces a smoother, more traditional finish because the fabric edges are folded underneath before stitching. This technique requires additional preparation but creates a refined appearance. Choose the method that best matches your experience and preferred quilting style.
3. Preventing Fabric Distortion and Puckering
Large appliqué designs can sometimes develop wrinkles or puckering during stitching. To prevent this, press the fabric before cutting and avoid stretching curved pieces. Use a suitable stabilizer when working on detailed facial features or narrow appliqué sections. Maintain consistent sewing-machine tension and avoid pulling the fabric while stitching. When quilting, begin near the center and gradually work outward. Proper preparation helps the handmade giraffe quilt remain smooth and professional-looking.
4. Creating Different Color Themes
The colorful giraffe design can be adapted to many decorative styles. For a vintage-inspired quilt, use muted burgundy, olive green, dusty rose, mustard yellow, and cream. For a modern nursery, choose pastel pink, baby blue, mint green, lavender, and soft yellow. A more dramatic version can feature navy blue, emerald green, deep purple, and gold. You can also create a monochromatic giraffe using different shades of one color. The key is maintaining enough contrast between neighboring fabric sections.
5. Displaying and Caring for the Finished Quilt
A Giraffe Patchwork Quilt can be displayed in a nursery, bedroom, craft room, or living area. Avoid prolonged exposure to direct sunlight because it may cause fabric colors to fade. If the quilt becomes dusty, gently clean it according to the fabric and batting manufacturers’ recommendations. For delicate appliqué and embroidery, spot cleaning or careful hand washing may be preferable. If washing is appropriate, use cool water and mild detergent, then dry the quilt flat whenever possible. Store it in a clean, dry environment away from excessive moisture.
6. Making the Quilt as a Personalized Handmade Gift
This quilt makes a thoughtful gift for animal lovers, children, quilting enthusiasts, and anyone who appreciates handmade artwork. You can personalize the design by selecting fabrics that match the recipient’s favorite colors or room décor. Add a small embroidered name, date, or meaningful message to the back label. For a nursery quilt, consider using soft pastel fabrics and playful floral details. If the quilt is intended for a baby, ensure that all appliqué pieces are securely attached and avoid loose decorative elements. For infant sleep, quilts and other loose bedding should be kept out of the crib.
Frequently Asked Questions About the Giraffe Patchwork Quilt
Is the Giraffe Patchwork Quilt suitable for beginners?
The project is best suited for confident beginners or intermediate quilters. Basic sewing skills are helpful, especially when working with curved appliqué shapes and detailed facial features.
What is the best fabric for a giraffe patchwork quilt?
High-quality quilting cotton is recommended because it is easy to cut, press, and sew. Cotton also provides a smooth surface for appliqué and decorative quilting.
How large should the finished quilt be?
A finished size of approximately 24 × 32 inches (61 × 81 cm) works well for a decorative wall hanging. However, the pattern can be enlarged or reduced according to your needs.
Can I make the giraffe using only fabric scraps?
Yes. This project is particularly suitable for scrap quilting because the giraffe is composed of many small fabric sections.
Do I need a special sewing machine for appliqué?
No. A regular sewing machine with straight and zigzag stitches can be used. A machine with adjustable stitch width and length provides additional flexibility.
What is the difference between patchwork and appliqué?
Patchwork involves joining fabric pieces together to create a larger surface, while appliqué involves attaching fabric shapes onto a background. This giraffe design combines both techniques.
Can I make the quilt without free-motion quilting?
Yes. Straight-line quilting, echo quilting, or simple curved stitching can be used instead of free-motion designs.
How do I create the giraffe’s expressive eyes?
Layer small fabric shapes to form the eye, iris, and pupil. Add embroidered eyelashes and a small white highlight to create a lively expression.
What batting should I use for a wall hanging?
Low-loft cotton or cotton-blend batting is an excellent choice because it provides structure without making the quilt excessively bulky.
Can I use fleece instead of batting?
Fleece may be used in some quilted wall hangings, but it can behave differently from traditional batting. Test the fabric layers before completing the project.
How do I prevent appliqué edges from fraying?
Use fusible web and secure the edges with a narrow zigzag or blanket stitch. Turned-edge appliqué is another option for a clean finish.
Can I add more flowers and leaves to the design?
Absolutely. Additional botanical appliqués can create a fuller garden-inspired composition. Keep the arrangement balanced so the giraffe remains the main focal point.
How long does it take to make a Giraffe Patchwork Quilt?
Depending on your experience and the level of detail, the project may take approximately 12–25 hours or longer.
Can I turn this design into a larger quilt?
Yes. You can enlarge the giraffe and add surrounding patchwork borders to create a larger decorative quilt.
Is this quilt suitable for a nursery?
Yes, as a decorative wall hanging. If making it for a baby’s room, ensure it is securely displayed and kept away from the sleeping area.
Can I sell handmade quilts created using this tutorial?
You can generally sell quilts made from your own original templates and designs, subject to applicable laws and any third-party design rights.
Conclusion
The Giraffe Patchwork Quilt is a delightful quilting project that combines colorful fabric scraps, artistic appliqué, and decorative stitching to create a charming animal portrait. Its expressive giraffe design, vibrant patchwork sections, and beautiful botanical details make it an eye-catching piece of handmade textile art. Whether displayed as a wall hanging or given as a special gift, this quilt celebrates creativity and the timeless appeal of fabric craftsmanship.
By following this step-by-step giraffe quilt tutorial, you can develop valuable sewing and quilting skills while creating a unique decorative project. From selecting coordinating fabrics and preparing appliqué templates to assembling the giraffe and adding free-motion quilting, each stage contributes to the finished artwork.
One of the most rewarding aspects of this project is the freedom to experiment with colors, textures, and decorative elements. Every fabric choice adds personality to the giraffe, allowing each finished quilt to become a one-of-a-kind creation. Whether you prefer bold contemporary prints, soft vintage florals, or playful nursery colors, the design can be adapted to reflect your personal style.
With patience, careful stitching, and attention to detail, your handmade Giraffe Patchwork Quilt can become a treasured decorative piece that showcases both your quilting skills and your imagination. The finished project demonstrates how simple pieces of fabric can be transformed into an extraordinary work of art through the beauty of patchwork and appliqué.