
One of the most appealing features of this Christmas Bag Ornament Tutorial is its versatility. The miniature bags shown in the reference image resemble tiny Santa gift sacks, complete with a snowy white opening and decorative green cords. Their rounded shape gives them a soft, cheerful appearance, while the gold accents add a sophisticated finishing touch. These ornaments can be filled lightly to maintain their shape or left partially hollow to hold small surprises such as wrapped candies, tiny handwritten messages, or lightweight gifts. They are also wonderful additions to handmade Christmas garlands, holiday wreaths, festive table settings, and decorative gift packaging. With only a few basic crochet techniques, you can create an entire collection of beautiful ornaments.
Making a crochet Christmas bag ornament is also a wonderful opportunity to practice working in continuous rounds, increasing and decreasing stitches, changing yarn colors, and creating decorative finishing details. The pattern primarily uses single crochet stitches, making it accessible to crocheters who are familiar with basic amigurumi techniques. By following this step-by-step tutorial, you will learn how to crochet the rounded base, build the sides of the miniature bag, shape the upper opening, add a fluffy white cuff, and attach the green hanging loop and golden bow. The finished ornaments are small enough to make in an afternoon, yet detailed enough to become treasured handmade Christmas decorations that can be enjoyed year after year.
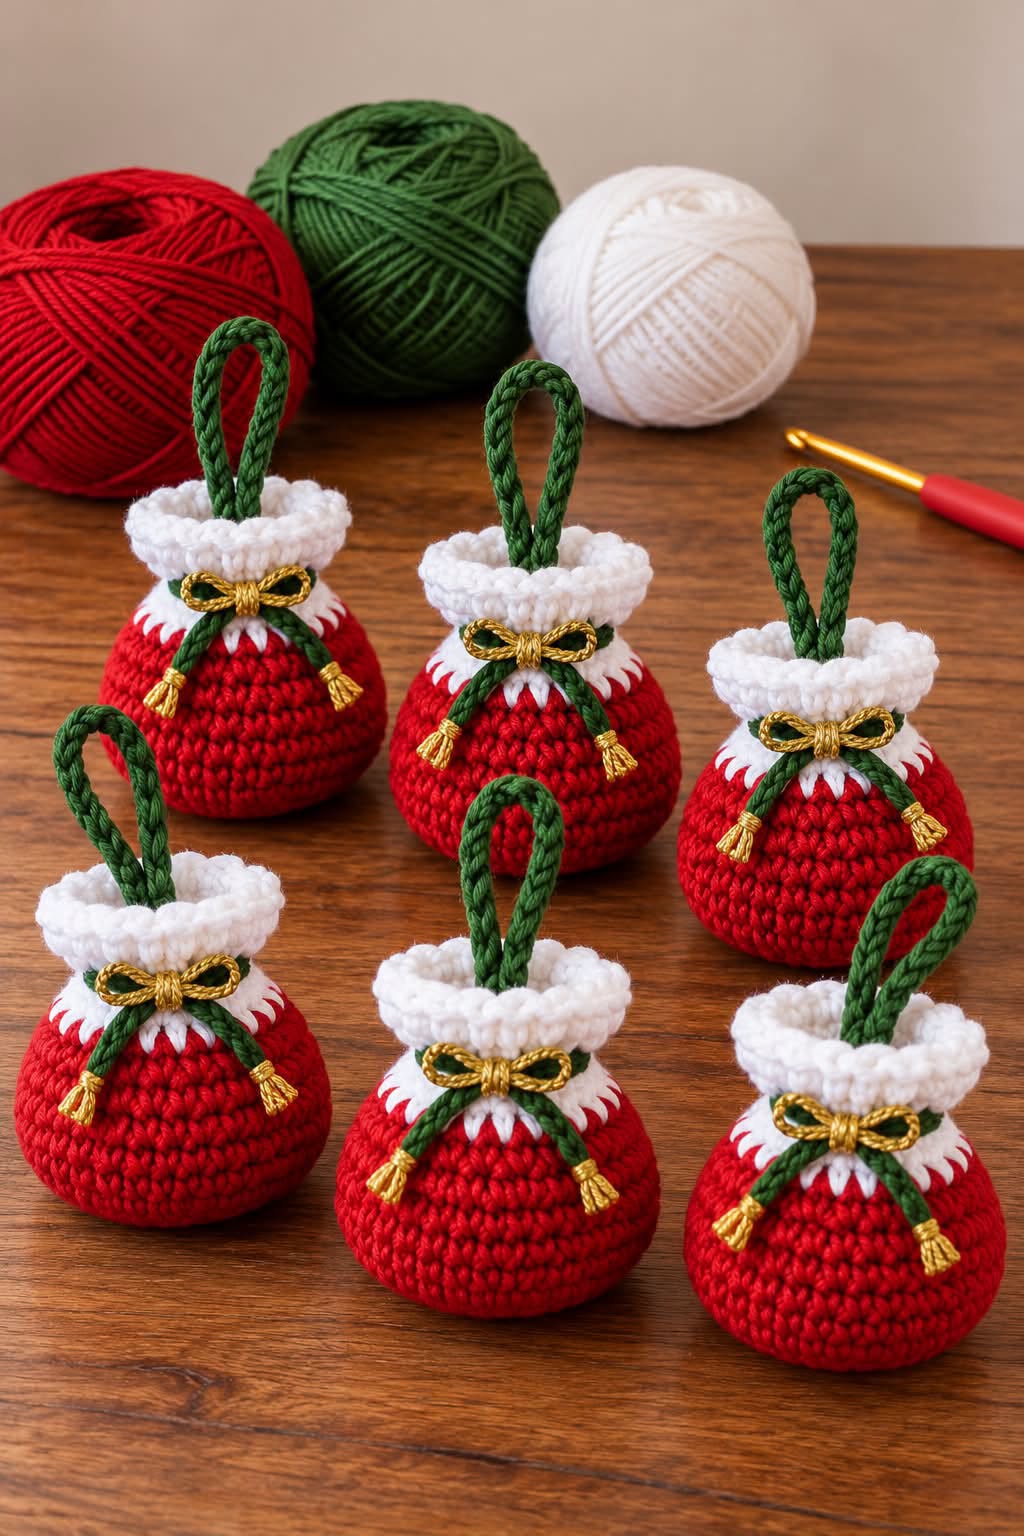
Materials, Crochet Stitches, and Measurements for the Christmas Bag Ornament Tutorial
1. Choosing the Best Yarn for Christmas Bag Ornaments
DISCOVER MORE FREE PATTERNS HERE!
The foundation of a beautiful Christmas Bag Ornament Tutorial begins with choosing the right yarn. For this project, medium-weight cotton yarn or a soft cotton-blend yarn is an excellent choice because it creates well-defined stitches and helps the miniature bags maintain their rounded shape. Cotton yarn also provides a smooth finish that makes the ornaments look neat and professionally crafted.
Traditional Christmas colors work particularly well for this design. Bright red creates the main body of the bag, white represents the snowy decorative cuff, and dark green adds contrast through the hanging loop and drawstring. Metallic gold embroidery thread or thin decorative cord completes the design with an elegant bow.
For a softer vintage appearance, consider burgundy, ivory, and moss green. For a modern Christmas collection, try emerald green, champagne gold, and creamy white.
2. Materials and Supplies Needed
Before starting your crochet Christmas gift bag ornament, gather the following materials:
-
Red cotton yarn, DK or light worsted weight (Category 3).
-
White cotton yarn in the same weight.
-
Dark green cotton yarn for the hanging loop and drawstring.
-
Gold embroidery floss or lightweight metallic cord.
-
3.0 mm or 3.5 mm crochet hook.
-
Yarn needle for sewing and weaving in ends.
-
Small scissors.
-
Stitch markers.
-
Optional polyester fiberfill.
-
Optional lightweight removable filling pouch.
-
Measuring tape.
-
Optional fabric glue for securing decorative details.
For one ornament, you will generally need approximately 15–25 yards (14–23 m) of red yarn, 5–8 yards (4.5–7.3 m) of white yarn, and a small amount of green and gold thread.
These quantities are estimates and may vary depending on yarn thickness, tension, and the finished size.
3. Recommended Finished Size and Project Difficulty
The Christmas Bag Ornament Tutorial creates a miniature ornament suitable for Christmas trees, gift wrapping, and holiday displays.
| Pattern detail | Recommended measurement |
|---|---|
| Finished bag height | 3–3.5 in (7.5–9 cm) |
| Widest bag diameter | 2.5–3 in (6.5–7.5 cm) |
| White cuff height | 0.5–0.75 in (1.3–2 cm) |
| Hanging loop height | 2–2.5 in (5–6.5 cm) |
| Crochet hook | 3.0–3.5 mm |
| Yarn weight | DK / Category 3 |
| Skill level | Beginner to intermediate |
| Estimated time | 1–2 hours per ornament |
The measurements above are suggested targets for recreating the appearance of the reference image. Your actual dimensions will depend on the yarn and gauge.
4. Understanding the Crochet Abbreviations
This Christmas Bag Ornament Tutorial uses standard U.S. crochet terminology.
| Abbreviation | Meaning |
|---|---|
| MR | Magic Ring |
| ch | Chain |
| sc | Single Crochet |
| hdc | Half Double Crochet |
| dc | Double Crochet |
| sl st | Slip Stitch |
| inc | Increase (2 sc in the same stitch) |
| dec | Invisible Single Crochet Decrease |
| BLO | Back Loop Only |
| FLO | Front Loop Only |
| st / sts | Stitch / Stitches |
| rnd | Round |
| rep | Repeat |
An asterisk (*) indicates that the enclosed stitch sequence should be repeated as instructed.
For example, (4 sc, inc) × 6 means work four single crochet stitches followed by one increase, repeating the sequence six times.
5. Understanding the Construction of the Miniature Christmas Bag
The crochet Christmas bag ornament pattern is constructed from the bottom upward.
First, a circular base is created using single crochet increases. The base gradually expands until it reaches the desired diameter.
Next, several rounds of single crochet build the rounded sides of the bag. The upper portion is gently decreased to create the gathered appearance of a traditional Christmas gift sack.
A white cuff is then crocheted around the opening, producing a soft decorative border.
Finally, a green hanging loop and decorative cords are attached, followed by a small golden bow.
This construction method creates a lightweight ornament with a defined shape and an attractive handmade finish.
6. Preparing Your Crochet Workspace
Before beginning, organize your yarn, hook, stitch markers, and accessories.
A well-lit workspace makes it easier to identify individual stitches and maintain consistent tension.
Wind small amounts of red, white, and green yarn into separate balls to prevent tangling.
If you plan to make several ornaments, prepare the decorative cords and bows in advance.
Using the same hook size and yarn weight for every ornament will help maintain a consistent finished appearance.
Making a small gauge sample is also useful if you want all the ornaments in your collection to match in size.
Step-by-Step Christmas Bag Ornament Tutorial: How to Crochet the Miniature Gift Bag
Step 1: Crochet the Circular Base
Begin your Christmas Bag Ornament Tutorial using red yarn.
The following instructions use continuous rounds. Do not join at the end of each round unless specifically instructed.
Place a stitch marker in the first stitch of every round.
Round 1: Make a magic ring and work 6 sc into the ring. (6 sts)
Round 2: Work 2 sc in each stitch around. (12 sts)
Round 3: (1 sc, inc) repeat 6 times. (18 sts)
Round 4: (2 sc, inc) repeat 6 times. (24 sts)
Round 5: (3 sc, inc) repeat 6 times. (30 sts)
Round 6: (4 sc, inc) repeat 6 times. (36 sts)
Round 7: (5 sc, inc) repeat 6 times. (42 sts)
Round 8: (6 sc, inc) repeat 6 times. (48 sts)
At the end of Round 8, you should have a flat circular base with 48 stitches.
If the base begins to curl excessively, check your stitch count and tension before continuing.
Step 2: Build the Rounded Red Bag Body
Once the circular base is complete, begin creating the sides of the miniature Christmas bag.
Round 9: Work 1 sc in BLO of each stitch around. (48 sts)
Working into the back loops creates a subtle turning edge between the base and the sides.
Rounds 10–15: Work 1 sc in each stitch around. (48 sts per round)
These rounds build the main body of the bag.
Continue maintaining even tension so the sides remain smooth.
The shape should gradually resemble a small cylindrical pouch with a rounded bottom.
If you want a slightly taller ornament, add one or two extra rounds before beginning the decreases.
Step 3: Shape the Upper Section of the Christmas Bag
To create the gathered appearance visible in the reference image, gradually decrease the number of stitches.
Round 16: (6 sc, dec) repeat 6 times. (42 sts)
Round 17: Work 1 sc in each stitch around. (42 sts)
Round 18: (5 sc, dec) repeat 6 times. (36 sts)
Round 19: Work 1 sc in each stitch around. (36 sts)
Round 20: (4 sc, dec) repeat 6 times. (30 sts)
Round 21: Work 1 sc in each stitch around. (30 sts)
The opening should now be narrower than the lower portion of the bag.
This shaping creates the characteristic silhouette of a miniature Santa gift sack.
Do not close the opening completely because the white cuff will be attached around the upper edge.
Step 4: Add the White Snowy Cuff
Change from red yarn to white yarn.
To create a clean color transition, complete the final yarn-over of the last red stitch using white yarn.
Round 22: Work 1 sc in each stitch around. (30 sts)
Round 23: Work 1 sc in BLO of each stitch around. (30 sts)
Round 24: Work 1 sc in each stitch around. (30 sts)
Round 25: Work 1 sc in each stitch around. (30 sts)
Round 26: Work 1 sc in each stitch around. (30 sts)
Fasten off, leaving a short tail for weaving in.
Fold the white section outward along the back-loop ridge created in Round 23.
This creates a double-layered cuff approximately two rounds deep, with a soft rolled appearance.
Use a yarn needle to tack the folded cuff into place at three or four evenly spaced points, keeping the opening accessible.
Step 5: Crochet the Green Hanging Loop and Decorative Drawstring
The green hanging loop is an important feature of this crochet Christmas ornament pattern.
Using dark green yarn, make a chain approximately 5–6 inches (13–15 cm) long.
Slip stitch into the second chain from the hook and each remaining chain to create a firm cord.
Fasten off, leaving long tails.
Fold the cord into a loop and secure both ends inside the back of the white cuff.
For the decorative drawstring, make a second green cord approximately 7–8 inches (18–20 cm) long using the same technique.
Position the cord around the front of the bag just below the white cuff.
Cross the ends at the center and allow them to hang downward.
Secure the cord with small hidden stitches so it remains in place.
Step 6: Add the Golden Bow and Final Decorative Details
To complete the Christmas Bag Ornament Tutorial, create a small golden bow using metallic embroidery thread.
Cut approximately 10–12 inches (25–30 cm) of gold thread.
Form two small loops and wrap the center several times to create a miniature bow.
Secure the bow with a knot at the back.
Attach it to the front of the bag, directly over the crossed green cord.
For additional detail, wrap a small amount of gold thread around the ends of the green drawstring to create decorative tassels.
If you prefer a slightly fuller ornament, insert a small amount of polyester fiberfill into the lower portion of the bag.
Keep the upper opening accessible if you want the ornament to function as a miniature gift pouch.
Finally, weave in all loose yarn ends and gently shape the bag with your fingers.
Your handmade crochet Christmas bag ornament is now complete.
Creative Christmas Ornament Ideas, Color Combinations, and Decorative Variations
1. Traditional Red, White, and Green Christmas Ornaments
The classic color combination shown in the reference image is ideal for creating a timeless Christmas Bag Ornament Tutorial collection.
Bright red represents the traditional Christmas gift sack, while white creates the appearance of soft snow.
Dark green cords provide contrast and complement the festive design.
Small golden bows add elegance without overwhelming the handmade texture.
Creating six or more matching ornaments produces a coordinated collection that looks beautiful on a Christmas tree.
You can also vary the shade of red slightly to add visual interest.
2. Elegant White and Gold Christmas Gift Bags
For a sophisticated variation, replace the red yarn with ivory or soft white.
Use champagne gold yarn for the cuff and decorative cords.
Add a small pearl-like bead to the center of the bow if the ornament is intended for adult decorative use.
This color combination works beautifully with elegant Christmas trees decorated in neutral tones.
The result is a delicate crochet Christmas gift bag ornament that complements modern holiday interiors.
You can also use subtle metallic embroidery to add sparkle.
3. Vintage Christmas Bag Ornaments
Vintage-inspired Christmas decorations are particularly charming when made with muted colors.
Choose burgundy, antique cream, moss green, and bronze-colored embroidery thread.
Use matte cotton yarn rather than shiny synthetic fibers for a softer appearance.
A slightly textured stitch pattern can also create an old-fashioned handmade effect.
These ornaments look especially attractive on Christmas trees decorated with wooden ornaments, dried orange slices, and natural ribbons.
They also make thoughtful handmade gifts for people who appreciate traditional holiday decorations.
4. Miniature Christmas Gift Bags for Small Surprises
The Christmas Bag Ornament Tutorial can be adapted to create tiny functional gift pouches.
Instead of stuffing the ornament, leave the interior hollow.
The finished bag can hold a small wrapped candy, a folded message, or a lightweight surprise.
If you want the opening to close, weave a functional drawstring through the stitches immediately below the white cuff.
Pull the drawstring gently to gather the opening.
This variation is especially useful for creating personalized Christmas gifts or holiday party favors.
Always choose contents appropriate for the recipient, especially when making gifts for children.
5. Christmas Garland and Holiday Table Decorations
These miniature crochet bags can be used for much more than Christmas tree ornaments.
Create several ornaments and attach them to a decorative cord to make a festive garland.
Alternate red, green, and white bags for a balanced appearance.
You can also place one ornament at each holiday table setting as a small handmade gift.
Attach a personalized name tag to transform the ornament into a charming Christmas place card holder.
For an elegant presentation, arrange the ornaments in a wooden bowl with pinecones and artificial greenery.
These simple decorating ideas allow your crochet work to become part of the overall holiday atmosphere.
6. Personalized Crochet Christmas Ornament Collections
One of the best aspects of the Christmas Bag Ornament Tutorial is the ability to personalize each ornament.
Add embroidered initials, small fabric labels, or different bow colors.
Create matching sets for family members, friends, or coworkers.
You can also adjust the size by using thicker yarn and a larger crochet hook.
For miniature ornaments, choose fine cotton yarn and a smaller hook.
Keeping the same basic construction while changing the colors and accessories allows you to create a wide variety of unique Christmas decorations.
Expert Crochet Tips, Common Mistakes, and Caring for Handmade Christmas Ornaments
1. Maintaining Consistent Crochet Tension
Consistent tension is essential when making a crochet Christmas bag ornament.
If your stitches are too loose, the ornament may lose its shape or develop visible gaps.
If the stitches are too tight, the fabric may become stiff and difficult to manipulate.
Choose a crochet hook that produces firm but flexible stitches.
Practice a few rounds before beginning the final ornament if you are unfamiliar with the yarn.
Maintaining the same tension throughout the project helps create a smooth and balanced appearance.
2. Preventing Uneven Increases and Decreases
Accurate stitch counting is particularly important when creating the rounded bag body.
Missing an increase can cause the base to become uneven.
Adding an extra stitch may create unwanted ripples.
Use a stitch marker to identify the beginning of every round.
Count the stitches after completing each increase or decrease round.
If the shape begins to look irregular, correct the stitch count before continuing.
3. Creating a Neat Color Change
The transition between the red body and white cuff is one of the most noticeable details in this Christmas Bag Ornament Tutorial.
To achieve a clean finish, change colors during the final yarn-over of the previous stitch.
Avoid tying bulky knots on the outside of the ornament.
Instead, secure the yarn tails inside the bag using a yarn needle.
Maintain consistent tension during the first round of the new color.
A neat color transition makes the finished ornament look more polished and professional.
4. Making Strong Hanging Loops
Because the ornament will hang from a Christmas tree branch or decorative hook, the hanging loop must be securely attached.
Use a firm crochet cord rather than a loose chain.
Sew the ends of the cord into several stitches inside the upper cuff.
Reinforce the attachment with additional hidden stitches.
Test the loop gently before hanging the ornament.
Avoid attaching heavy decorations that may pull on the loop.
A properly secured hanging loop helps ensure the ornament remains attractive and functional throughout the holiday season.
5. Avoiding Common Crochet Ornament Mistakes
One common mistake is using yarn that is too thick for the intended ornament size.
Bulky yarn can make small decorative details difficult to create.
Another frequent problem is overstuffing the bag, which may distort its rounded shape.
Use only a small amount of fiberfill if you want a stuffed ornament.
Avoid making the decorative drawstring too tight because it may pull the upper section out of shape.
Take your time when attaching the bow and tassels to ensure that the details remain centered and balanced.
6. Cleaning and Storing Your Crochet Christmas Decorations
Proper care helps preserve your handmade crochet Christmas ornaments for many holiday seasons.
If the ornaments become dusty, gently remove surface dust using a soft brush.
For washable cotton ornaments, spot clean with cool water and mild detergent.
Avoid soaking ornaments that contain metallic thread, glue, beads, or nonwashable decorations.
Allow the ornaments to dry completely before storing them.
Place them in a breathable storage container with tissue paper between individual pieces.
Keep them away from moisture, direct sunlight, and excessive heat to help preserve their shape and colors.
Frequently Asked Questions About the Christmas Bag Ornament Tutorial
What is a Christmas Bag Ornament Tutorial?
A Christmas Bag Ornament Tutorial is a crochet guide that explains how to create miniature decorative Christmas gift bags using yarn, basic crochet stitches, and festive accessories.
Is this crochet Christmas ornament suitable for beginners?
Yes. The pattern uses basic stitches such as single crochet, increases, and decreases. Beginners who understand working in rounds can complete the project with practice.
What type of yarn is best for crochet Christmas bag ornaments?
DK-weight cotton yarn or a cotton blend is recommended because it creates defined stitches and helps the ornaments maintain their shape.
What crochet hook size should I use?
A 3.0 mm or 3.5 mm crochet hook is suitable for many DK-weight cotton yarns. Adjust the hook size according to your yarn and tension.
How big is the finished Christmas bag ornament?
The suggested finished ornament measures approximately 3–3.5 inches (7.5–9 cm) tall, excluding the hanging loop.
How long does it take to crochet one ornament?
Most crocheters can complete one ornament in approximately one to two hours, depending on experience and decorative details.
Can I make these ornaments without stuffing?
Yes. The ornaments can remain hollow and function as miniature gift pouches.
Can I use acrylic yarn instead of cotton?
Yes. Acrylic yarn works well, although the finished texture and structure may differ slightly from cotton.
How do I make the ornaments larger?
Use thicker yarn and a larger hook, or add additional increase rounds to the base and corresponding rounds to the body.
Can I make smaller Christmas bag ornaments?
Yes. Use thinner yarn and a smaller hook to create miniature versions suitable for small Christmas trees or gift wrapping.
How do I keep the white cuff from unfolding?
Secure the folded cuff with several small hidden stitches around its circumference.
Can I add a functional drawstring?
Yes. Weave a crochet cord through the stitches beneath the cuff, leaving both ends accessible for opening and closing the bag.
Are these ornaments suitable for children?
The basic soft crochet ornament can be adapted for children, but small beads, detachable bows, long cords, and other loose decorations may pose hazards. For young children, omit these details and ensure all components are securely attached.
Can I wash crochet Christmas ornaments?
Washability depends on the yarn and decorations. Plain cotton ornaments may be gently hand washed, while ornaments with metallic accessories are usually better spot cleaned.
Can I sell finished crochet Christmas bag ornaments?
Generally, handmade ornaments created from your own work can be sold, subject to applicable laws and any rights or restrictions associated with third-party designs.
What other colors can I use?
Popular combinations include red and gold, white and silver, emerald green and cream, burgundy and ivory, and pastel pink with white.
Can I use these ornaments as Christmas party favors?
Absolutely. Small crochet gift bags make charming party favors, especially when filled with a wrapped treat or personalized message.
How many ornaments should I make for a matching set?
A set of six ornaments is a practical choice for a coordinated Christmas decoration collection, although you can make as many as you prefer.
Conclusion
The Christmas Bag Ornament Tutorial is a delightful holiday crochet project that combines simplicity, creativity, and traditional Christmas charm. With its rounded red body, soft white cuff, green hanging loop, and delicate golden bow, this miniature ornament captures the festive spirit of handmade Christmas decorations.
VIDEO PATTERN :
By following the step-by-step crochet Christmas bag ornament pattern, you can learn how to create a circular base, shape a miniature gift sack, add decorative crochet details, and finish the ornament with an elegant handmade appearance. The techniques used throughout the project are accessible to beginners while still offering opportunities for experienced crocheters to experiment with colors, textures, and embellishments.
These handmade crochet Christmas gift bags are incredibly versatile. They can decorate Christmas trees, embellish wrapped presents, become personalized holiday party favors, or form part of a beautiful festive garland. Their small size also makes them an excellent project for using leftover yarn from previous crochet creations.
Whether you choose the traditional red, white, green, and gold combination shown in the reference image or create your own personalized color palette, each ornament can become a meaningful handmade keepsake. With a little patience and creativity, this Christmas Bag Ornament Tutorial will help you create beautiful crochet decorations that bring warmth, joy, and festive charm to your home throughout the Christmas season.