
The Cat Block Pattern is a charming patchwork quilting project that combines the timeless beauty of traditional quilting with the playful personality of cats. Featuring pointed ears, a recognizable feline silhouette, and carefully arranged fabric pieces, this adorable quilt block is perfect for anyone who enjoys sewing, quilting, and creating handmade decorations. Whether you are an experienced quilter or a beginner learning basic patchwork techniques, this tutorial will guide you through making a beautiful cat-inspired quilt block using simple fabric shapes, accurate measurements, and easy sewing methods.
One of the most appealing features of the Cat Block Pattern is its versatility. Cat quilt blocks can be created using colorful fabric scraps, vintage floral prints, modern geometric patterns, or traditional quilting cotton. Black cats, orange tabbies, gray kittens, white cats, and multicolored patchwork designs all make wonderful subjects for handmade quilts. The finished blocks can be combined into larger quilts, sewn into decorative pillows, used in wall hangings, or incorporated into table runners and other fabric projects. This makes the pattern especially attractive to cat lovers, quilting enthusiasts, and anyone who enjoys creating personalized handmade gifts.
Learning how to make a Cat Quilt Block is an excellent opportunity to practice essential patchwork techniques while working on a creative and rewarding project. This tutorial explains how to select coordinating fabrics, prepare accurate cutting measurements, construct half-square triangle units, sew the cat’s pointed ears, assemble the face and body, and complete the block with professional finishing techniques. The pattern uses beginner-friendly straight seams and basic geometric shapes, making it approachable for quilters who are still developing their skills. More experienced makers can personalize the design by adding embroidered facial details, decorative collars, or creative fabric combinations.
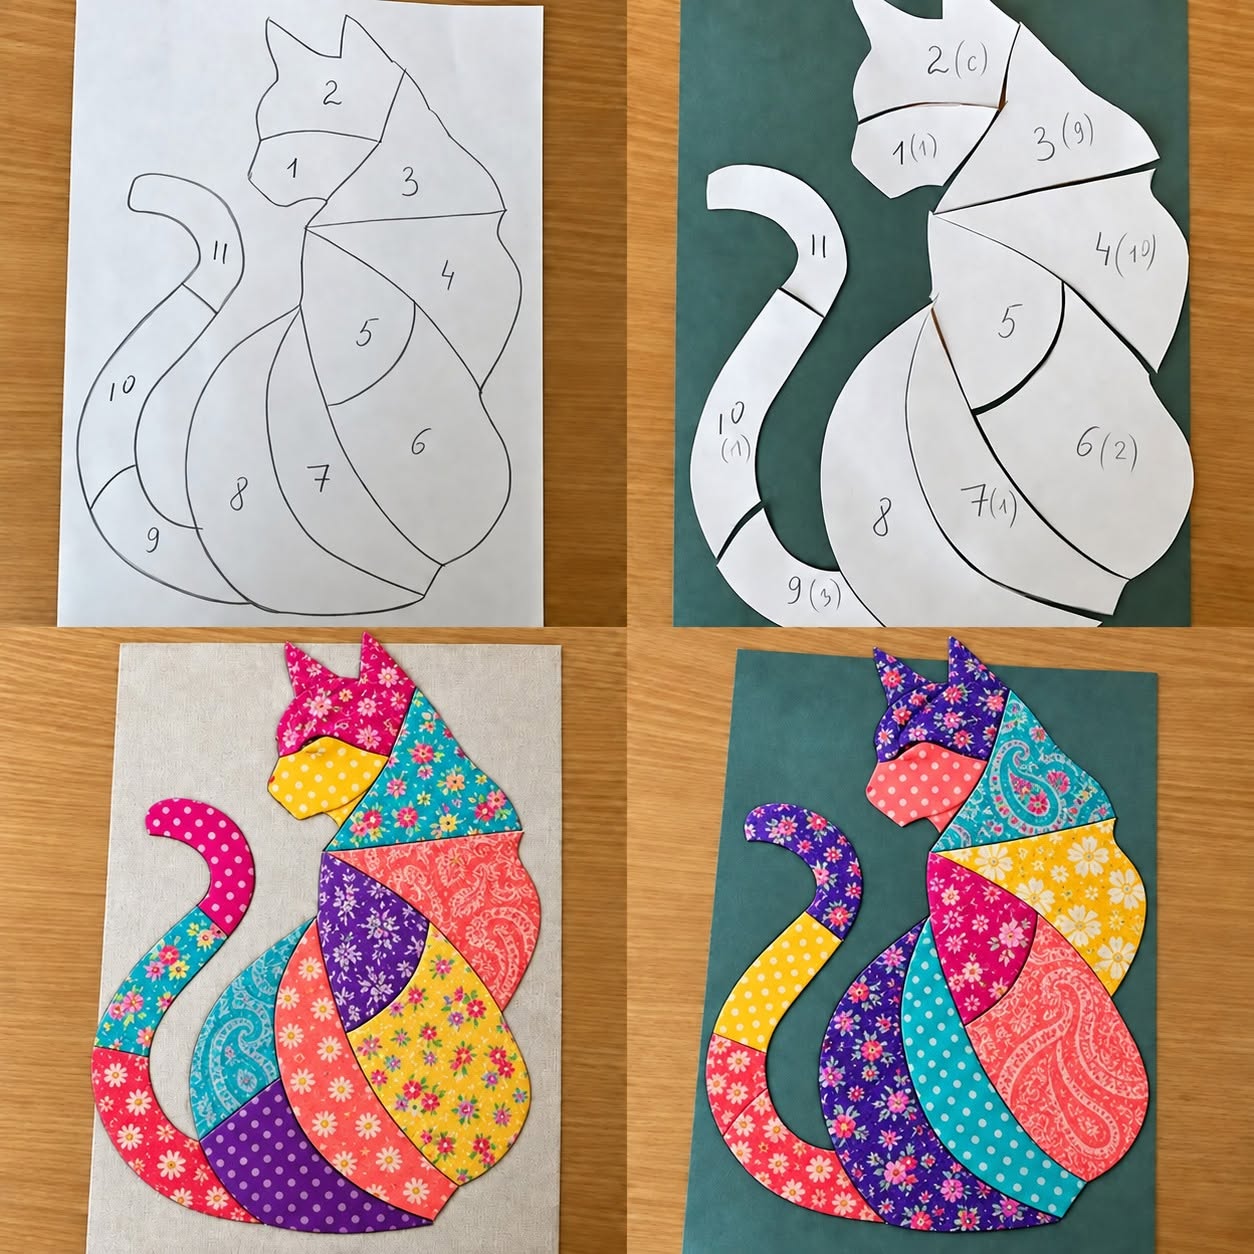
The finished Cat Block Pattern in this tutorial measures 12 × 12 inches (30.5 × 30.5 cm), making it suitable for many quilting projects. The design features a stylized cat with two triangular ears, a rectangular face, and a larger body section surrounded by coordinating background fabric. A standard ¼-inch (0.6 cm) seam allowance is used throughout the construction. By combining several blocks, you can create a beautiful cat-themed quilt featuring different colors, patterns, and feline personalities. With accurate cutting, careful pressing, and consistent stitching, this delightful patchwork project can become a treasured addition to your handmade quilting collection.
DISCOVER MORE FREE PATTERNS HERE!
Materials, Fabric Selection, and Cutting Measurements for the Cat Block Pattern
Before beginning your Cat Block Pattern, gather the materials needed to complete the project. Choosing suitable quilting cotton is especially important because the fabric’s stability and texture influence the accuracy of the finished patchwork.
High-quality quilting cotton is recommended because it is easy to cut, press, and sew. Its stable woven structure helps the pieces maintain their shape during assembly.
For a traditional cat design, choose one main fabric for the cat’s body and a contrasting background fabric. Black, orange, gray, cream, and brown are excellent choices for the cat silhouette.
For a more playful appearance, use floral prints, polka dots, stripes, or colorful fabric scraps.
Materials needed:
- One fat quarter of quilting cotton for the cat.
- One fat quarter of contrasting background fabric.
- Small fabric scraps for optional facial details.
- Coordinating sewing thread.
- Sewing machine.
- Rotary cutter.
- Self-healing cutting mat.
- Acrylic quilting ruler.
- Fabric scissors.
- Sewing pins or fabric clips.
- Iron and ironing board.
- Fabric marking pencil.
- Seam ripper.
- Optional embroidery thread.
- Optional lightweight fusible appliqué web.
- Optional batting and backing fabric for a finished quilt project.
A fat quarter generally measures approximately 18 × 21 inches (45.7 × 53.3 cm), although dimensions may vary slightly.
Finished block measurements:
| Component | Measurement |
|---|---|
| Finished Quilt Block | 12 × 12 in (30.5 × 30.5 cm) |
| Unfinished Quilt Block | 12½ × 12½ in (31.8 × 31.8 cm) |
| Standard Seam Allowance | ¼ in (0.6 cm) |
| Finished Cat Head Width | 6 in (15.2 cm) |
| Finished Cat Head Height | 4 in (10.2 cm) |
| Finished Cat Body Width | 6 in (15.2 cm) |
| Finished Cat Body Height | 5 in (12.7 cm) |
| Recommended Fabric | Quilting Cotton |
| Skill Level | Confident Beginner |
The finished size refers to the block after it has been sewn into a quilt. The unfinished size includes seam allowances around the outside edges.
Cutting instructions
The following cutting plan creates a stylized cat silhouette centered in a 12-inch finished quilt block.
Cat fabric:
| Piece | Quantity | Cut Size |
|---|---|---|
| Cat Face | 1 | 6½ × 3½ in |
| Cat Body | 1 | 6½ × 5½ in |
| Ear Squares | 2 | 2½ × 2½ in |
Background fabric:
| Piece | Quantity | Cut Size |
|---|---|---|
| Upper Background Strip | 1 | 12½ × 1½ in |
| Lower Background Strip | 1 | 12½ × 2½ in |
| Side Background Strips | 2 | 3½ × 9½ in |
| Ear Background Squares | 2 | 2½ × 2½ in |
| Center Ear Background | 1 | 2½ × 2½ in |
| Outer Ear Background Squares | 2 | 2½ × 2½ in |
These pieces provide the basis for the decorative cat silhouette. The ear section is assembled separately, while the head and body are constructed using rectangular fabric pieces.
Before cutting, press all fabrics carefully to remove wrinkles.
Use a sharp rotary cutter and a quilting ruler to create accurate straight edges.
A consistent ¼-inch seam allowance is essential for keeping the block square.
Step-by-Step Cat Block Pattern: Creating the Cat Ears and Patchwork Head
The first stage of the Cat Block Pattern involves constructing the pointed ears and preparing the cat’s face.
The ears are one of the most recognizable features of the design. They are created using simple corner triangles rather than complicated curved sewing.
This method is especially suitable for beginners because it uses straight stitching and basic fabric shapes.
Step 1: Prepare the ear pieces.
Take the two 2½-inch cat fabric squares.
Place one background square right sides together with each cat square.
Align the edges carefully.
Use a fabric marker to draw a diagonal line from one corner to the opposite corner on the wrong side of each background square.
Step 2: Sew the diagonal seams.
Sew directly along the marked diagonal line on each pair of squares.
Trim the excess fabric approximately ¼ inch beyond the stitching line on the side you intend to remove.
Press the background triangle open.
Each completed unit should measure 2½ × 2½ inches.
These units form the pointed ears.
Step 3: Arrange the ear row.
Place one outer background square at each end.
Position the two ear units between them.
Place the center background square between the ears.
Arrange the pieces in a horizontal row.
Check that the triangular cat fabric sections point upward.
Step 4: Sew the ear row together.
Place the first two squares right sides together.
Sew using a ¼-inch seam allowance.
Continue adding the remaining squares.
Press the seams carefully.
The completed row will contain five 2½-inch squares and measure 10½ inches wide.
Step 5: Prepare the cat face.
Take the 6½ × 3½-inch cat fabric rectangle.
Press it flat.
Position it beneath the central portion of the ear row.
Check that the face is centered between the pointed ears.
Step 6: Prepare the upper section for assembly.
Arrange the ear row and face section on a flat surface.
Check the proportions of the cat silhouette.
Use additional background strips as needed to align the upper and lower sections.
Keep the pieces organized before continuing.
The completed Cat Quilt Block Ear and Head Section should feature two pointed triangular ears above a clearly defined rectangular face.
How to Assemble the Cat Quilt Block Body and Complete the Patchwork Design
After preparing the ears and head, the next stage of the Cat Block Pattern involves constructing the body and joining the patchwork sections.
The cat’s body is represented by a larger rectangular fabric piece, creating a simple silhouette that is easy to recognize.
The surrounding background fabric helps emphasize the cat shape and creates a clean quilt block design.
Step 1: Prepare the cat body.
Take the 6½ × 5½-inch cat fabric rectangle.
Press the fabric carefully.
Position it beneath the cat face.
Align the center of the body with the center of the head.
Step 2: Join the head and body.
Place the head and body right sides together.
Align the edges.
Sew using a ¼-inch seam allowance.
Press the seam toward the darker fabric.
The joined section should form the main cat silhouette.
Step 3: Add the background fabric.
Position the background strips around the cat silhouette.
Arrange the side strips evenly.
Check that the cat remains centered.
Trim or piece the background sections as necessary to fit the layout.
Step 4: Sew the side sections.
Place one background strip right sides together with the cat section.
Sew along the edge using a ¼-inch seam allowance.
Repeat on the opposite side.
Press the seams carefully.
Step 5: Attach the upper and lower background strips.
Position the upper background strip above the cat ears.
Place the lower background strip beneath the body.
Sew the strips into place.
Press the completed block flat.
Step 6: Square the quilt block.
Place the completed patchwork block on a cutting mat.
Use an acrylic quilting ruler to check the dimensions.
The unfinished block should measure 12½ × 12½ inches.
Trim small irregularities if necessary, ensuring that enough fabric remains for the outer seam allowance.
The completed Handmade Cat Quilt Block should feature a recognizable cat silhouette surrounded by contrasting background fabric.
Creative Cat Quilt Block Designs, Decorative Details, and Professional Finishing Tips
One of the greatest advantages of the Cat Block Pattern is the freedom to personalize the finished design.
The same basic construction can be adapted to create black cats, orange tabbies, floral kittens, colorful patchwork cats, and charming vintage-inspired quilt blocks.
Step 1: Create a classic black cat block.
Use solid black quilting cotton for the cat silhouette.
Choose cream or white background fabric.
Keep the patchwork lines simple.
The strong contrast creates a bold and recognizable cat design.
Step 2: Make an orange tabby variation.
Choose orange fabric with subtle stripes.
Use beige or cream fabric for the background.
Arrange the striped fabric carefully so the pattern runs in a consistent direction.
This creates a cheerful cat-inspired quilt block.
Step 3: Add embroidered facial details.
Use black embroidery thread to create small eyes, a nose, and whiskers.
Position the details carefully on the face.
Use simple backstitches or satin stitches.
Keep the embroidery balanced and symmetrical.
Step 4: Create a colorful patchwork cat.
Replace the solid cat body with small fabric pieces sewn together.
Use floral prints, polka dots, and geometric fabrics.
Press the patchwork seams carefully.
Cut the required cat pieces from the completed patchwork fabric.
Step 5: Add decorative accessories.
Create a small fabric collar using contrasting cotton.
Add a tiny appliqué bow or heart.
Position the accessory near the cat’s neck.
Secure it with machine stitching or hand embroidery.
Step 6: Complete the final inspection.
Check the seams and patchwork alignment.
Inspect the cat ears.
Remove loose threads.
Press the block carefully.
Measure the finished patchwork once more before incorporating it into a larger project.
The completed Cat Patchwork Quilt Block should have a balanced appearance, secure seams, and a charming feline personality.
Beautiful Color Combinations for a Cat Block Pattern
A black and white Cat Quilt Block creates a classic and sophisticated appearance. The strong contrast emphasizes the cat silhouette and works beautifully in modern quilts.
An orange and cream Cat Block offers a cheerful design inspired by traditional tabby cats. Warm orange fabrics combined with soft cream backgrounds create a welcoming handmade appearance.
A gray and dusty pink Cat Quilt Block produces a delicate and charming combination. These gentle colors are especially attractive for decorative pillows, nursery quilts, and handmade gifts.
A navy blue and white Cat Block creates a modern and elegant appearance. Deep blue fabric emphasizes the pointed ears and works beautifully with geometric quilting patterns.
A sage green and beige Cat Quilt Block offers a soft farmhouse-inspired style. These natural colors complement rustic interiors and vintage fabric collections.
For a colorful cat-themed quilt, combine black, orange, gray, cream, dusty rose, turquoise, and lavender fabrics. Each block can feature a different cat color, creating a playful collection of handmade feline designs.
Helpful Tips for Sewing a Beautiful Cat Quilt Block
Maintain a consistent ¼-inch seam allowance throughout the project. Accurate seams help the fabric pieces align neatly and create a professional-looking block.
Press each seam after sewing. Proper pressing helps reduce bulk and improves the overall appearance of the patchwork.
Use a sharp rotary cutter and quilting ruler. Accurate cutting makes the assembly process easier and helps prevent uneven edges.
Choose contrasting fabrics for the cat and background. Strong color contrast makes the feline silhouette more recognizable.
Check the orientation of the ear triangles before sewing. Both ears should point upward and remain symmetrical.
Measure the block before adding it to a quilt. A correctly sized unfinished block helps maintain consistent alignment with neighboring blocks.
Frequently Asked Questions About the Cat Block Pattern
1. Is the Cat Block Pattern suitable for beginners?
Yes. This pattern is suitable for confident beginners who understand basic straight stitching, fabric cutting, and simple patchwork construction.
2. What is a Cat Quilt Block?
A Cat Quilt Block is a decorative patchwork block featuring a cat-inspired silhouette created from fabric shapes and traditional quilting techniques.
3. What fabric is best for a Cat Block Pattern?
Quilting cotton is recommended because it is stable, easy to cut, and suitable for accurate patchwork seams.
4. What size is the finished Cat Quilt Block?
The suggested finished size is 12 × 12 inches, with an unfinished size of 12½ × 12½ inches.
5. Can I make the Cat Block larger?
Yes. Enlarge the pattern pieces proportionally and maintain a consistent seam allowance.
6. Can I make a smaller Cat Quilt Block?
Absolutely. Reduce the design dimensions while keeping enough fabric for accurate seams.
7. What seam allowance should I use?
A ¼-inch (0.6 cm) seam allowance is recommended throughout the project.
8. Can I use leftover quilting fabric?
Yes. This pattern is an excellent way to use fabric scraps from previous sewing and quilting projects.
9. Do I need a sewing machine?
A sewing machine makes the project faster, but the block can also be sewn by hand using small, secure stitches.
10. Can I use different colors for the cats?
Yes. Black, orange, gray, cream, brown, pink, blue, and multicolored fabrics all create attractive variations.
11. Can I add embroidered facial details?
Yes. Small embroidered eyes, whiskers, and a nose can make the cat design more expressive.
12. Can I combine several Cat Blocks into a quilt?
Yes. Multiple cat blocks can be arranged into a larger quilt with sashing, borders, or alternating background blocks.
13. How long does it take to sew a Cat Quilt Block?
The time required depends on experience and decorative details. Many beginners can complete a simple block in approximately one to two hours.
14. How should I press the Cat Quilt Block?
Press the seams carefully using an iron suitable for the fabric. Avoid stretching the bias edges of the triangular ear sections.
15. Can I make Cat Quilt Blocks as handmade gifts?
Yes. Cat Quilt Blocks can be used in handmade pillows, quilts, wall hangings, table runners, and other thoughtful gifts for cat lovers.
Conclusion
The Cat Block Pattern is a charming patchwork quilting project that combines traditional sewing techniques with the playful personality of cats. Its pointed ears, recognizable feline silhouette, and colorful fabric combinations create an attractive quilt block suitable for many handmade projects.
By following the instructions in this tutorial, you can create a beautiful Handmade Cat Quilt Block using quilting cotton, simple geometric shapes, accurate measurements, and basic straight seams.
One of the greatest advantages of this pattern is its versatility. Classic black cats, cheerful orange tabbies, elegant gray kittens, vintage floral designs, and colorful patchwork variations can all be created using the same basic construction.
The finished block can become part of a larger cat-themed quilt, a decorative pillow, a wall hanging, or a thoughtful handmade gift for someone who loves cats. Its simple construction makes it an enjoyable project for using fabric scraps and experimenting with creative color combinations.
With accurate cutting, consistent seam allowances, careful pressing, symmetrical ear construction, and thoughtful finishing, your Cat Quilt Block will have a neat appearance and a charming handmade character.
Enjoy selecting your favorite quilting fabrics, experimenting with colorful feline designs, and bringing your own beautiful Cat Block Pattern to life through the relaxing and rewarding art of quilting.