
The Circular Crochet Hat Pattern is a beautiful handmade accessory that combines timeless crochet techniques with a modern, feminine design. Inspired by the elegant red hats shown in the reference image, this project features a rounded crown, a decorative openwork section, a gently flared brim, and a delicate white edging. The finished result is a stylish crochet bucket hat that can complement casual outfits, summer dresses, and handmade fashion collections.
One of the most attractive features of this Circular Crochet Hat Pattern is the combination of solid crochet stitches and delicate lace-inspired openings. The upper crown provides structure, while the openwork section introduces texture and breathability. The brim widens gradually, creating a flattering silhouette that frames the face without appearing excessively large.
Learning how to crochet a circular hat is an excellent way to practice working in continuous rounds, increasing stitches evenly, creating decorative mesh patterns, and shaping a comfortable brim. The construction begins at the center of the crown and continues downward, making it easy to customize the finished hat according to individual head measurements.
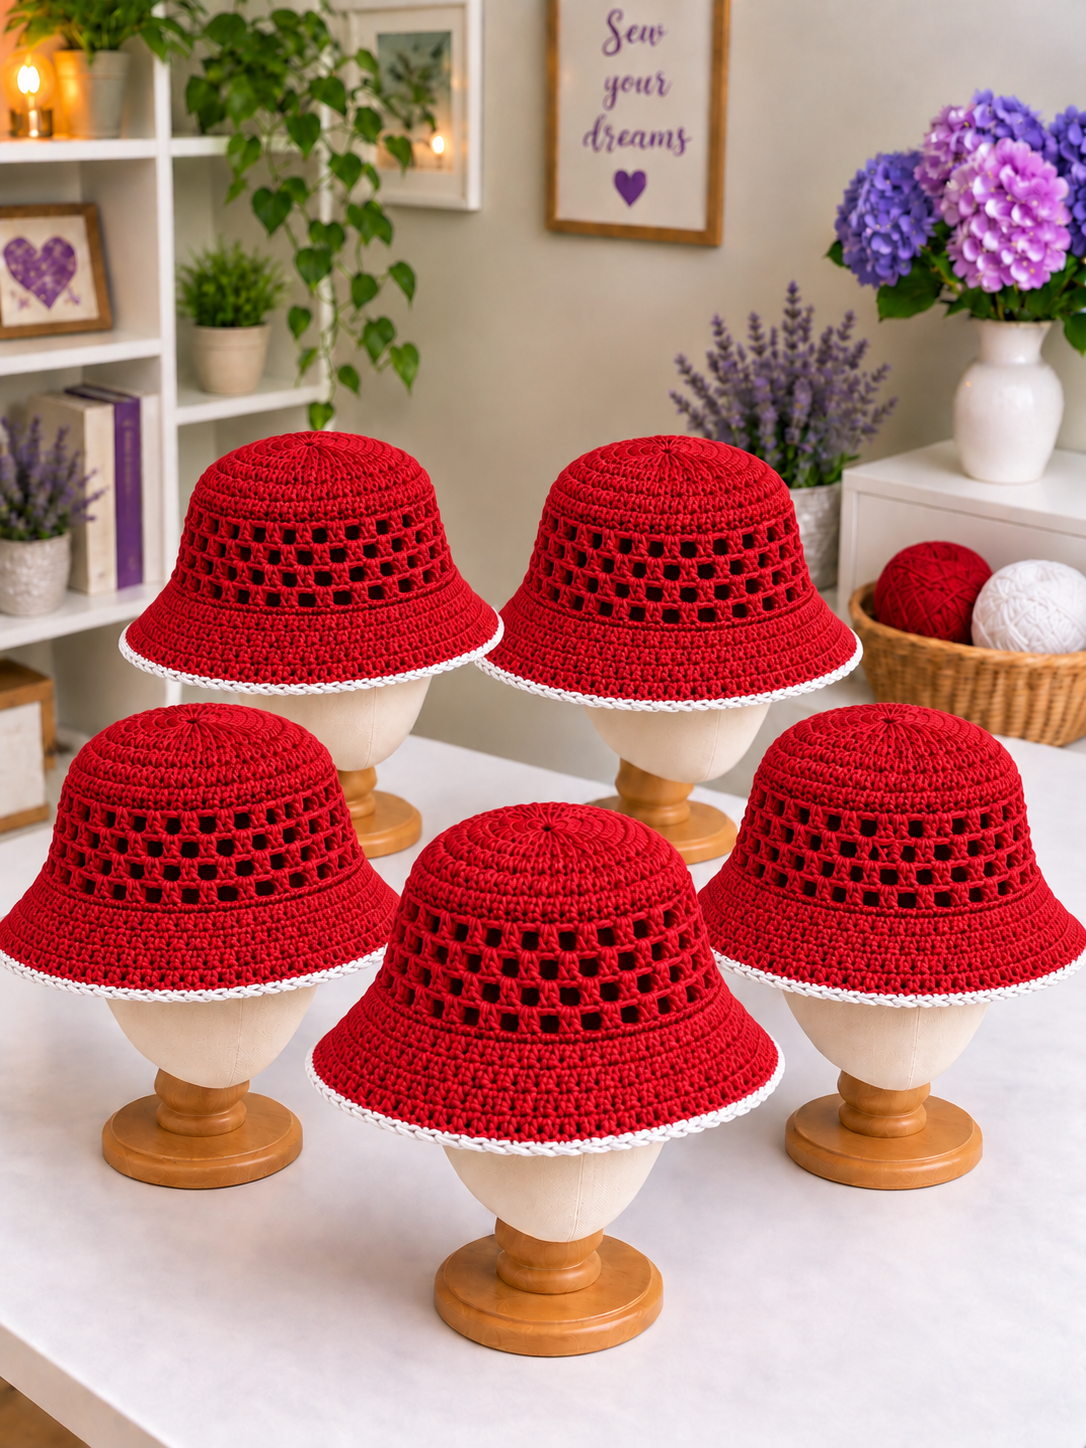
This tutorial explains how to make a Red Circular Crochet Hat with White Trim, including materials, measurements, stitch abbreviations, crown construction, openwork detailing, brim shaping, and professional finishing. All instructions use U.S. crochet terminology, and the pattern is designed for confident beginners and intermediate crocheters who enjoy creating beautiful handmade accessories.
DISCOVER MORE FREE PATTERNS HERE!
Materials, Measurements, and Crochet Stitches for the Circular Crochet Hat Pattern
Choosing the correct yarn is essential when making a Circular Crochet Hat Pattern. A bucket-style hat should be comfortable, lightweight, and structured enough to maintain its shape.
For a design inspired by the reference image, use a rich red cotton yarn with a small amount of white yarn for the contrasting border. Cotton is particularly suitable because it provides defined stitches and a breathable finish.
A smooth yarn also makes the openwork section more visible, allowing the decorative pattern to become an important part of the finished design.
Materials needed
- Approximately 250–350 yards (230–320 m) of DK-weight cotton yarn in red.
- Approximately 10–20 yards (9–18 m) of matching white cotton yarn.
- One 3.5 mm crochet hook, or the size needed to obtain gauge.
- Tapestry needle.
- Small sharp scissors.
- Flexible measuring tape.
- Stitch markers.
- Optional blocking pins.
- Optional hat form or rounded mannequin head.
- Optional lightweight fabric stiffener suitable for crochet.
For the most elegant appearance, choose a vibrant red yarn and a clean ivory or white yarn for the final edging.
Finished hat measurements
| Component | Approximate Measurement |
|---|---|
| Adult Head Circumference | 21–23 in (53–58.5 cm) |
| Sample Head Circumference | 22 in (56 cm) |
| Crown Diameter | 6¾–7 in (17–18 cm) |
| Crown and Side Height | 6–6½ in (15–16.5 cm) |
| Brim Width | 2–2½ in (5–6.5 cm) |
| Total Hat Height | 8–9 in (20–23 cm) |
| Crochet Hook | 3.5 mm |
| Skill Level | Confident Beginner / Intermediate |
These measurements are approximate. The exact finished size depends on yarn thickness, stitch tension, and the number of rounds worked.
The hat should sit comfortably around the head without feeling too tight.
U.S. crochet abbreviations
| Abbreviation | Meaning |
|---|---|
| ch | Chain |
| sl st | Slip Stitch |
| sc | Single Crochet |
| hdc | Half Double Crochet |
| dc | Double Crochet |
| st | Stitch |
| sts | Stitches |
| sp | Space |
| inc | Increase |
| rep | Repeat |
| MR | Magic Ring |
| FO | Fasten Off |
Important: This pattern uses U.S. crochet terminology. The beginning ch 2 of a joined hdc round does not count as a stitch. Join each round with a sl st to the first actual stitch unless otherwise indicated.
Understanding crochet gauge
For the sample construction, aim for approximately 16 hdc stitches and 12 hdc rounds per 4 inches (10 cm) using DK cotton yarn.
Make a gauge swatch before starting.
If your stitches are too tight, use a larger crochet hook.
If your stitches are too loose, use a smaller hook.
Gauge is particularly important because it determines the crown diameter and overall fit of the hat.
Step-by-Step Circular Crochet Hat Pattern: Creating the Rounded Crown
The first stage of the Circular Crochet Hat Pattern involves crocheting a flat circular crown.
The crown is worked from the center outward using half double crochet stitches.
Even increases help create a smooth circle without excessive rippling or curling.
Step 1: Begin with a magic ring
Using red yarn, make a magic ring.
Round 1: Ch 2, work 10 hdc into the ring.
Pull the ring closed.
Join with a sl st to the first hdc.
You should have 10 stitches.
Step 2: Begin increasing
Round 2: Ch 2, work 2 hdc in each stitch around.
Join.
You should have 20 stitches.
Round 3: Ch 2, repeat 1 hdc in the next stitch, 2 hdc in the following stitch around.
Join.
You should have 30 stitches.
Step 3: Continue shaping the crown
Round 4: Ch 2, repeat 1 hdc in each of the next 2 stitches, 2 hdc in the next stitch around.
Join.
You should have 40 stitches.
Round 5: Ch 2, repeat 1 hdc in each of the next 3 stitches, 2 hdc in the next stitch around.
Join.
You should have 50 stitches.
Step 4: Expand the circular crown
Continue increasing evenly.
| Round | Increase Pattern | Total Stitches |
|---|---|---|
| 6 | 4 hdc, inc | 60 |
| 7 | 5 hdc, inc | 70 |
| 8 | 6 hdc, inc | 80 |
| 9 | 7 hdc, inc | 90 |
| 10 | 8 hdc, inc | 100 |
Repeat the indicated sequence ten times in each round.
For example, Round 6 consists of four individual hdc stitches followed by two hdc in the next stitch, repeated around.
Step 5: Check the crown diameter
Place the crown on a flat surface.
Measure across the widest part.
For the sample adult size, the crown should measure approximately 6¾–7 inches.
If your crown is too small, continue increasing with the same established formula.
If the crown is too large, stop increasing earlier.
The stitch count used in the remaining instructions assumes a crown of 100 stitches.
Step 6: Begin forming the sides
Round 11: Ch 2, work 1 hdc in each stitch around.
Join.
Repeat for Rounds 12–14.
Do not increase.
The fabric will gradually begin curving downward, creating the rounded upper section of the hat.
At this stage, the Circular Crochet Hat Crown should resemble a shallow bowl with a smooth, rounded top.
How to Crochet the Decorative Openwork Section and Shape the Hat Brim
The openwork section gives this Circular Crochet Hat Pattern its distinctive appearance.
In the reference image, the decorative openings create horizontal rows of small rectangular spaces around the middle of the hat.
This tutorial uses a simple double crochet mesh pattern that produces a similar effect.
The brim is then worked in solid stitches to create a balanced, gently flared shape.
Step 1: Prepare the openwork section
After completing Round 14, check that the stitch count remains at 100.
Place a stitch marker at the beginning of the round.
The openwork section will use double crochet stitches separated by chain spaces.
Work with relaxed, consistent tension.
Step 2: Crochet the first mesh round
Round 15: Ch 3 (counts as the first dc and ch 1).
Skip the next stitch.
Work 1 dc in the following stitch, ch 1.
Repeat skip 1 stitch, dc in the next stitch, ch 1 around, beginning with the first dc already represented by the initial chains.
Join with a sl st to the second chain of the beginning ch 3.
You should have 50 dc posts and 50 ch-1 spaces.
Step 3: Continue the decorative mesh
Round 16: Sl st into the first ch-1 space.
Ch 3 (counts as dc and ch 1).
Work 1 dc into the next ch-1 space, ch 1.
Repeat around, placing one dc into each successive ch-1 space and separating the dc stitches with ch 1.
Join to the second chain of the beginning ch 3.
Repeat the same construction for Rounds 17–19.
This creates five decorative mesh rounds.
Step 4: Return to solid crochet stitches
Round 20: Ch 2, work 1 hdc into each dc post and 1 hdc into each ch-1 space around.
Join.
You should have 100 hdc.
Rounds 21–23: Ch 2, work 1 hdc in each stitch around.
Join.
The solid section beneath the mesh creates a clean transition into the brim.
Step 5: Begin widening the brim
Round 24: Ch 2, repeat 9 hdc, 2 hdc in the next stitch around.
Join.
You should have 110 stitches.
Round 25: Ch 2, work 1 hdc in each stitch around.
Join.
Round 26: Ch 2, repeat 10 hdc, 2 hdc in the next stitch around.
Join.
You should have 120 stitches.
Step 6: Complete the flared brim
Round 27: Work 1 hdc in each stitch around.
Round 28: Repeat 11 hdc, 2 hdc in the next stitch around.
You should have 130 stitches.
Round 29: Work 1 hdc in each stitch around.
Round 30: Repeat 12 hdc, 2 hdc in the next stitch around.
You should have 140 stitches.
Round 31: Work 1 hdc in each stitch around.
Join and fasten off.
The completed brim should flare gently outward. Depending on gauge, add or omit an even round to adjust its width without introducing additional increases.
White Crochet Edging, Professional Finishing, and Creative Circular Hat Designs
The final stage of the Circular Crochet Hat Pattern involves adding the white contrasting border and shaping the hat.
The reference image features a delicate white edging that creates a beautiful contrast against the vibrant red crochet fabric.
This simple detail gives the finished hat a polished and coordinated appearance.
Step 1: Attach the white yarn
Place the hat with the right side facing outward.
Attach the white yarn at any stitch along the outer brim.
Chain 1.
Work 1 sc into each stitch around.
Join with a sl st.
This creates a neat white border.
Step 2: Create a decorative finishing edge
For a slightly textured edge, work a round of reverse single crochet, also called crab stitch.
Alternatively, finish after the first white sc round for a cleaner, minimalist appearance.
Keep the edging relaxed.
Avoid pulling the stitches too tightly.
Step 3: Secure the yarn ends
Fasten off the white yarn.
Use a tapestry needle to weave the yarn tails into the surrounding stitches.
Weave in different directions to help secure the ends.
Trim the excess yarn carefully.
Check the inside of the hat for loose strands.
Step 4: Shape the brim
Place the hat on a rounded hat form.
Arrange the brim evenly.
Gently smooth the crochet fabric.
If necessary, lightly steam-block the brim, following the yarn manufacturer’s care recommendations.
Allow the hat to dry completely before removing it from the form.
Step 5: Check the final fit
Try on the completed hat.
The crown should sit comfortably without squeezing the head.
The openwork section should maintain its decorative appearance.
The brim should extend evenly around the hat.
If the hat feels too tight, consider making another version with a larger hook or an additional crown increase round.
Step 6: Add optional decorations
For a personalized appearance, add a small crochet flower, decorative ribbon, or simple embroidered detail.
A narrow ribbon can be woven through the openwork section.
A small flower can be sewn to one side of the brim.
Keep decorations lightweight so they do not distort the hat.
The completed Red Circular Crochet Hat with White Trim should have a rounded crown, a breathable decorative mesh section, and a softly flared brim.
Beautiful Color Combinations for Circular Crochet Hats
Classic Red and White: This combination closely reflects the reference image. Vibrant red crochet fabric and a delicate white border create a cheerful, timeless design.
Emerald Green and Ivory: Deep emerald green paired with ivory edging produces a sophisticated vintage-inspired hat that works beautifully with neutral clothing.
Dusty Rose and Cream: Soft pink yarn and a cream border create a romantic, feminine accessory with a delicate handmade appearance.
Navy Blue and White: A navy blue circular crochet hat with white edging offers a classic nautical-inspired style suitable for summer outfits.
Lavender and White: Lavender yarn creates a soft pastel appearance, while the white border highlights the shape of the brim.
Burgundy and Beige: Deep burgundy cotton paired with warm beige edging produces an elegant hat with a rich, vintage color palette.
Helpful Tips for Making a Beautiful Circular Crochet Hat
Maintain even stitch tension. Consistent tension helps the circular crown remain smooth and prevents irregular shaping.
Measure the crown frequently. The crown diameter is one of the most important measurements for achieving a comfortable fit.
Avoid excessive brim increases. Too many increases can cause the brim to ripple instead of forming a gentle flare.
Use breathable cotton yarn. Cotton is a good choice for warm-weather accessories because it is comfortable and produces defined stitches.
Keep the mesh pattern consistent. Counting the chain spaces helps maintain evenly spaced decorative openings around the hat.
Block the finished hat carefully. Gentle blocking helps smooth the brim and improve the overall appearance.
Frequently Asked Questions About the Circular Crochet Hat Pattern
1. Is the Circular Crochet Hat Pattern suitable for beginners?
Yes. Confident beginners who understand basic crochet stitches, increases, and working in rounds can complete this project.
2. What is a Circular Crochet Hat?
A Circular Crochet Hat is a hat made by crocheting from the center of the crown outward and then working downward to form the sides and brim.
3. What type of yarn is best for this pattern?
DK-weight cotton yarn is recommended because it provides stitch definition, comfort, and a lightweight finish.
4. What crochet hook should I use?
A 3.5 mm crochet hook is suggested, although the correct hook size depends on the yarn and your personal gauge.
5. What size is the finished hat?
The sample is designed for an adult head circumference of approximately 21–23 inches (53–58.5 cm).
6. Can I make the hat larger?
Yes. Continue increasing the crown until it reaches the diameter needed for the desired size, then adjust the side and brim stitch counts accordingly.
7. Can I make a smaller hat?
Yes. Stop the crown increases earlier and adjust the remaining rounds to fit the smaller stitch count.
8. Can I crochet the hat without the mesh section?
Absolutely. Replace the decorative mesh rounds with solid hdc rounds for a more traditional bucket hat.
9. Can I make the brim wider?
Yes. Add additional brim rounds, increasing gradually when necessary to maintain the desired shape.
10. Can I use acrylic yarn?
Yes, although acrylic may behave differently from cotton and may produce a softer or less structured brim.
11. Can I add a crochet flower?
Yes. A small crochet flower can be sewn to the side of the hat for an attractive decorative detail.
12. Can I use two or more colors?
Yes. The crown, mesh section, brim, and edging can all be crocheted in different coordinating colors.
13. How long does it take to crochet this hat?
Depending on experience and crochet speed, the project may take approximately four to eight hours.
14. How should I wash the finished hat?
Follow the yarn manufacturer’s washing instructions. Gentle hand washing and reshaping while damp are often suitable for cotton crochet hats.
15. Can I make Circular Crochet Hats as handmade gifts?
Yes. These hats make thoughtful handmade gifts for birthdays, holidays, summer celebrations, and anyone who enjoys unique crochet accessories.
Conclusion
The Circular Crochet Hat Pattern is a beautiful and practical project that combines classic crochet techniques with a modern bucket-hat silhouette. Its rounded crown, decorative openwork section, gently flared brim, and contrasting white edging create an elegant handmade accessory inspired by the reference image.
By following this step-by-step tutorial, you can learn how to crochet a circular hat using basic crochet stitches, carefully spaced increases, decorative mesh rounds, and simple finishing techniques.
One of the greatest advantages of this design is its versatility. You can create a vibrant red and white version, experiment with romantic pastel colors, or choose sophisticated vintage shades such as burgundy, emerald green, and navy blue.
The finished Crochet Bucket Hat is lightweight, comfortable, and customizable. Its breathable openwork section and softly shaped brim make it an attractive accessory for casual outfits and warm-weather styling.
With careful attention to gauge, stitch tension, crown measurements, and brim shaping, your Circular Crochet Hat Pattern can become a polished handmade accessory that reflects your personal creativity.
Enjoy choosing beautiful yarn colors, practicing circular crochet techniques, and creating your own elegant Circular Crochet Hat with the timeless charm of handmade crochet.