
The Bear Hanging Organizer Pattern is a charming sewing project that combines adorable animal-inspired details with practical storage. Featuring a sweet bear face, soft rounded ears, decorative patchwork fabrics, and useful storage pockets, this handmade organizer is perfect for adding warmth and personality to bedrooms, nurseries, craft rooms, and sewing spaces.
One of the most appealing features of this Quilted Bear Hanging Organizer is its combination of beauty and functionality. Instead of using ordinary storage containers, you can create a decorative fabric organizer that hangs on a wall, door hook, or sturdy wooden peg. Its pockets can hold lightweight accessories such as hair bows, small sewing supplies, ribbons, stationery, and other everyday essentials.
This sewing project is also an excellent opportunity to use beautiful cotton fabrics and leftover quilting scraps. Soft beige, vintage florals, sage green, dusty rose, and warm brown fabrics work especially well with the bear design. By combining different colors and textures, you can create an organizer that feels handmade, cozy, and completely unique.
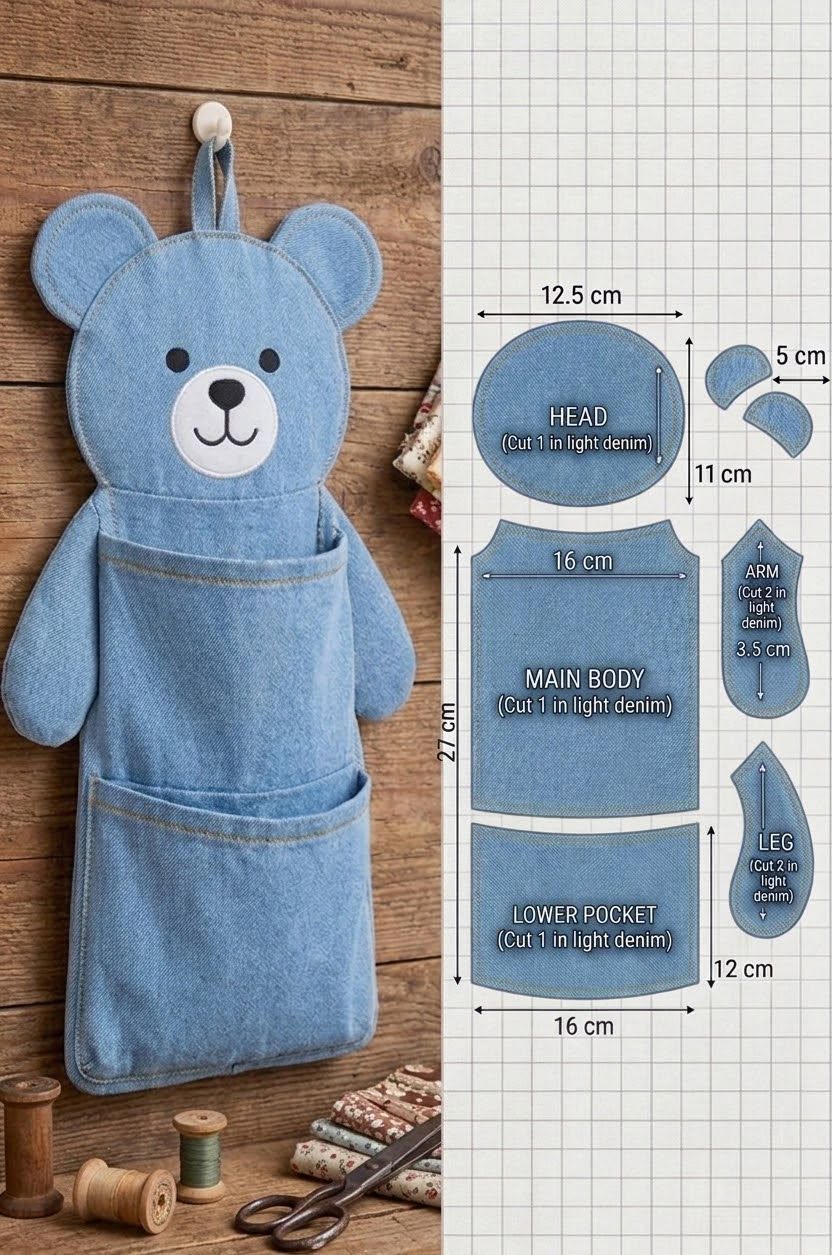
In this complete Bear Hanging Organizer Pattern Tutorial, you will learn how to select fabrics, prepare measurements, cut the bear-shaped pieces, create quilted panels, sew storage pockets, assemble the organizer, and finish it with professional details. The design is beginner-friendly, although some experience with curved sewing and bias binding will make the process easier.
DISCOVER MORE FREE PATTERNS HERE!
Materials, Fabric Measurements, and Cutting Instructions for the Bear Hanging Organizer Pattern
Before beginning your Bear Hanging Organizer Pattern, choose fabrics that are both attractive and durable. Since the organizer will be hanging vertically and supporting small objects, the backing should be stable enough to maintain its shape.
Quilting cotton is ideal for the main body because it is easy to sew, available in countless prints, and comfortable to work with. You can combine a neutral fabric for the bear’s face with patterned cotton for the ears, pockets, and decorative sections.
For a vintage-inspired design, consider using cream fabric with tiny floral prints, warm caramel brown, and delicate pink accents. These colors create a timeless appearance that looks beautiful in children’s rooms and cozy sewing spaces.
Materials needed
- ½ yard of quilting cotton for the main bear body.
- ½ yard of coordinating cotton for the backing and pockets.
- ¼ yard of contrasting fabric for the ears and decorative appliqués.
- ½ yard of lightweight fusible interfacing.
- A piece of low-loft quilt batting measuring approximately 18 × 24 inches.
- Small scraps of dark brown, black, and blush fabric for the face.
- Approximately 2 yards of double-fold bias binding, or enough to finish the outer perimeter.
- Coordinating sewing thread.
- Embroidery floss for the mouth and facial details.
- Sewing machine.
- Fabric scissors or rotary cutter.
- Cutting mat and quilting ruler.
- Pins or sewing clips.
- Fabric marking pencil.
- Iron and ironing board.
- Optional wooden dowel or sturdy hanging loop.
Suggested finished measurements
| Component | Approximate Finished Size |
|---|---|
| Bear organizer body | 14 × 20 inches (35.5 × 51 cm) |
| Main storage pocket | 12 × 7 inches (30.5 × 18 cm) |
| Upper divided pocket section | 12 × 5 inches (30.5 × 12.5 cm) |
| Bear ears | 3 × 3 inches each (7.5 × 7.5 cm) |
| Hanging loop | 1 × 4 inches (2.5 × 10 cm) |
| Finished organizer including ears | Approximately 14 × 22 inches (35.5 × 56 cm) |
These dimensions are approximate and can be adjusted according to your available space.
Cutting guide
| Fabric Piece | Quantity | Cutting Measurement |
|---|---|---|
| Main front panel | 1 | 15 × 21 inches |
| Main backing panel | 1 | 15 × 21 inches |
| Quilt batting | 1 | 15 × 21 inches |
| Lower pocket exterior | 1 | 13 × 8 inches |
| Lower pocket lining | 1 | 13 × 8 inches |
| Upper pocket exterior | 1 | 13 × 6 inches |
| Upper pocket lining | 1 | 13 × 6 inches |
| Ear fabric pieces | 4 | 4 × 4 inches |
| Ear interfacing | 2 | 4 × 4 inches |
| Hanging loop fabric | 1 | 2 × 10 inches |
All cutting measurements include working allowances. The front and backing panels will be trimmed to the final bear silhouette after quilting.
Use a ¼-inch seam allowance unless otherwise specified.
Recommended fabric combinations
Vintage Floral Bear: Cream, dusty rose, and small floral prints.
Woodland Bear: Caramel brown, sage green, and warm ivory.
Classic Teddy Bear: Beige, chocolate brown, and soft white.
Pastel Nursery Bear: Baby pink, lavender, and pale cream.
Rustic Country Bear: Mustard yellow, gingham, and natural linen tones.
Modern Neutral Bear: Oatmeal, taupe, and muted gray.
Step-by-Step Bear Hanging Organizer Pattern: Preparing the Quilted Body and Bear Face
The first stage of this Bear Hanging Organizer Sewing Tutorial involves creating the main quilted panel and preparing the adorable bear details.
A carefully constructed base will help the organizer maintain its shape and support the attached pockets.
Step 1: Prepare the bear-shaped template
Begin by drawing a rounded bear silhouette on a large sheet of paper.
For this sample, use a body shape approximately 14 inches wide and 20 inches tall.
The upper section should have a softly rounded head, while the lower section can remain slightly wider to accommodate the storage pockets.
Keep the ears separate from the main silhouette.
Fold the paper template vertically before cutting so both sides remain symmetrical.
Open the template and check that the overall shape is balanced.
Step 2: Prepare the quilt sandwich
Place the backing fabric wrong side up on a flat surface.
Position the quilt batting over the backing.
Place the main front fabric right side up over the batting.
Smooth all three layers carefully.
Secure the layers with quilting pins or temporary basting stitches.
This creates the quilt sandwich used for the organizer body.
Step 3: Quilt the main fabric panel
Choose a simple quilting design.
Straight vertical lines, diagonal lines, or a gentle diamond pattern are excellent options.
For a beginner-friendly design, mark parallel quilting lines approximately 1½ inches apart.
Sew along the marked lines through all three layers.
Remove the pins as you work.
The quilting stitches will hold the layers together and provide structure.
Step 4: Cut the bear silhouette
Place the paper bear template over the quilted panel.
Trace around the template using a removable fabric marker.
Carefully cut along the outline.
Make sure the front fabric, batting, and backing remain aligned.
Baste around the entire outer edge using a narrow seam allowance to secure the layers.
The main body should now resemble a rounded bear shape without ears.
Step 5: Create the bear ears
Take two ear fabric squares and place them right sides together.
Draw a rounded ear shape approximately 3 inches wide and 3 inches tall.
Sew around the curved edge, leaving the bottom open.
Trim the seam allowance and clip the curves carefully.
Turn the ear right side out.
Press gently.
Repeat for the second ear.
If desired, add a smaller contrasting fabric appliqué to the center of each ear.
Step 6: Create the bear face
Cut two small circles from dark brown or black fabric for the eyes.
Cut a slightly larger oval or rounded triangle for the nose.
Position the facial pieces near the upper section of the organizer.
Use a narrow zigzag stitch or hand appliqué stitches to secure them.
Embroider a small curved mouth below the nose.
You can also add two delicate blush-colored circles for the cheeks.
For a child-friendly decorative design, use embroidered eyes instead of loose buttons or beads.
How to Sew the Bear Hanging Organizer Pockets and Assemble the Fabric Pieces
The storage pockets are the functional heart of the Bear Hanging Organizer Pattern.
You can create one large pocket, several smaller pockets, or a combination of both.
For this tutorial, we will use a large lower pocket and an upper pocket divided into smaller compartments.
This arrangement provides useful storage while keeping the bear face clearly visible.
Step 1: Prepare the lower pocket
Place the lower pocket exterior and lining pieces right sides together.
Align all edges.
Sew along one 13-inch edge using a ¼-inch seam allowance.
Open the pieces and press the seam.
Fold them wrong sides together along the stitched edge.
Press again to create a neat finished upper edge.
Topstitch approximately ⅛ inch from the folded upper edge.
The remaining raw edges will be secured when the pocket is attached to the organizer.
Step 2: Prepare the upper pocket
Repeat the same process with the upper pocket exterior and lining pieces.
Sew the two fabrics together along one long edge.
Turn the fabrics wrong sides together.
Press carefully.
Topstitch the upper folded edge.
For a decorative finish, you may add a narrow strip of lace or contrasting bias tape.
Keep embellishments securely attached.
Step 3: Position the pockets
Lay the quilted bear body flat with the right side facing upward.
Position the lower pocket near the bottom of the organizer.
Center the pocket horizontally.
Keep its lower raw edge approximately ½ inch above the bottom edge of the body.
Position the upper pocket above it, leaving enough space to access the lower compartment.
Check that the pockets do not cover the bear’s eyes, nose, or mouth.
Adjust the placement until the design looks balanced.
Step 4: Attach the lower pocket
Pin or clip the lower pocket in place.
Sew along both sides and the bottom edge.
Use a narrow seam allowance and reinforce the upper corners with several backstitches.
For additional durability, sew a second line of stitching approximately ⅛ inch inside the first.
Do not sew across the upper opening.
The lower pocket should remain open and ready to hold lightweight accessories.
Step 5: Divide the upper pocket
Pin the upper pocket into position.
Sew along both sides and the bottom edge.
Decide how many compartments you want.
For example, you can divide the upper pocket into three sections.
Mark two vertical stitching lines at equal intervals.
Sew from the lower edge to the upper opening along each marked line.
Backstitch at the top of each division to strengthen the pocket openings.
You now have several useful compartments for small items.
Step 6: Attach the bear ears
Position the ears near the upper corners of the bear’s head.
Arrange them symmetrically.
Baste the open bottom edges of the ears to the quilted body.
Make sure the ears extend beyond the main silhouette.
For a more dimensional appearance, gently fold the lower corners of each ear inward before attaching.
Check that both ears sit at similar angles.
The organizer should now have its recognizable teddy bear appearance.
Creative Bear Hanging Organizer Designs, Professional Finishing, and Decorative Details
The finishing stage is where your Quilted Bear Hanging Organizer becomes a polished handmade accessory.
Careful edge finishing, reinforced hanging points, and decorative details will improve both appearance and durability.
You can also personalize the design with embroidered names, patchwork accents, or coordinating fabric bows.
Step 1: Finish the outer edges with bias binding
Begin at a straight section near the lower edge of the organizer.
Open one fold of the bias binding.
Align the raw edge of the binding with the raw edge of the quilted body.
Sew around the perimeter, gently easing the binding along the curves.
Join the binding ends neatly.
Fold the binding over the raw edge to the back.
Secure it with hand stitching or machine stitching.
The binding should lie flat without twisting or pulling.
Step 2: Create the hanging loop
Take the 2 × 10-inch fabric strip.
Fold it in half lengthwise with wrong sides together and press.
Open the strip.
Fold both long raw edges toward the center crease.
Fold the strip in half again.
Topstitch along both long edges.
Fold the finished strip into a loop.
Position it at the upper back of the organizer, centered between the ears.
Secure both ends with a reinforced rectangular stitch pattern.
For extra strength, add diagonal stitching across the rectangle.
Step 3: Reinforce the hanging attachment
Since the organizer will support small objects, the hanging point should be strong.
Cut a small rectangular fabric reinforcement patch.
Place it over the loop ends on the back of the organizer.
Stitch around the rectangle and across its center.
Make sure the stitches pass through the backing and stable quilted layers.
Test the organizer with a few lightweight objects before regular use.
Avoid overloading the pockets.
Step 4: Add decorative appliqué details
You can decorate the organizer with small fabric hearts, flowers, stars, or patchwork shapes.
Cut the desired shapes from coordinating fabric scraps.
Apply fusible web according to the manufacturer’s instructions.
Position the appliqués on the pockets or near the bear’s ears.
Secure the edges with a narrow zigzag stitch.
Choose decorative details that complement the main fabric rather than overwhelming the bear design.
Step 5: Add a personalized name
For a nursery or child’s bedroom, consider adding an embroidered name.
Choose a simple font that is easy to read.
Mark the lettering lightly on the fabric.
Use embroidery floss to stitch the name using backstitch or stem stitch.
Alternatively, create letters from fabric appliqué.
Place the name on the lower pocket or along a decorative fabric strip.
Personalization makes the organizer especially meaningful as a handmade gift.
Step 6: Press and inspect the finished organizer
Gently press the completed organizer.
Use a pressing cloth if the design includes delicate appliqués or embroidery.
Check the pocket seams, ear attachments, and hanging loop.
Trim any loose threads.
Hang the organizer on a sturdy hook.
Add a few lightweight accessories to check how it hangs.
The finished project should look balanced, with accessible pockets and a clearly visible bear face.
Beautiful Color Combinations for the Bear Hanging Organizer Pattern
Sage Green and Cream: A peaceful, nature-inspired combination that looks beautiful in modern nurseries and cozy bedrooms.
Dusty Rose and Ivory: A romantic vintage palette that works wonderfully with floral cotton prints.
Caramel Brown and Beige: A classic teddy bear color combination that creates a warm and timeless appearance.
Lavender and Soft Gray: A delicate, sophisticated combination for children’s rooms and handmade gifts.
Mustard Yellow and White: A cheerful palette that adds warmth and personality to the organizer.
Denim Blue and Natural Linen: A rustic combination that is ideal for sewing rooms and farmhouse-inspired interiors.
Helpful Tips for Sewing a Beautiful Bear Hanging Organizer
Choose stable fabrics. Quilting cotton combined with interfacing and batting helps the organizer maintain its shape.
Keep the pockets lightweight. This project is designed for small accessories rather than heavy objects.
Use consistent seam allowances. Accurate stitching helps the pockets remain straight and evenly positioned.
Reinforce stress points. The hanging loop and upper pocket corners should receive additional stitching.
Press throughout the project. Carefully pressed seams create a cleaner, more professional finish.
Personalize the design. Small fabric flowers, embroidered names, and contrasting binding can make every organizer unique.
Frequently Asked Questions About the Bear Hanging Organizer Pattern
1. Is the Bear Hanging Organizer Pattern suitable for beginners?
Yes. The project uses basic sewing techniques, although sewing curves and applying bias binding may require some practice.
2. What fabric is best for this organizer?
Quilting cotton is an excellent choice because it is easy to sew and available in many beautiful colors and prints.
3. Do I need quilt batting?
Batting is recommended because it provides structure and gives the organizer a soft quilted appearance.
4. Can I make the organizer larger?
Yes. Enlarge the bear template and adjust the pocket dimensions proportionally.
5. Can I add more pockets?
Absolutely. You can divide the existing pockets or add additional pocket panels.
6. Can I use denim fabric?
Yes. Lightweight denim can create a durable organizer, although thick denim may make curved seams more difficult to sew.
7. How do I make the bear ears stand upright?
Use interfacing inside the ears and reinforce their attachment points.
8. Can I hang the organizer on a door?
Yes, provided it is attached to a suitable hook and does not interfere with the door’s operation.
9. Is the organizer suitable for a nursery?
It can be used as decorative storage when installed securely and kept out of children’s reach. It should not be hung over a crib or sleeping area.
10. Can I make the organizer without a sewing machine?
Yes. It can be sewn by hand, although the project will take longer and requires strong, even stitches.
11. How can I personalize the bear face?
You can change the eye shape, nose color, embroidered expression, or add fabric cheeks.
12. Can I wash the finished organizer?
That depends on the fabrics, batting, interfacing, and embellishments used. If all materials are washable, gentle cleaning and air drying are generally preferable.
13. Can I use leftover quilting scraps?
Yes. Fabric scraps are perfect for creating patchwork pockets, decorative ears, and appliqué details.
14. What can I store inside the pockets?
Lightweight items such as hair accessories, ribbons, sewing notions, small stationery supplies, and craft materials.
15. Can I sell handmade Bear Hanging Organizers?
Yes, handmade organizers made from your own designs can generally be sold, subject to any applicable pattern terms and local regulations.
Conclusion
The Bear Hanging Organizer Pattern is a delightful sewing project that brings together practical storage and charming handmade decoration. Its adorable bear face, soft quilted body, and useful pockets make it an attractive accessory for many different spaces.
One of the greatest advantages of this project is its versatility. By changing the fabric colors, pocket arrangements, and decorative details, you can create organizers for nurseries, bedrooms, sewing rooms, and craft spaces.
The combination of quilting, appliqué, and simple sewing techniques also makes this project an enjoyable way to develop new skills. From preparing the quilt sandwich to attaching the final binding, each stage contributes to a beautiful finished result.
For anyone who loves handmade gifts, the Quilted Bear Hanging Organizer is a thoughtful choice. Personalized with a name or created in someone’s favorite colors, it becomes a unique accessory that combines usefulness with sentimental value.
Whether you prefer vintage florals, woodland-inspired colors, or soft pastel fabrics, this project offers endless creative possibilities.
With careful measurements, secure stitching, and attention to the finishing details, your Bear Hanging Organizer can become a beautiful handmade addition to your home or a special gift for someone you love.