
The Crochet Hat Holder Pattern is a beautiful and practical handmade project designed to organize baseball caps while adding a cozy decorative touch to your home. Featuring textured crochet stitches, raised horizontal bands, a long vertical construction, and decorative fringe, this hanging organizer is an excellent way to combine creativity with everyday storage.
One of the most attractive features of this Crochet Baseball Cap Holder is its simple yet elegant design. Instead of storing hats in drawers or stacking them on shelves, you can display them vertically on a handmade crochet holder. The open pockets and raised bands help organize your favorite caps while keeping them accessible. The finished organizer can be displayed in a bedroom, closet, entryway, or dressing area.
The design shown in the reference image features three beautiful color combinations: warm terracotta with cream accents, golden mustard with pale yellow, and delicate dusty pink. Each version has a long textured body, several raised bands that create spaces for the caps, and a decorative fringe at the bottom. The result is a charming bohemian accessory that looks attractive even when it is not holding hats.
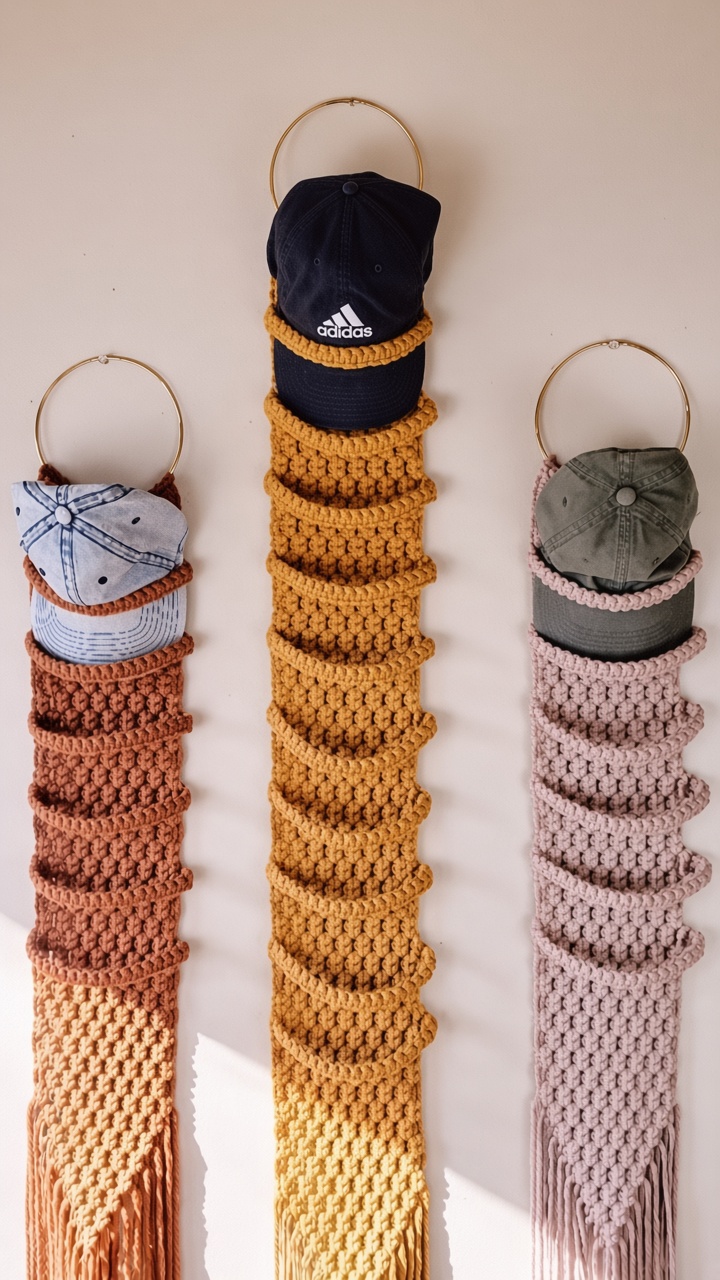
In this complete Crochet Hat Holder Tutorial, you will learn how to choose suitable yarn, understand the stitches, create the main hanging panel, crochet the raised cap-support bands, add a secure hanging loop, and finish the organizer with beautiful fringe. This original, beginner-friendly interpretation uses a reinforced flat panel and individual horizontal retaining straps to reproduce the overall appearance and function of the pictured design.
DISCOVER MORE FREE PATTERNS HERE!
Materials, Crochet Stitches, and Measurements for the Hat Holder Pattern
Before starting your Hanging Crochet Hat Organizer, choosing the right yarn is essential. Because the finished project will hold several baseball caps, the crochet fabric should be sturdy enough to maintain its shape without stretching excessively.
Cotton yarn is an excellent choice because it offers durability, stitch definition, and a pleasant natural texture. Cotton-blend yarn can also work beautifully, especially when you want a slightly softer finish.
For a design similar to the reference image, choose medium-weight cotton yarn in mustard yellow, terracotta, or dusty pink. These colors create a warm, vintage-inspired appearance that coordinates beautifully with modern and rustic interiors.
The organizer can be made in different lengths depending on how many hats you want to display. The sample pattern below creates a holder with six retaining bands.
Materials needed
- Approximately 350–500 yards (320–460 meters) of worsted-weight cotton or cotton-blend yarn.
- A 4.5 mm crochet hook, or a hook that produces a firm fabric.
- Scissors.
- Yarn needle.
- Measuring tape.
- Stitch markers.
- A sturdy wooden dowel or metal hanging ring.
- Optional cotton cord for reinforcing the hanging loop.
- Optional fabric lining or cotton tape for additional support.
- A flat surface for blocking the finished organizer.
Suggested finished measurements
| Component | Approximate Measurement |
|---|---|
| Organizer width | 5 in (12.5 cm) |
| Organizer length without fringe | 35 in (89 cm) |
| Fringe length | 5–6 in (12.5–15 cm) |
| Number of hat-support bands | 6 |
| Vertical spacing between bands | Approximately 5 in (12.5 cm) |
| Hanging loop | Approximately 4 in (10 cm) |
The finished dimensions may vary depending on yarn thickness and crochet tension.
For a longer organizer, increase the number of rows in the main panel and add more retaining bands.
For a smaller organizer, reduce the length and use fewer bands.
Crochet abbreviations – US terminology
| Abbreviation | Meaning |
|---|---|
| ch | Chain |
| sc | Single crochet |
| hdc | Half double crochet |
| dc | Double crochet |
| sl st | Slip stitch |
| st | Stitch |
| BLO | Back loop only |
| FLO | Front loop only |
| rep | Repeat |
| FO | Fasten off |
Special crochet stitches
Half Double Crochet: Yarn over, insert the hook into the indicated stitch, yarn over and pull up a loop, yarn over and pull through all three loops.
Back Loop Only Single Crochet: Insert the hook through the back loop of the stitch and complete a single crochet. This creates a subtle ribbed texture.
Front Post Double Crochet (FPdc): Yarn over, insert the hook from front to back and back to front around the post of the indicated stitch, yarn over and pull up a loop, then complete a double crochet.
Slip Stitch Join: Insert the hook into the indicated stitch or space, yarn over, and pull the yarn through both the stitch and the loop on the hook.
Understanding the construction
This organizer consists of three main elements.
The first is a long, textured crochet panel that forms the vertical foundation.
The second is a series of horizontal retaining bands that extend slightly away from the panel to hold the caps.
The third is a reinforced hanging loop and decorative fringe.
The caps are inserted beneath the retaining bands, with the crowns supported by the crocheted structure and the brims remaining accessible.
This construction is intended for lightweight baseball caps, not heavy objects.
Step-by-Step Crochet Hat Holder Pattern: Creating the Main Hanging Panel
The main panel is the foundation of the Crochet Hat Holder Pattern.
It should be firm, evenly stitched, and long enough to accommodate the desired number of caps.
For this tutorial, we will create a rectangular panel approximately 5 inches wide and 35 inches long.
Step 1: Create the foundation chain
Using your main yarn color and a 4.5 mm crochet hook, make a slip knot.
Chain 21.
Row 1: Work one half double crochet in the third chain from the hook.
Continue working one half double crochet into each remaining chain.
You should have 19 half double crochet stitches.
Chain 2 and turn.
The turning chain does not count as a stitch.
Step 2: Crochet the textured body
Row 2: Work one half double crochet into each stitch across.
Chain 2 and turn.
You should have 19 stitches.
Repeat Row 2 until the panel measures approximately 35 inches long.
Count your stitches regularly to ensure the edges remain straight.
If your panel is narrower or wider than 5 inches, adjust the hook size or foundation stitch count.
Step 3: Add decorative texture
To create a richer texture similar to the reference image, you can alternate plain half double crochet rows with ribbed rows.
For example:
Row A: Work one half double crochet in every stitch.
Row B: Work one half double crochet in the back loop only of every stitch.
Repeat these two rows throughout the panel.
This creates subtle horizontal ridges that give the fabric more depth.
Step 4: Reinforce the panel edges
Once the panel reaches the desired length, do not fasten off.
Chain 1.
Work one single crochet evenly along the first long edge.
At the lower corner, work three single crochet stitches to turn.
Continue across the bottom edge.
Work three single crochet stitches into the next corner.
Continue along the opposite long edge.
Finish across the top.
Join with a slip stitch.
The border helps stabilize the panel and creates a neat foundation for attaching the retaining bands.
Step 5: Check the panel measurements
Lay the crocheted panel on a flat surface.
Measure the width and length.
Check that the edges are reasonably straight.
If necessary, gently block the panel according to the yarn manufacturer’s care instructions.
Avoid stretching it excessively.
A firm, evenly shaped panel will help the finished organizer hang neatly.
Step 6: Mark the retaining-band positions
Place the panel vertically with the right side facing upward.
Use stitch markers to identify six evenly spaced band positions.
For a 35-inch panel, place the first band approximately 3 inches below the top edge.
Position the remaining bands approximately 5 inches apart.
The final band should sit several inches above the bottom edge to leave room for the fringe.
Make sure the markers on the left and right edges are aligned horizontally.
How to Crochet the Raised Hat-Support Bands and Assemble the Organizer
The horizontal bands are the most distinctive feature of this Crochet Baseball Cap Storage Pattern.
They create the raised openings that hold the caps in place.
For a functional organizer, the bands should be slightly longer than the width of the main panel, allowing them to curve outward.
Step 1: Crochet the first retaining band
Using the main yarn color, chain 27.
Row 1: Work one single crochet into the second chain from the hook.
Continue working one single crochet into each remaining chain.
You should have 26 single crochet stitches.
Chain 1 and turn.
Row 2: Work one single crochet into each stitch across.
Chain 1 and turn.
Row 3: Repeat Row 2.
Fasten off, leaving long yarn tails for sewing.
The band should measure approximately 6–7 inches long, depending on your gauge.
Step 2: Create the remaining bands
Repeat the same instructions until you have six matching bands.
Check that all bands have approximately the same width and length.
For a more textured appearance, you can replace the middle row with back-loop-only single crochet stitches.
This creates a subtle raised ridge.
Keep the bands firm enough to support lightweight caps.
Step 3: Attach the first band
Place the first band across the upper section of the main panel.
Align its ends with the marked positions along the panel edges.
Because the band is longer than the panel is wide, its center should curve outward slightly.
Using a yarn needle, sew one end securely to the left edge.
Repeat on the right edge.
Reinforce each attachment with several stitches.
Do not sew the center of the band flat against the panel.
The space beneath the band will hold the baseball cap.
Step 4: Attach the remaining bands
Position the second band approximately 5 inches below the first.
Sew both ends securely to the main panel.
Repeat with the remaining bands.
Check that the bands are evenly spaced.
Make sure each band curves outward in a similar way.
The finished organizer should have a repeating series of raised horizontal openings.
Step 5: Test the hat openings
Insert a lightweight baseball cap beneath one retaining band.
Adjust the cap so the band supports it without excessive pressure.
The crown should rest comfortably against the main panel.
The brim should remain accessible.
If the band feels too tight, replace it with a slightly longer strip.
If it feels too loose, shorten the band or adjust the attachment points.
Test the remaining openings in the same way.
Step 6: Reinforce the attachment points
Use a yarn needle and matching yarn to add several extra stitches at each end of every band.
Pass the yarn through the band and the main panel.
Avoid leaving loose knots on the front.
Weave the yarn ends into the back of the organizer.
This reinforcement is important because the bands will experience repeated movement when hats are inserted and removed.
Creative Crochet Hat Holder Designs, Hanging Loop, Fringe, and Finishing Tips
The final stage of the Crochet Hat Holder Pattern involves adding a secure hanging loop and decorative fringe.
These details transform the organizer into a beautiful handmade wall accessory.
You can also customize the colors and textures to match your bedroom, closet, or entryway.
Step 1: Crochet the hanging loop
Using the main yarn color, chain 25.
Row 1: Work one single crochet into the second chain from the hook.
Continue working one single crochet into each remaining chain.
You should have 24 stitches.
Chain 1 and turn.
Row 2: Work one single crochet into each stitch across.
Fasten off, leaving long tails.
Fold the strip into a loop.
Position both ends at the upper back of the organizer.
Sew the ends securely through the reinforced top section.
For added strength, pass a length of cotton cord through the crocheted loop before attaching it.
Step 2: Add a wooden dowel or hanging ring
A sturdy wooden dowel or metal ring can be used to hang the organizer.
If using a ring, attach the crocheted loop around the ring and sew it securely.
If using a dowel, create two small fabric or crochet loops near the upper corners of the organizer.
Slide the dowel through the loops.
Attach a separate hanging cord to the dowel ends.
Make sure the support is strong enough for the combined weight of the organizer and hats.
Step 3: Create the decorative fringe
Cut approximately 40–60 yarn strands measuring 12 inches long.
Fold two strands together in half.
Insert your crochet hook through a stitch along the bottom edge.
Pull the folded center through the stitch to form a loop.
Pass the loose yarn ends through the loop.
Pull gently to secure.
Repeat across the lower edge.
The fringe will measure approximately 6 inches before trimming.
Step 4: Trim the fringe
Lay the organizer flat.
Comb the fringe gently with your fingers.
Use scissors to trim the ends evenly.
For a bohemian appearance, leave the fringe slightly longer in the center.
For a modern design, trim it into a straight horizontal line.
You can also create a subtle V-shaped fringe.
The decorative fringe adds movement and softness to the finished organizer.
Step 5: Create a two-tone design
The reference image includes beautiful organizers with contrasting lower sections.
To recreate this appearance, change yarn colors during the final rows of the main panel.
For example, use terracotta for the upper portion and cream for the lower portion.
Another beautiful combination is mustard yellow with pale butter yellow.
Dusty pink can also be paired with ivory or soft beige.
Keep the retaining bands in the main color for a coordinated finish.
Step 6: Finish and hang the organizer
Weave in all remaining yarn ends.
Inspect the band attachments and hanging loop.
Gently shape the organizer with your hands.
Hang it from a sturdy wall hook installed according to the hook manufacturer’s instructions.
Insert the caps one at a time.
Distribute their weight evenly.
Avoid placing the organizer above a bed or anywhere a falling hook could cause injury.
The finished Crochet Hat Holder is now ready to organize your favorite baseball caps.
Beautiful Color Combinations for the Crochet Hat Holder Pattern
Mustard Yellow and Cream: A warm vintage-inspired combination that creates a cheerful bohemian appearance.
Terracotta and Beige: A rustic palette that works beautifully in cozy bedrooms and farmhouse-style interiors.
Dusty Rose and Ivory: A delicate, sophisticated combination with a soft romantic feeling.
Sage Green and Natural Cotton: A peaceful botanical palette that complements modern minimalist spaces.
Denim Blue and White: A timeless combination that looks beautiful with casual accessories and baseball caps.
Lavender and Soft Gray: An elegant palette that adds subtle color without overwhelming the room.
Caramel Brown and Champagne: A rich neutral combination that creates a refined handmade appearance.
Helpful Tips for a Perfect Crochet Hat Holder
Choose durable yarn. Cotton and cotton blends are excellent choices for organizers because they resist stretching better than many soft, loosely spun yarns.
Maintain consistent tension. Even stitches help the panel remain straight and the retaining bands maintain their shape.
Reinforce the hanging loop. The top attachment supports the weight of the entire organizer.
Avoid overloading the holder. Use it for lightweight caps rather than heavy hats or other objects.
Adjust the band length. Different baseball caps may require slightly different opening sizes.
Block the panel carefully. Gentle blocking improves the overall shape and gives the finished organizer a more professional appearance.
Frequently Asked Questions About the Crochet Hat Holder Pattern
1. Is the Crochet Hat Holder Pattern suitable for beginners?
Yes. This project uses basic stitches such as chains, single crochet, and half double crochet.
2. What yarn is best for a crochet hat organizer?
Worsted-weight cotton yarn is an excellent choice because it is durable and provides good stitch definition.
3. What crochet hook should I use?
A 4.5 mm hook is a suitable starting point, although the ideal size depends on your yarn and tension.
4. How many hats can the organizer hold?
The sample design includes six retaining bands, allowing it to hold approximately six lightweight baseball caps when the openings are appropriately sized.
5. Can I make the organizer longer?
Yes. Add more rows to the main panel and create additional retaining bands.
6. Can I make the organizer wider?
Yes. Increase the number of foundation stitches and adjust the retaining-band lengths accordingly.
7. Can I use acrylic yarn?
Yes, although cotton generally provides better structural stability for this type of hanging organizer.
8. How do I prevent the organizer from stretching?
Use firm stitches, reinforce the hanging loop, and avoid placing excessive weight on the bands.
9. Can I use different colors?
Absolutely. Two-tone and multicolored designs can create beautiful decorative effects.
10. Can I make the organizer without fringe?
Yes. Simply finish the bottom edge with a row of single crochet stitches.
11. Can I use this holder for other accessories?
It may hold lightweight items such as scarves or fabric headbands, provided they fit securely and do not overload the structure.
12. How do I clean the finished organizer?
Follow the yarn manufacturer’s care instructions. Gentle handwashing and flat drying are generally suitable for many cotton crochet projects.
13. Can I attach the organizer to a door?
Yes, if a suitable over-door hook provides adequate support and the organizer does not interfere with the door’s movement.
14. Can I use macramé cord instead of yarn?
Yes, although the cord thickness may require a larger hook and adjustments to the stitch counts.
15. Can I sell handmade crochet hat holders?
Handmade organizers made from your own work can generally be sold, subject to any applicable pattern terms, product safety requirements, and local regulations.
Conclusion
The Crochet Hat Holder Pattern is a beautiful and functional project that combines simple crochet techniques with practical home organization. Its long textured panel, raised retaining bands, and decorative fringe create a charming handmade accessory that can transform an ordinary wall into an attractive storage area.
One of the greatest advantages of this design is its flexibility. You can adjust the length, width, number of retaining bands, and color combinations to suit your needs. Whether you prefer rustic terracotta, elegant dusty rose, or cheerful mustard yellow, the finished organizer can reflect your personal style.
The project is also an excellent opportunity to practice basic crochet stitches while creating something useful. The repetitive construction makes it relaxing to work on, while the final assembly adds an enjoyable decorative element.
For anyone who enjoys handmade home accessories, this Hanging Crochet Baseball Cap Organizer is a thoughtful project that combines beauty, creativity, and everyday convenience.
With careful measurements, firm stitching, secure attachment points, and a little attention to the finishing details, your Crochet Hat Holder can become a lovely addition to your bedroom, closet, or entryway.
Whether you make one for yourself or create a personalized handmade gift, this pattern offers a rewarding way to turn yarn into a practical and beautiful piece of home décor.