
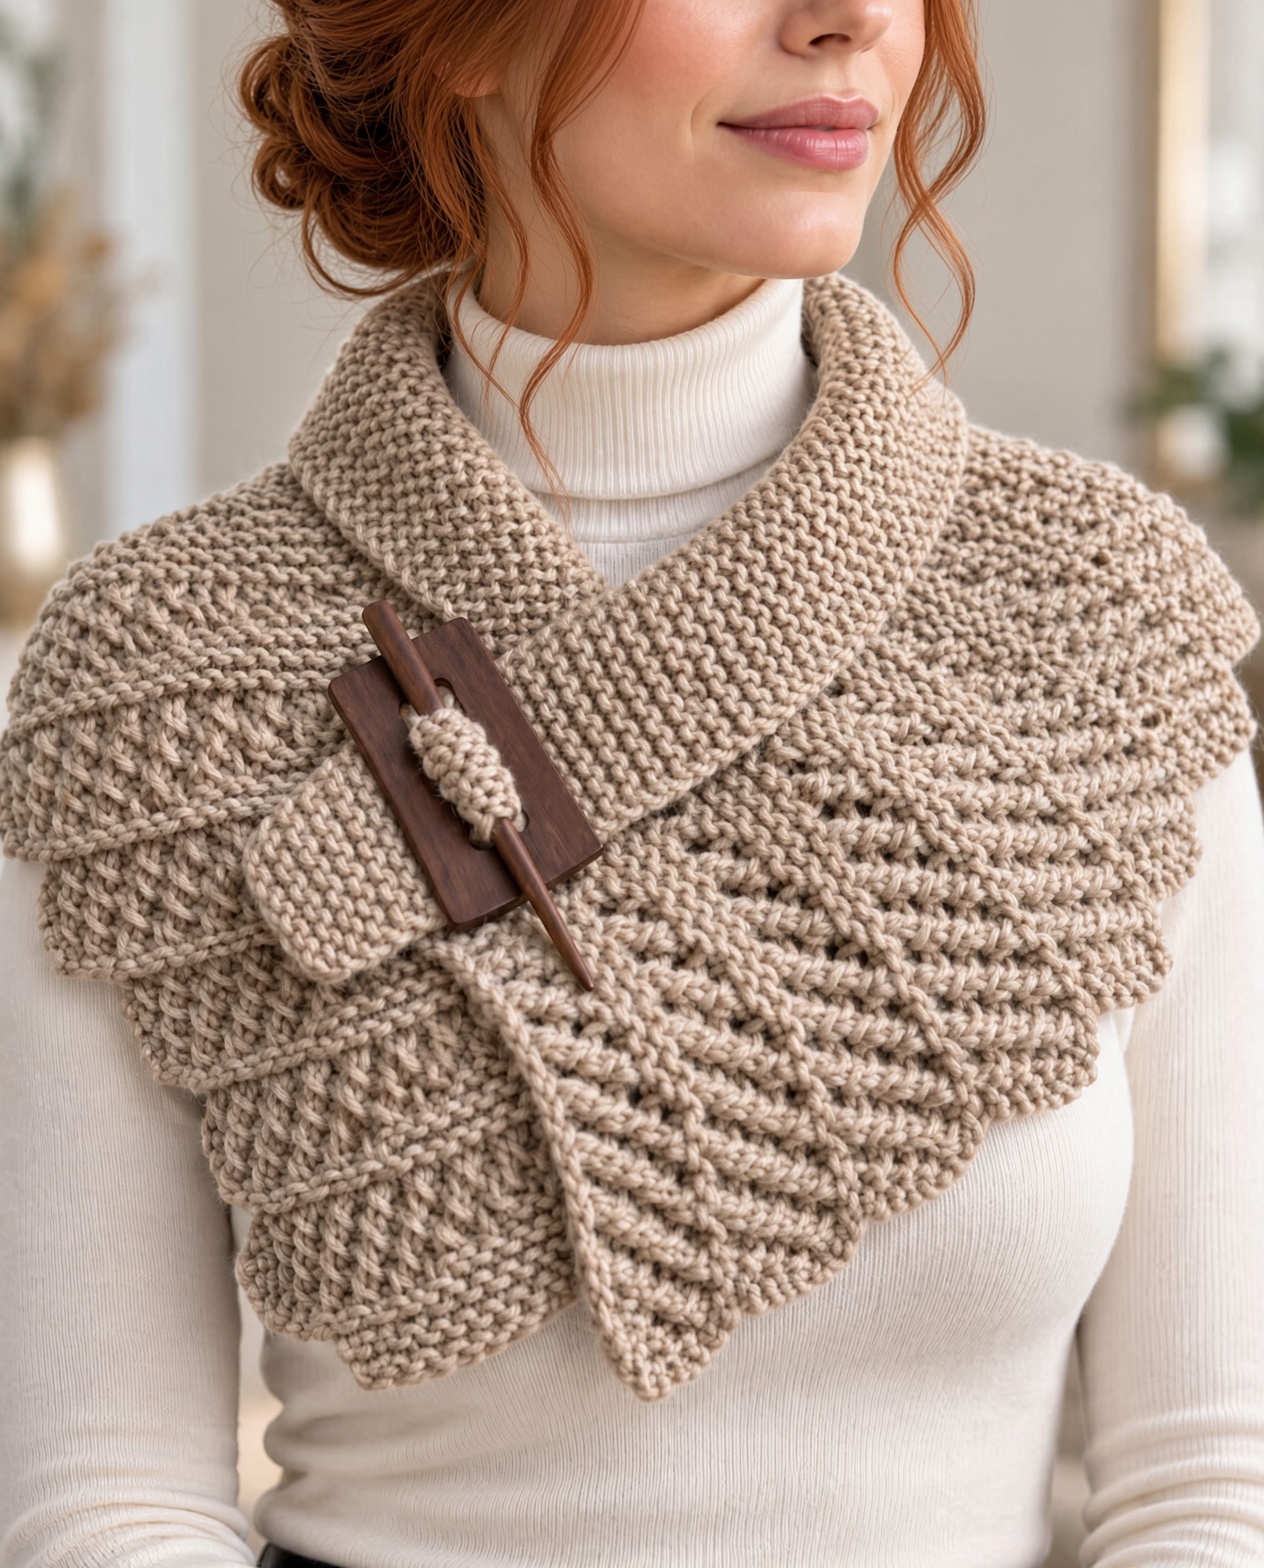
The Elegant Scarf Pattern is a beautiful crochet accessory that combines timeless style, luxurious texture, and practical warmth. Inspired by the sophisticated scarf shown in the reference image, this handmade design features a wide textured body, a softly folded collar, overlapping front panels, and a decorative wooden closure. Its graceful shape makes it a wonderful accessory for autumn, winter, and chilly spring days.
One of the most attractive features of this Elegant Crochet Scarf is its unique crossover construction. Unlike a traditional long scarf that wraps several times around the neck, this design rests comfortably across the shoulders and overlaps at the front. The wide panels create a flattering layered appearance, while the folded collar frames the neckline beautifully. A decorative wooden shawl pin holds the overlapping sections in place and adds a warm, rustic finishing touch.
The reference image features a sophisticated oatmeal-beige scarf with beautifully defined crochet stitches. The main fabric has a textured, slightly raised appearance, while the collar is denser and more structured. The neutral yarn complements the cream turtleneck underneath, creating an elegant outfit that feels both comfortable and polished. This style is especially appealing because it looks beautiful with sweaters, fitted tops, long-sleeved dresses, and classic winter coats.
In this complete Elegant Scarf Crochet Tutorial, you will learn how to choose the best yarn, create a textured rectangular scarf, add a folded collar, arrange the crossover panels, and finish the accessory with a removable decorative closure. The tutorial uses US crochet terminology and provides an original, approachable interpretation inspired by the photographed design. With careful measurements and even stitching, you can create a beautiful handmade scarf that combines traditional crochet techniques with modern elegance.
DISCOVER MORE FREE PATTERNS HERE!
Materials, Crochet Stitches, and Measurements for the Elegant Scarf Pattern
Before beginning your Elegant Crochet Scarf Pattern, choosing the right yarn is essential. Since the accessory will rest against the neck and shoulders, the yarn should feel soft against the skin while providing enough structure to maintain the crossover shape.
Worsted-weight or light bulky yarn works beautifully for this type of project. A wool-acrylic blend provides warmth and flexibility, while soft merino wool creates a more luxurious finish. Premium acrylic yarn can also be a practical choice for crocheters who prefer easy-care materials.
For a scarf similar to the reference image, choose oatmeal beige, warm taupe, ivory, or soft camel. These neutral colors highlight the raised crochet stitches and coordinate beautifully with classic clothing. A slightly heathered yarn can create additional depth without distracting from the textured pattern.
Materials needed
- Approximately 650–850 yards (595–775 meters) of worsted-weight yarn.
- A 5.5 mm crochet hook.
- A 5.0 mm crochet hook for the collar, optional.
- Yarn needle.
- Scissors.
- Measuring tape.
- Stitch markers.
- Blocking mat.
- Rustproof blocking pins.
- One removable wooden shawl pin or toggle-style scarf fastener.
Suggested finished measurements
| Component | Approximate Measurement |
|---|---|
| Main scarf length | 58–64 in (147–163 cm) |
| Main scarf width | 12–14 in (30–35.5 cm) |
| Folded collar depth | 3–4 in (7.5–10 cm) |
| Front panel overlap | 6–9 in (15–23 cm) |
| Decorative closure | Approximately 3–5 in (7.5–12.5 cm) |
The finished measurements can be adjusted to accommodate different body sizes and styling preferences.
For this tutorial, the sample scarf will measure approximately 60 inches long and 13 inches wide before adding the collar.
Crochet abbreviations – US terminology
| Abbreviation | Meaning |
|---|---|
| ch | Chain |
| sc | Single crochet |
| hdc | Half double crochet |
| dc | Double crochet |
| sl st | Slip stitch |
| BLO | Back loop only |
| FLO | Front loop only |
| st | Stitch |
| rep | Repeat |
| RS | Right side |
| WS | Wrong side |
| FO | Fasten off |
Special crochet stitches
Back Loop Only Half Double Crochet: Yarn over, insert the hook into the back loop of the indicated stitch, yarn over and pull up a loop, then yarn over and pull through all three loops.
Front Loop Only Half Double Crochet: Work a half double crochet into the front loop of the indicated stitch.
Single Crochet Ribbing: Work single crochet stitches through the back loops only to create a flexible ribbed texture.
Slip Stitch Join: Insert the hook into the indicated stitch, yarn over, and pull through the stitch and the loop on the hook.
Understanding the scarf construction
The Elegant Crossover Scarf Pattern consists of three main sections.
The first is a long rectangular scarf worked in a textured crochet stitch.
The second is a wide ribbed collar that is attached along the central portion of one long edge.
The third is the decorative closure that secures the overlapping front panels.
The scarf is designed to drape across the shoulders and cross at the front.
This construction allows the accessory to look similar to a short shawl while maintaining the simplicity of a rectangular scarf.
Step-by-Step Elegant Scarf Pattern: Creating the Textured Crochet Body
The main scarf body is the foundation of this project.
It should be wide enough to cover the upper shoulders while remaining flexible enough to fold and overlap comfortably.
For this tutorial, we will use a textured half double crochet stitch pattern that creates subtle horizontal ridges.
Step 1: Create the foundation chain
Using oatmeal beige yarn and a 5.5 mm crochet hook, make a slip knot.
Chain 47.
Row 1: Work one half double crochet into the second chain from the hook.
Continue working one half double crochet into each remaining chain.
You should have 46 half double crochet stitches.
Chain 1 and turn.
The turning chain does not count as a stitch.
Step 2: Begin the textured stitch pattern
Row 2: Work one half double crochet into the back loop only of each stitch across.
You should have 46 stitches.
Chain 1 and turn.
Row 3: Work one half double crochet into the front loop only of each stitch across.
You should have 46 stitches.
Chain 1 and turn.
The alternating loop placement creates a textured fabric with gentle raised ridges.
Step 3: Continue the scarf body
Row 4: Repeat Row 2.
Row 5: Repeat Row 3.
Continue alternating these two rows.
Maintain 46 stitches across every row.
The scarf will gradually develop a beautiful textured surface.
Check your stitch count regularly to prevent the edges from becoming uneven.
Step 4: Crochet to the desired length
Continue working until the scarf measures approximately 60 inches long.
The number of rows required will depend on your yarn and tension.
For a longer scarf, continue until the piece measures 64 inches.
For a shorter version, stop at approximately 56–58 inches.
Lay the scarf flat occasionally to check its shape.
The edges should remain straight and the width should stay consistent.
Step 5: Check the fabric texture
Run your hand gently across the crochet surface.
The alternating front-loop and back-loop stitches should create a subtle ribbed effect.
If the fabric feels too stiff, try a slightly larger hook.
If it feels too loose, use a smaller hook.
The finished scarf should drape comfortably over the shoulders.
Step 6: Finish the main body
Once the desired length is reached, fasten off.
Leave a yarn tail approximately 6 inches long.
Use a yarn needle to weave the tail into the fabric.
Repeat at the foundation end.
Lay the scarf flat and check that both ends are even.
The main scarf body is now complete.
How to Crochet the Folded Collar and Create the Elegant Crossover Shape
The folded collar is one of the most distinctive features of the Elegant Scarf Pattern.
It creates a structured neckline and gives the scarf its sophisticated appearance.
For this tutorial, we will crochet a separate ribbed collar panel and attach it to the center of the scarf.
Step 1: Measure the collar placement
Lay the completed scarf horizontally on a flat surface.
Find the midpoint of the scarf length.
Mark the center with a stitch marker.
Measure approximately 12 inches to the left and 12 inches to the right of the center.
This creates a 24-inch section for the collar.
The collar will be attached along this section of one long edge.
Step 2: Create the collar foundation
Using the same yarn and a 5.0 mm crochet hook, chain 17.
Row 1: Work one single crochet into the second chain from the hook.
Continue working one single crochet into each remaining chain.
You should have 16 single crochet stitches.
Chain 1 and turn.
Step 3: Crochet the ribbed collar
Row 2: Work one single crochet into the back loop only of each stitch across.
You should have 16 stitches.
Chain 1 and turn.
Row 3: Repeat Row 2.
Continue working back-loop-only single crochet rows.
The fabric will develop vertical ribbing when viewed from the side.
This creates a flexible, comfortable collar.
Step 4: Crochet the collar to size
Continue until the collar panel measures approximately 24 inches along its long dimension.
The short dimension should measure approximately 4 inches, depending on gauge.
Adjust the number of rows until the collar matches the marked section of the scarf.
Fasten off, leaving a long yarn tail for sewing.
Step 5: Attach the collar to the scarf
Place the scarf right side up.
Position the collar along the marked 24-inch section.
Align one long edge of the collar with the long edge of the scarf.
Pin the collar in place.
Thread a yarn needle with matching yarn.
Sew the collar to the scarf using small, even stitches.
Avoid pulling the seam too tightly.
The collar should remain flexible.
Step 6: Fold the collar
Fold the collar outward toward the right side of the scarf.
Adjust the fold so it creates a soft, rounded neckline.
The ribbed texture should remain visible.
Try the scarf on.
Check that the collar rests comfortably around the back of the neck.
If necessary, adjust the fold.
Step 7: Create the crossover front
Drape the scarf across your shoulders.
Position the collar around the back of your neck.
Bring the left end diagonally across your chest.
Bring the right end over the first panel.
Adjust the overlap until the scarf feels comfortable.
The front panels should create a graceful layered shape.
Step 8: Secure the crossover
Use a removable wooden shawl pin to hold the overlapping panels together.
Position the closure near the upper chest.
Avoid placing it too close to the neck.
If using a pin, pass it carefully through the crochet fabric without splitting the yarn.
Check that the closure is secure.
The scarf should remain comfortably in place.
Elegant Scarf Styling Ideas, Color Combinations, Finishing Tips, and Creative Variations
The Elegant Crochet Scarf Pattern can be customized in many beautiful ways.
Its classic crossover shape makes it suitable for casual outfits, office wear, winter gatherings, and special occasions.
The textured stitches add visual interest without requiring complicated lacework.
Step 1: Create a vintage-inspired scarf
Choose warm taupe, oatmeal beige, or antique ivory yarn.
Use a wooden closure in a natural walnut finish.
Keep the crochet texture simple and elegant.
This combination creates a timeless handmade accessory.
It looks beautiful with neutral sweaters and classic coats.
Step 2: Make a sophisticated winter version
Choose soft merino wool or a premium wool blend.
Use charcoal gray, deep burgundy, or forest green.
Crochet the scarf slightly wider for additional warmth.
Add a dense ribbed collar.
This creates a cozy accessory suitable for cold weather.
Step 3: Create a delicate spring scarf
Use lightweight cotton-blend yarn.
Choose dusty rose, lavender, or sage green.
Reduce the scarf width slightly.
Use a more open stitch pattern for a lighter fabric.
The finished accessory can be worn over blouses and dresses.
Step 4: Add decorative edging
Attach matching yarn to one corner of the scarf.
Work one single crochet evenly around the outer edge.
At each corner, work three single crochet stitches.
Join with a slip stitch.
Fasten off.
This creates a neat, professional finish.
For a more decorative appearance, add a second round of reverse single crochet.
Step 5: Create a matching headband
Use the same textured stitch pattern.
Crochet a narrow rectangular strip.
Join the short ends to form a headband.
Add a small decorative twist at the front.
This creates a coordinated winter accessory set.
Step 6: Block and finish the scarf
Weave in all remaining yarn tails.
Gently dampen the scarf according to the yarn manufacturer’s care instructions.
Lay it flat on a blocking mat.
Shape the edges carefully.
Arrange the collar.
Allow the scarf to dry completely.
Blocking helps the fabric drape more smoothly and gives the finished accessory a polished appearance.
Beautiful Color Combinations for the Elegant Scarf Pattern
Oatmeal Beige: A timeless neutral shade inspired by the reference image.
Dusty Rose: A soft, feminine color with a romantic vintage appearance.
Forest Green: A rich, sophisticated shade that complements autumn and winter outfits.
Champagne Cream: A delicate neutral color that creates an elegant handmade finish.
Deep Burgundy: A luxurious color suitable for classic winter accessories.
Sage Green: A gentle botanical shade that looks beautiful with cream and beige clothing.
Charcoal Gray: A modern neutral that creates a refined, versatile scarf.
Helpful Tips for a Perfect Elegant Crochet Scarf
Choose soft yarn. The scarf should feel comfortable against the neck and shoulders.
Maintain even tension. Consistent stitches help the textured pattern look uniform.
Measure before attaching the collar. Accurate placement creates a balanced neckline.
Use a removable closure. A shawl pin allows you to adjust the crossover style.
Avoid overly tight seams. Flexible seams help the scarf drape naturally.
Block the finished accessory. Gentle blocking improves the shape and texture.
Frequently Asked Questions About the Elegant Scarf Pattern
1. Is the Elegant Scarf Pattern suitable for beginners?
Yes. The project is suitable for confident beginners who understand half double crochet, single crochet, and basic sewing techniques.
2. What yarn is best for this scarf?
Soft worsted-weight acrylic, wool blends, and merino wool are excellent choices.
3. What crochet hook should I use?
A 5.5 mm hook is recommended for the main scarf, while a 5.0 mm hook can be used for the collar.
4. How long should the scarf be?
Approximately 58–64 inches is suitable for many adult sizes.
5. Can I make the scarf wider?
Yes. Increase the foundation chain to create a wider scarf.
6. Can I make the collar taller?
Yes. Increase the collar foundation chain to create a deeper folded collar.
7. How do I secure the crossover panels?
Use a removable shawl pin, decorative toggle, or suitable scarf fastener.
8. Can I use cotton yarn?
Yes. Cotton yarn creates a lighter accessory, although it may have less elasticity than wool blends.
9. How do I prevent the edges from curling?
Maintain even tension and block the finished scarf carefully.
10. Can I use different stitch patterns?
Absolutely. Moss stitch, half double crochet ribbing, and textured crochet stitches can all be adapted to this design.
11. Can I wear the scarf without the wooden closure?
Yes. You can drape the panels loosely or secure them with another suitable accessory.
12. How do I wash the finished scarf?
Follow the yarn manufacturer’s care instructions. Gentle washing and flat drying are recommended for many handmade crochet accessories.
13. Can I make a matching hat or headband?
Yes. The same yarn and textured stitch pattern can be used for coordinating accessories.
14. Is this scarf suitable for winter?
Yes. The wide crossover panels and folded collar provide warmth around the neck and shoulders.
15. Can I sell handmade elegant crochet scarves?
Handmade accessories created from your own work can generally be sold, subject to applicable pattern rights, product safety requirements, and local regulations.
Conclusion
The Elegant Scarf Pattern is a beautiful crochet project that combines timeless style, cozy texture, and practical warmth. Its wide textured panels, softly folded collar, and decorative crossover closure create a sophisticated handmade accessory that complements many different outfits.
One of the greatest advantages of this design is its versatility. You can adjust the length, width, collar depth, and yarn color to create a scarf that suits your personal style.
The project also provides an enjoyable opportunity to practice textured crochet stitches, ribbed construction, careful measuring, and simple assembly techniques.
For crocheters who appreciate classic handmade fashion, this Elegant Crochet Crossover Scarf is a rewarding project that combines comfort with refined design.
Whether you choose the oatmeal-beige shade shown in the reference image or experiment with dusty rose, forest green, burgundy, or champagne cream, the finished scarf can become a beautiful addition to your wardrobe.
With careful stitching, soft yarn, and attention to the finishing details, your Handmade Elegant Crochet Scarf can become a treasured accessory that brings warmth, beauty, and timeless handmade charm to your outfits for many seasons.