
The Crochet Capelet Pattern is a beautiful handmade fashion project that combines delicate lacework, romantic scalloped edges, and a classic shoulder-covering silhouette. Inspired by the gorgeous blue and pink capelet shown in the reference image, this elegant accessory features cascading rows of decorative shell stitches, a comfortable rounded neckline, and contrasting pink borders that highlight every detail of the crochet design.
One of the most attractive features of this Elegant Crochet Capelet is its layered lace appearance. The upper section begins with a structured neckline that rests comfortably around the shoulders, while the lower portion expands into flowing rows of openwork crochet shells. Each row creates a beautiful scalloped effect, giving the garment a soft and graceful shape. The delicate pink edging adds contrast against the rich blue yarn, making the individual stitch patterns more visible.
The reference image shows a sophisticated short capelet worn over a simple white dress. The garment features a blue crochet body, soft pink decorative edging, a small opening at the front, and a pearl-style button near the neckline. The combination of colors creates a charming vintage-inspired appearance that works beautifully for special occasions, family gatherings, spring celebrations, and elegant everyday outfits. The capelet provides light shoulder coverage without the weight of a traditional shawl or cardigan.
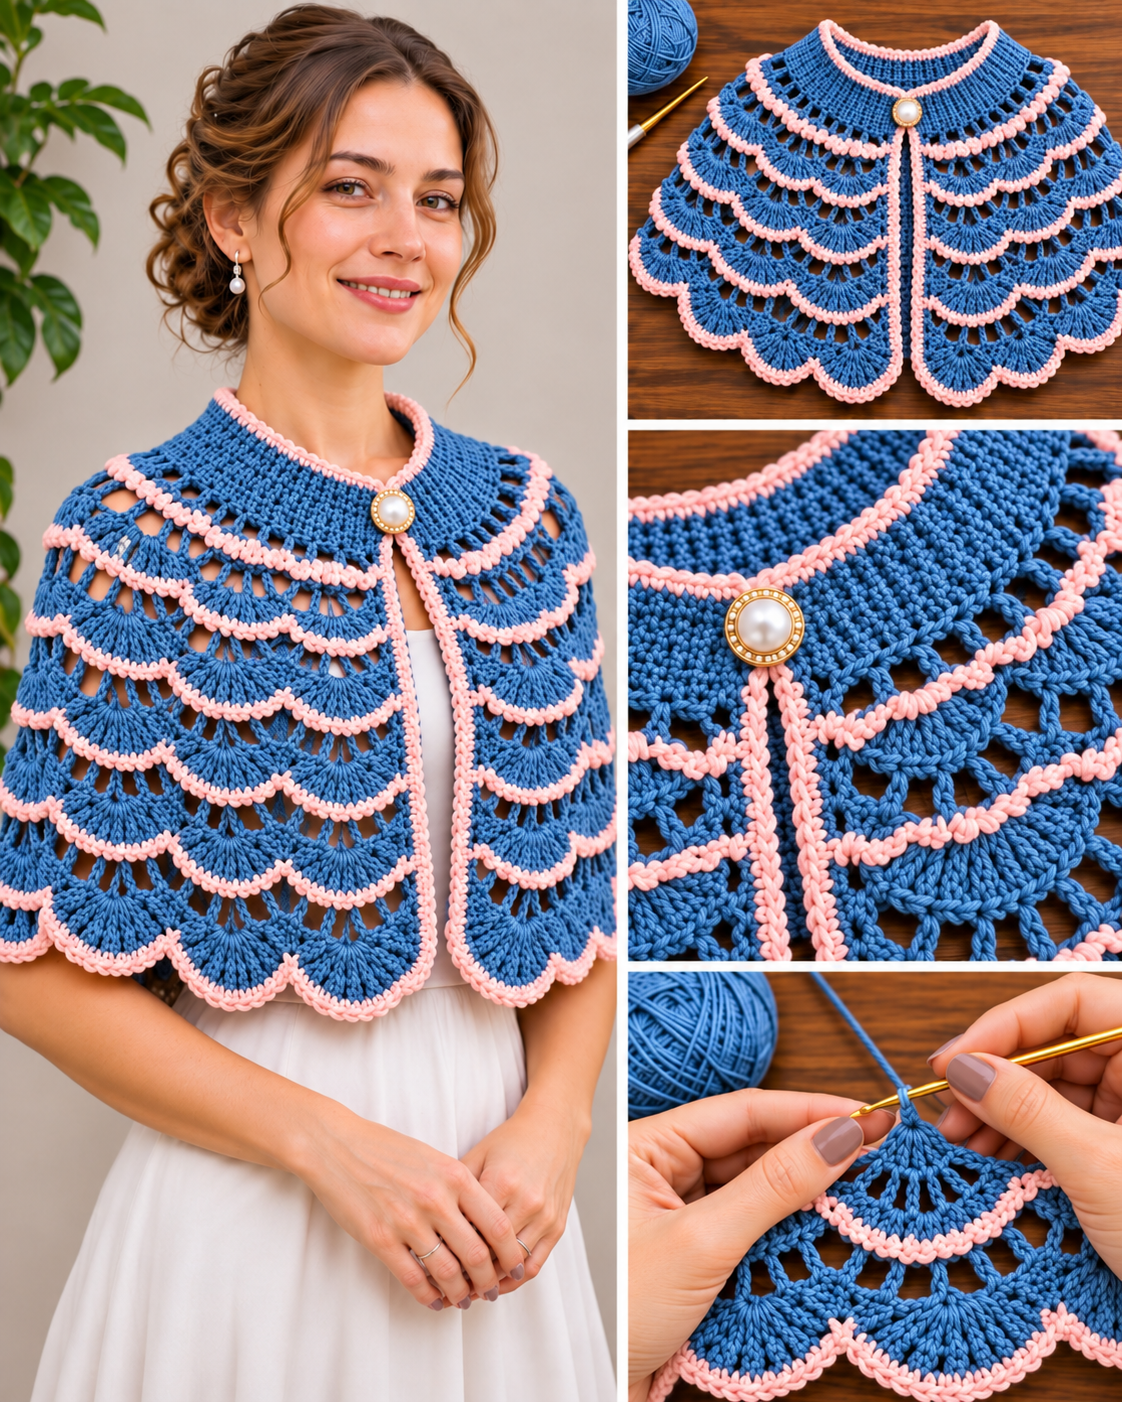
In this complete Crochet Capelet Tutorial, you will learn how to select the best yarn, measure the neckline, crochet a comfortable collar, create expanding lace rows, add decorative shell stitches, finish the garment with contrasting borders, and attach an elegant button closure. The instructions use US crochet terminology and provide an original, adaptable interpretation inspired by the photographed design. With patience and careful stitching, you can create a beautiful handmade accessory that combines traditional crochet techniques with timeless fashion.
DISCOVER MORE FREE PATTERNS HERE!
Materials, Measurements, and Crochet Stitches for the Elegant Capelet Pattern
Before beginning your Crochet Capelet Pattern, choosing the right yarn is essential. Since the garment rests around the neckline and shoulders, the yarn should be soft, lightweight, and flexible enough to create a comfortable drape.
DK-weight cotton yarn is an excellent choice for a spring or summer capelet. It provides good stitch definition and allows the decorative shells to maintain their shape. A cotton-bamboo blend creates a softer finish, while lightweight acrylic yarn is a practical alternative for cooler weather.
For a design similar to the reference image, choose a rich cornflower blue or medium denim blue for the main body. Pair it with soft blush pink yarn for the decorative borders. This combination highlights the scalloped stitches and creates a beautiful contrast without overwhelming the lacework.
Materials needed
- Approximately 550–750 yards (503–686 meters) of DK-weight yarn in blue.
- Approximately 100–150 yards (91–137 meters) of DK-weight yarn in blush pink.
- A 4.0 mm crochet hook.
- A 3.5 mm crochet hook for the neckline, optional.
- Yarn needle.
- Sharp scissors.
- Flexible measuring tape.
- Stitch markers.
- Blocking mat and rustproof pins.
- One decorative pearl-style button, approximately ¾–1 inch (19–25 mm).
- Matching sewing thread.
- Hand-sewing needle.
Suggested finished measurements
| Component | Approximate Measurement |
|---|---|
| Neckline circumference | 18–20 in (46–51 cm) |
| Shoulder circumference | 38–44 in (96.5–112 cm) |
| Capelet length | 12–15 in (30.5–38 cm) |
| Neckline band height | 1½–2½ in (4–6.5 cm) |
| Shell pattern depth | 9–12 in (23–30.5 cm) |
| Front opening | Full length of the capelet |
These measurements are suitable for an adjustable adult capelet.
The pattern can be enlarged or reduced by changing the foundation stitch count and the number of expanding lace rows.
For this tutorial, the sample capelet will have a neckline of approximately 19 inches and a finished length of approximately 13 inches.
Crochet abbreviations – US terminology
| Abbreviation | Meaning |
|---|---|
| ch | Chain |
| sc | Single crochet |
| hdc | Half double crochet |
| dc | Double crochet |
| tr | Treble crochet |
| sl st | Slip stitch |
| sp | Space |
| st | Stitch |
| rep | Repeat |
| RS | Right side |
| WS | Wrong side |
| FO | Fasten off |
Special crochet stitches
Shell Stitch: A group of five double crochet stitches worked into the same stitch or chain space.
V-Stitch: One double crochet, chain one, and one double crochet worked into the same stitch or space.
Picot Stitch: Chain three, then slip stitch into the first chain to create a small decorative point.
Back Loop Only Single Crochet: Insert the hook into the back loop of the indicated stitch and complete a single crochet.
Scalloped Edging: A decorative border created with groups of double crochet stitches and single crochet anchors.
Understanding the capelet construction
The Crochet Capelet Pattern is worked from the neckline downward.
The first section forms a comfortable collar.
The second section expands gradually to accommodate the shoulders.
The third section creates the decorative lace body using repeating shell stitches.
The fourth section adds contrasting pink borders and the button closure.
This top-down construction makes it easier to adjust the garment as you work.
Step-by-Step Crochet Capelet Pattern: Creating the Neckline and Shoulder Section
The neckline is the foundation of the entire Handmade Crochet Capelet.
It should sit comfortably around the neck without feeling tight.
The capelet must also expand sufficiently to rest over the shoulders.
Step 1: Measure the neckline
Use a flexible measuring tape to measure around the base of your neck.
Add approximately 2–3 inches (5–7.5 cm) of ease.
For example, if your neck measures 16 inches, a finished neckline of approximately 19 inches may be comfortable.
The opening should allow the capelet to sit naturally without pressing against the throat.
Record your measurement before beginning.
Step 2: Create the foundation chain
Using blue yarn and a 4.0 mm crochet hook, chain 101.
Work one half double crochet into the second chain from the hook.
Continue working one half double crochet into each remaining chain.
You should have 100 half double crochet stitches.
Chain 1 and turn.
The turning chain does not count as a stitch.
Step 3: Crochet the neckline band
Row 2: Work one half double crochet into the back loop only of each stitch across.
You should have 100 stitches.
Chain 1 and turn.
Rows 3–6: Repeat Row 2.
This creates a textured neckline band.
The back-loop stitches provide a gentle ribbed appearance.
Measure the band and adjust the number of rows if necessary.
Step 4: Create the first expansion row
Row 7: Chain 3, counting as the first double crochet.
Work one double crochet into each of the next four stitches.
Work two double crochet stitches into the following stitch.
Repeat the sequence of five single double crochets followed by one increase across the row.
Adjust the final stitches as needed to maintain a smooth edge.
The purpose of this row is to begin widening the capelet.
The fabric should gradually expand toward the shoulders.
Step 5: Continue expanding the shoulder section
Row 8: Chain 3 and turn.
Work one double crochet into each stitch across.
Row 9: Work one double crochet into each of the next six stitches, then two double crochet stitches into the following stitch.
Repeat across the row.
Continue alternating a plain double crochet row with an increase row.
Space the increases evenly.
The capelet should gradually form a gentle semicircular shape when laid flat.
Step 6: Check the shoulder fit
After several expansion rows, place the capelet around your shoulders.
Check that the neckline remains comfortable.
The fabric should rest smoothly over the shoulders without pulling.
If the capelet feels tight, add another increase row.
If the fabric begins to ripple excessively, reduce the number of increases.
Continue until the shoulder section reaches approximately 4–5 inches (10–12.5 cm) in depth.
Step 7: Prepare for the lace section
Work one row of double crochet stitches across the expanded shoulder section.
Count the stitches.
The next section will introduce open chain spaces and decorative shell motifs.
The exact number of stitches will depend on the amount of expansion needed for your size.
Make sure the fabric remains symmetrical before beginning the lace pattern.
How to Crochet the Beautiful Shell Lace Rows and Layered Capelet Body
The decorative lace section is the most eye-catching feature of the Crochet Lace Capelet Pattern.
The reference image features repeated fan-shaped motifs arranged in cascading rows.
These motifs create the appearance of overlapping scallops, while open chain spaces provide lightness and flexibility.
Step 1: Create the first openwork row
Attach blue yarn if necessary.
Chain 4, counting as one double crochet and one chain.
Skip the next stitch.
Work one double crochet into the following stitch.
Chain 1.
Repeat this sequence across the row.
Turn.
The result is a row of evenly spaced openwork spaces.
These openings provide the foundation for the decorative shell pattern.
Step 2: Begin the shell stitch pattern
Chain 3.
Work four additional double crochet stitches into the first suitable chain space.
Skip the next chain space.
Work one single crochet into the following chain space.
Skip the next chain space.
Work five double crochet stitches into the following chain space.
Repeat the shell-and-anchor sequence across the row.
Adjust the final edge with a partial shell or single crochet if necessary.
Step 3: Create the next openwork row
Chain 4 and turn.
Work one double crochet into the center stitch of the first shell.
Chain 3.
Work one double crochet into the center stitch of the next shell.
Repeat across the row.
This creates open chain arches between the shell motifs.
The arches will support the next decorative layer.
Step 4: Crochet the second shell row
Chain 3 and turn.
Work four additional double crochet stitches into the first chain-3 space.
Work one single crochet into the next chain-3 space.
Continue alternating shell groups and anchoring stitches.
The new shells should appear slightly offset from the previous row.
This creates a layered lace appearance.
Step 5: Add fullness to the capelet
As the capelet becomes wider, additional stitch groups may be necessary.
At regular intervals, create two shell groups where the previous section contained one.
Distribute the increases evenly.
Avoid placing all increases near the front edges.
Check the capelet frequently to ensure the fabric drapes naturally.
The lower edge should become wider as the garment grows.
Step 6: Continue the decorative lace pattern
Repeat the openwork and shell rows.
Maintain consistent stitch tension.
Allow the shell motifs to form soft scalloped layers.
Continue until the lace section measures approximately 9–12 inches (23–30.5 cm), including the shoulder section as appropriate for your desired length.
For a shorter capelet, stop earlier.
For additional shoulder coverage, continue working more rows.
Step 7: Create the final scalloped row
Work a final row of decorative shells along the lower edge.
Use five to seven double crochet stitches per shell, depending on the available spaces.
Anchor the shells with single crochet stitches.
Keep the spacing consistent.
The final edge should form a soft, rounded scalloped shape.
Fasten off the blue yarn.
Step 8: Check the finished shape
Lay the capelet flat.
The neckline should form a gentle curve.
The shoulder section should expand smoothly.
The shell rows should create a flowing lace pattern.
The lower edge should appear softly scalloped.
Check both front panels for symmetry.
Make adjustments before adding the contrasting border.
Adding Pink Edging, the Pearl Button, Finishing Details, and Beautiful Variations
The soft pink border is one of the most charming details of the Blue and Pink Crochet Capelet Pattern.
It highlights the shell stitches and gives the garment a delicate vintage-inspired appearance.
The pearl-style button adds a sophisticated finishing touch.
Step 1: Add pink edging to the neckline
Attach blush pink yarn to one front corner of the neckline.
Work one single crochet into each stitch along the upper edge.
Keep the tension even.
Work slowly around the curved neckline.
Join or fasten off at the opposite front corner.
This creates a neat decorative border.
Step 2: Highlight the shell rows
Attach pink yarn to the outer edge of a completed shell row.
Work one single crochet into each available stitch along the shell curves.
For a more textured border, alternate single crochet and small picot stitches.
Continue across the decorative row.
Fasten off.
Repeat on additional shell rows if desired.
This creates the layered pink-and-blue appearance inspired by the reference image.
Step 3: Finish the lower scalloped edge
Attach pink yarn to one lower corner.
Work single crochet stitches evenly around the final scalloped edge.
At the highest point of each shell, work a small picot if desired.
Continue across the entire lower edge.
Fasten off.
The pink border should emphasize the curved shape of each shell.
Step 4: Crochet the front opening borders
Attach pink yarn to the lower corner of one front panel.
Work single crochet stitches evenly up the front edge.
Continue around the neckline if desired.
Work down the opposite front edge.
Fasten off.
The contrasting trim creates a polished finish.
Step 5: Add the pearl-style button
Position the decorative button near the upper neckline.
Use a hand-sewing needle and strong matching thread.
Sew the button securely to one front panel.
Create a small crochet chain loop on the opposite panel.
The loop should fit around the button comfortably.
Test the closure before fastening off.
Avoid placing the button too close to the throat.
Step 6: Block the completed capelet
Gently dampen the capelet according to the yarn manufacturer’s instructions.
Lay it flat on a blocking mat.
Shape the neckline.
Arrange the shell rows.
Smooth the front edges.
Pin the scalloped borders carefully.
Allow the garment to dry completely.
Blocking helps the lace open beautifully and improves the finished drape.
Beautiful Color Combinations for the Crochet Capelet Pattern
Cornflower Blue and Blush Pink: A romantic combination inspired by the reference image.
Ivory and Champagne Gold: A sophisticated palette suitable for weddings and special occasions.
Dusty Rose and Cream: A soft vintage combination with a delicate handmade appearance.
Emerald Green and White: A rich, elegant color pairing that highlights the lacework.
Lavender and Pearl Gray: A gentle pastel combination with a refined finish.
Burgundy and Antique Pink: A dramatic vintage-inspired palette.
Navy Blue and Ivory: A timeless combination suitable for formal and casual outfits.
Styling Ideas for the Elegant Crochet Capelet
Wear the capelet over a simple white dress for a romantic spring outfit.
Pair it with a fitted blouse and a long skirt for a vintage-inspired appearance.
Choose neutral colors for a classic accessory that complements many outfits.
For special occasions, use a subtle pearl-style closure.
A shorter capelet looks beautiful over sleeveless dresses.
A longer version can provide additional coverage across the upper arms.
Helpful Tips for a Perfect Crochet Capelet
Choose lightweight yarn. Soft DK-weight yarn creates a comfortable drape.
Measure the neckline carefully. A comfortable neckline is essential.
Distribute increases evenly. Balanced increases help the capelet rest smoothly over the shoulders.
Maintain consistent shell spacing. Evenly placed motifs create a professional appearance.
Use contrasting edging. Pink trim highlights the decorative stitch pattern.
Block the finished garment. Gentle blocking improves the lace definition.
Frequently Asked Questions About the Crochet Capelet Pattern
1. Is the Crochet Capelet Pattern suitable for beginners?
The project is best suited to confident beginners or intermediate crocheters familiar with double crochet, chain spaces, increases, and shell stitches.
2. What yarn is best for this capelet?
DK-weight cotton, cotton-bamboo blends, and lightweight acrylic yarn are excellent choices.
3. What crochet hook should I use?
A 4.0 mm hook is recommended for the main body, while a 3.5 mm hook can be used for the neckline.
4. Can I make the capelet larger?
Yes. Increase the neckline foundation and add additional expansion rows.
5. Can I make the capelet longer?
Yes. Continue the shell stitch pattern until the desired length is reached.
6. Can I make the capelet in one color?
Absolutely. A single-color capelet creates a classic and elegant appearance.
7. Is the pearl button necessary?
No. You can use a ribbon tie, crochet cord, or another suitable closure.
8. Can I use a different shell stitch?
Yes. Different shell stitch variations can create beautiful decorative effects.
9. How do I prevent the neckline from stretching?
Use a slightly smaller hook for the neckline and maintain even tension.
10. Can I wear the capelet over a dress?
Yes. The design is especially attractive over sleeveless dresses and fitted tops.
11. How do I prevent the lace from curling?
Maintain consistent tension, distribute increases carefully, and block the finished garment.
12. Can I use wool yarn?
Yes. Lightweight wool blends can create a warmer capelet suitable for cooler weather.
13. How do I wash the finished capelet?
Follow the yarn manufacturer’s care instructions. Gentle hand washing and flat drying are recommended for many delicate crochet garments.
14. Can I make matching accessories?
Yes. Matching headbands, wrist warmers, handbags, and decorative collars can be created using the same yarn and shell stitch pattern.
15. Can I sell handmade crochet capelets?
Handmade garments created from your own work can generally be sold, subject to applicable pattern rights and local regulations.
Conclusion
The Crochet Capelet Pattern is a beautiful handmade fashion project that combines delicate lacework, graceful scalloped edges, and timeless elegance. Its structured neckline, expanding shoulder section, decorative shell stitches, and contrasting pink borders create a charming accessory inspired by the reference image.
One of the greatest advantages of this design is its versatility. You can customize the yarn colors, neckline size, capelet length, shell pattern, and decorative closure to create a garment that reflects your personal style.
The project also provides an enjoyable opportunity to practice top-down crochet construction, shell stitches, lacework, decorative edging, and careful finishing techniques.
For crocheters who appreciate romantic handmade fashion, this Elegant Crochet Lace Capelet offers a rewarding way to transform simple yarn into a beautiful wearable accessory.
Whether you choose the cornflower blue and blush pink combination shown in the image or experiment with ivory, champagne gold, dusty rose, emerald green, or lavender, the finished capelet can become a treasured addition to your handmade wardrobe.
With careful stitching, thoughtful color choices, and attention to the finishing details, your Handmade Crochet Capelet can bring warmth, beauty, and timeless crochet charm to your favorite outfits for many seasons.