
The Crochet Decoration Pattern is a charming handmade project that transforms ordinary yarn into an adorable pair of romantic street lamps. Inspired by the beautiful reference image, these decorative crochet figures feature elegant charcoal-gray lamp posts, softly glowing cream-colored lanterns, curved arms, and delightful accessories that give each character a unique personality. One lamp wears a small burgundy bow tie, while the other features a pretty pink flower, a ruffled skirt, and a matching decorative band.
What makes this Amigurumi Street Lamp Couple especially appealing is the combination of classic street-lamp architecture and playful character design. The tall, slightly curved posts resemble vintage lanterns found along romantic European streets, while the handmade accessories give the figures a sweet, affectionate appearance. Positioned together, the two lamps create a beautiful decorative scene that can symbolize friendship, love, companionship, or a special relationship.
The design is ideal for crocheters who enjoy creating unusual home decorations. Unlike traditional amigurumi animals or dolls, these decorative lamp posts use cylindrical crochet construction, gradual shaping, narrow tubes, and small ornamental details. The finished pieces can be displayed on shelves, side tables, craft-room desks, or decorative trays. Their neutral charcoal color makes the cream lanterns stand out, while the burgundy and dusty pink accessories introduce warmth and personality.
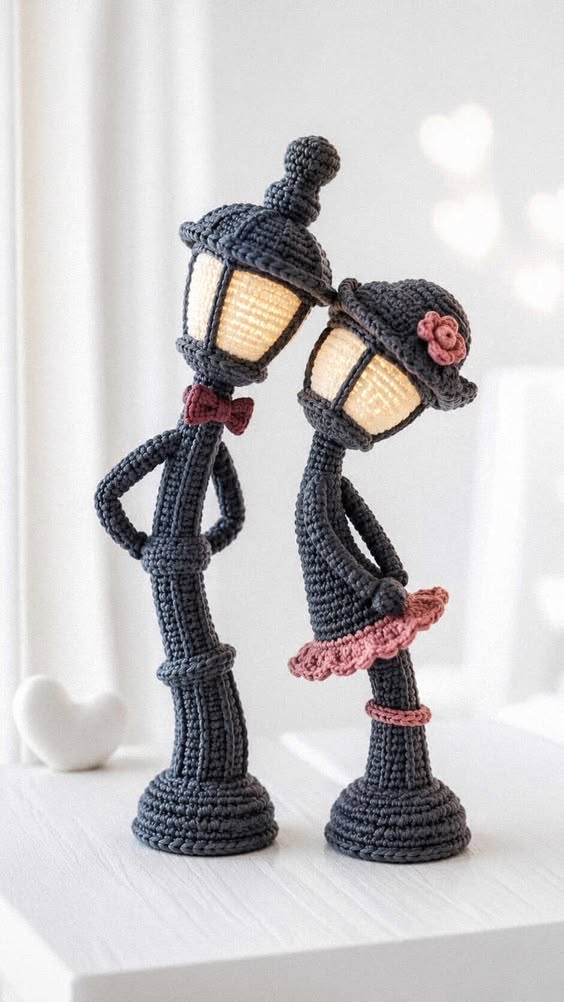
In this complete Crochet Decoration Tutorial, you will learn how to crochet the bases, shape the lamp posts, create the lantern bodies, add vintage-style lamp caps, make curved arms, and finish both figures with decorative accessories. The tutorial uses US crochet terminology and offers an original, simplified construction inspired by the reference photograph. With careful assembly and thoughtful finishing, you can create a lovely handmade decoration that celebrates the beauty of crochet and imaginative design.
DISCOVER MORE FREE PATTERNS HERE!
Materials, Measurements, and Crochet Stitches for the Decorative Street Lamp Pattern
Before beginning your Crochet Street Lamp Pattern, selecting the correct materials is important. Because the figures are tall and narrow, they need a combination of soft crochet fabric and internal support to maintain their shape.
Cotton yarn is particularly suitable for this project because it produces defined stitches and holds small details beautifully. A cotton-acrylic blend is another practical option, especially for crocheters who prefer a slightly softer texture.
For a design similar to the reference image, choose dark charcoal gray for the lamp posts and lantern frames, warm ivory for the lantern centers, burgundy for the bow tie, and dusty rose for the flower and skirt.
Materials needed
- Approximately 180–250 yards (165–229 meters) of DK-weight charcoal-gray cotton yarn.
- Approximately 60–90 yards (55–82 meters) of warm ivory yarn.
- Small amounts of burgundy yarn.
- Small amounts of dusty pink yarn.
- A 3.0 mm crochet hook.
- A 2.5 mm crochet hook for small details, optional.
- Polyester fiberfill.
- Yarn needle.
- Sharp scissors.
- Stitch markers.
- Flexible measuring tape.
- Two small weighted bases or fabric pouches filled with clean aquarium gravel.
- Two pieces of smooth, rigid plastic support tubing, optional.
- Small pieces of felt for covering internal support ends.
- Battery-operated LED tea lights, optional.
- Removable LED inserts or translucent plastic diffusers, optional.
Use only cool, battery-operated lighting. Never place candles, open flames, hot bulbs, or exposed electrical wiring inside crochet decorations.
Suggested finished measurements
| Component | Approximate Measurement |
|---|---|
| Tall street lamp height | 11–13 in (28–33 cm) |
| Short street lamp height | 9–11 in (23–28 cm) |
| Base diameter | 3–3½ in (7.5–9 cm) |
| Lantern height | 3–3½ in (7.5–9 cm) |
| Lantern width | 2–2½ in (5–6.5 cm) |
| Lamp post diameter | ¾–1 in (2–2.5 cm) |
| Decorative skirt width | 3–4 in (7.5–10 cm) |
The measurements can vary depending on yarn weight, hook size, and tension.
For this tutorial, the taller lamp will measure approximately 12 inches, while the shorter lamp will measure approximately 10 inches.
Crochet abbreviations – US terminology
| Abbreviation | Meaning |
|---|---|
| MR | Magic ring |
| ch | Chain |
| sc | Single crochet |
| hdc | Half double crochet |
| dc | Double crochet |
| sl st | Slip stitch |
| inc | Increase – two single crochets in one stitch |
| dec | Decrease – single crochet two stitches together |
| BLO | Back loop only |
| FLO | Front loop only |
| st | Stitch |
| rnd | Round |
| FO | Fasten off |
Important crochet techniques
Magic Ring: An adjustable loop used to begin circular crochet pieces.
Invisible Decrease: A decrease worked through the front loops of two stitches to create a smoother surface.
Single Crochet in Continuous Rounds: A technique commonly used in amigurumi construction.
Back Loop Only Stitch: A stitch worked through the back loop to create a defined ridge.
Slip Stitch Join: A stitch used to connect crochet rounds or attach decorative pieces.
Understanding the street lamp construction
Each Crochet Decoration Street Lamp consists of several individual components.
The base is a wide circular piece that provides stability.
The lamp post is a narrow crocheted tube.
The lantern body is a cream-colored cylindrical section surrounded by dark decorative supports.
The top cap gives the lantern its vintage appearance.
The arms are narrow curved tubes attached to the sides of the post.
Finally, small accessories create the personalities of the two figures.
The components are crocheted separately and assembled after shaping.
Step-by-Step Crochet Decoration Pattern: Making the Base and Lamp Post
The base and post are the foundation of each Amigurumi Street Lamp.
Because the figures are tall, the base should be sufficiently wide and weighted to prevent tipping.
Step 1: Crochet the circular base
Using charcoal-gray yarn and a 3.0 mm crochet hook, make a magic ring.
Round 1: Work 6 single crochet stitches into the magic ring. (6)
Round 2: Work 2 single crochet stitches into each stitch around. (12)
Round 3: Repeat 1 sc, 1 inc around. (18)
Round 4: Repeat 2 sc, 1 inc around. (24)
Round 5: Repeat 3 sc, 1 inc around. (30)
Round 6: Repeat 4 sc, 1 inc around. (36)
Round 7: Repeat 5 sc, 1 inc around. (42)
Round 8: Repeat 6 sc, 1 inc around. (48)
The result is a flat circular base.
Step 2: Create the raised base edge
Round 9: Work one single crochet into the back loop only of each stitch around. (48)
Rounds 10–12: Work one single crochet into each stitch around. (48)
This creates a short raised wall.
Fasten off, leaving a long yarn tail.
Make a second circular piece using Rounds 1–8.
This second circle will close the underside of the base.
Step 3: Add weight to the base
Place a small sealed fabric pouch containing aquarium gravel inside the raised base.
Keep the weight centered.
Add a small amount of polyester fiberfill around the pouch.
Position the second circular piece over the opening.
Sew the two pieces together using a yarn needle.
The finished base should remain flat and stable.
Step 4: Begin the lamp post
Using charcoal-gray yarn, make a magic ring.
Round 1: Work 6 single crochet stitches into the ring. (6)
Round 2: Work 2 single crochet stitches into each stitch around. (12)
Round 3: Work one single crochet into each stitch around. (12)
Continue working single crochet rounds without increasing.
This creates a narrow cylindrical tube.
Step 5: Crochet the taller post
For the taller lamp, continue until the post measures approximately 7–8 inches (18–20 cm).
The exact length depends on the planned lantern height.
Stuff the tube lightly as you work.
If using a rigid plastic support, place it inside the tube with both ends covered by protective felt.
The support must remain completely enclosed.
Do not use sharp wire ends.
Step 6: Crochet the shorter post
Repeat the same instructions for the second lamp.
Continue until the post measures approximately 5½–6½ inches (14–16.5 cm).
Stuff and shape the post.
The shorter lamp should be slightly curved near the top to create a romantic leaning pose.
Step 7: Attach the posts to the bases
Position one post in the center of each circular base.
Pin securely.
Sew around the bottom edge using matching yarn.
Make several reinforced stitches.
Check that the post stands upright.
The weighted base should prevent the figure from tipping.
Step 8: Shape the curved lamp posts
Gently bend the upper section of each post.
The taller lamp can lean slightly toward the shorter lamp.
The shorter lamp can lean in the opposite direction.
If using internal support tubing, use only material designed to bend safely without sharp edges.
The figures should appear to lean affectionately toward each other.
How to Crochet the Lanterns, Vintage Caps, and Decorative Arms
The lanterns are the most recognizable feature of the Crochet Decoration Pattern.
The reference image features cream-colored lantern centers surrounded by charcoal-gray frames.
The taller lamp has a classic pointed cap, while the shorter lamp wears a decorative rounded hat with a pink flower.
Step 1: Crochet the cream lantern body
Using warm ivory yarn, make a magic ring.
Round 1: Work 6 single crochet stitches into the ring. (6)
Round 2: Work 2 single crochet stitches into each stitch around. (12)
Round 3: Repeat 1 sc, 1 inc around. (18)
Round 4: Repeat 2 sc, 1 inc around. (24)
Rounds 5–14: Work one single crochet into each stitch around. (24)
This creates a cylindrical lantern body.
Step 2: Close the lantern top
Round 15: Repeat 2 sc, 1 dec around. (18)
Round 16: Repeat 1 sc, 1 dec around. (12)
Add a small amount of polyester fiberfill if you are making an unlit decorative lantern.
Round 17: Work 6 decreases around. (6)
Fasten off.
Close the opening with a yarn needle.
For an illuminated version, use a separately designed removable diffuser rather than stuffing or sealing a light inside the crochet piece.
Step 3: Crochet the lantern frame
Using charcoal-gray yarn, chain 15.
Work one single crochet into the second chain from the hook.
Continue across.
Fasten off.
Make four narrow strips for each lantern.
Position the strips vertically around the cream lantern body.
Sew them evenly into place.
These strips create the appearance of traditional lantern window frames.
Step 4: Create the bottom lantern rim
Using charcoal-gray yarn, chain 25.
Join with a slip stitch to form a ring, taking care not to twist the chain.
Round 1: Work one single crochet into each chain around. (25)
Round 2: Work one single crochet into each stitch around. (25)
Fasten off.
Sew the ring around the lower edge of the lantern.
Repeat for the upper edge if desired.
Step 5: Crochet the taller lamp cap
Using charcoal-gray yarn, make a magic ring.
Round 1: Work 6 single crochet stitches into the ring. (6)
Round 2: Work 2 single crochet stitches into each stitch around. (12)
Round 3: Repeat 1 sc, 1 inc around. (18)
Round 4: Repeat 2 sc, 1 inc around. (24)
Round 5: Repeat 3 sc, 1 inc around. (30)
Rounds 6–7: Work one single crochet into each stitch around. (30)
Fasten off.
Position the cap over the lantern.
Sew it securely.
Step 6: Add the top ornament
Using charcoal-gray yarn, make a magic ring.
Work 6 single crochet stitches into the ring.
Increase to 12 stitches.
Work two rounds without increasing.
Stuff lightly.
Decrease to 6 stitches.
Fasten off.
Sew the small rounded ornament to the center of the cap.
For a more elaborate design, add a short crocheted stem beneath the ornament.
Step 7: Crochet the shorter lamp’s decorative hat
Begin with a circular crown using charcoal-gray yarn.
Work increasing rounds until the circle measures approximately 2½ inches (6.5 cm) across.
Continue for several rounds without increasing.
Create a slightly wider brim by adding evenly spaced increases.
Finish with a round of single crochet.
Fasten off.
Sew the hat onto the shorter lantern.
Step 8: Create the curved arms
Using charcoal-gray yarn, make a magic ring.
Work 6 single crochet stitches into the ring.
Continue working one single crochet into each stitch around.
Crochet a narrow tube approximately 4–5 inches (10–12.5 cm) long.
Fasten off.
Make four arms in total.
Stuff very lightly.
Bend each tube into a gentle curve.
Attach two arms to each lamp post.
Position the arms so they resemble relaxed hands resting near the waist.
Adding Romantic Accessories, Assembly Details, and Beautiful Finishing Touches
The small decorative accessories give this Romantic Crochet Street Lamp Couple its special personality.
The taller lamp features a burgundy bow tie, while the shorter lamp wears a dusty pink flower and a matching ruffled skirt.
These details transform the street lamps into charming decorative characters.
Step 1: Crochet the burgundy bow tie
Using burgundy yarn, chain 9.
Row 1: Work one single crochet into the second chain from the hook.
Continue across. (8)
Chain 1 and turn.
Rows 2–4: Work one single crochet into each stitch across. (8)
Fasten off.
Wrap a short piece of yarn around the center of the rectangle.
Pull gently to create the bow shape.
Secure the center.
Sew the bow tie beneath the taller lantern.
Step 2: Crochet the pink flower
Using dusty pink yarn, make a magic ring.
Work 5 single crochet stitches into the ring.
Join with a slip stitch.
For each petal, work chain 3, 2 double crochet, chain 3, slip stitch into the same stitch.
Repeat around.
Fasten off.
Arrange the petals.
Sew the flower onto the shorter lamp’s hat.
Step 3: Create the ruffled skirt
Using dusty pink yarn, chain enough stitches to wrap comfortably around the shorter lamp post.
Join into a ring.
Round 1: Work one single crochet into each chain.
Round 2: Work two double crochet stitches into each stitch around.
Round 3: Work one double crochet into each stitch around.
Round 4: Work a decorative shell edging.
Fasten off.
Position the skirt around the shorter lamp post.
Sew it securely.
Step 4: Add the matching decorative band
Using dusty pink yarn, chain enough stitches to wrap around the lower section of the shorter lamp post.
Join into a ring.
Work one round of single crochet.
Fasten off.
Sew the band into position.
This creates a coordinated decorative detail.
Step 5: Assemble the lanterns
Position each lantern on top of its post.
Check the angle.
The taller lamp should lean gently toward the shorter lamp.
The shorter lamp should appear to lean toward its companion.
Sew the lanterns securely to the posts.
Reinforce the attachment points.
Make sure the figures remain balanced.
Step 6: Complete the final shaping
Adjust the arms.
Straighten the bases.
Check the lantern frames.
Make sure the decorative accessories are securely attached.
Trim loose yarn ends.
Use a yarn needle to weave in remaining tails.
Your Crochet Decoration Street Lamp Couple is now complete.
Beautiful Color Combinations for the Crochet Decoration Pattern
Charcoal Gray and Warm Ivory: A timeless vintage combination inspired by the reference image.
Black and Champagne Cream: A sophisticated palette for elegant home decorations.
Antique Bronze and Soft Gold: A warm rustic combination inspired by traditional street lamps.
White and Dusty Pink: A delicate romantic palette for wedding-themed decorations.
Navy Blue and Cream: A classic color pairing with a charming handmade appearance.
Forest Green and Ivory: A beautiful combination for seasonal and holiday displays.
Burgundy and Champagne: A rich vintage-inspired palette suitable for romantic gifts.
Creative Display Ideas for the Crochet Street Lamp Couple
Place the finished figures together on a decorative shelf.
Arrange them beside framed photographs or handmade flowers.
Use them as part of a romantic Valentine’s Day display.
Create a small miniature street scene with crocheted flowers.
Display them on a wooden tray with other handmade decorations.
For a wedding-themed arrangement, choose ivory and champagne colors.
The figures also make thoughtful handmade gifts for crochet lovers.
Helpful Tips for a Perfect Crochet Decoration
Use firm stitches. Tight single crochet stitches help the figures maintain their shape.
Choose a stable base. Weighted bases are important for tall decorations.
Keep internal supports enclosed. Avoid exposed wires or sharp materials.
Stuff gradually. Small amounts of fiberfill help prevent lumps.
Sew the components securely. Reinforced attachment points improve durability.
Use safe lighting. Only cool, battery-operated lighting should be considered.
Keep small decorations away from young children and pets. Beads, buttons, and removable pieces may present choking hazards.
Frequently Asked Questions About the Crochet Decoration Pattern
1. Is the Crochet Decoration Pattern suitable for beginners?
The project is best suited to confident beginners or intermediate crocheters familiar with amigurumi, cylindrical construction, and assembly techniques.
2. What yarn is best for the street lamps?
DK-weight cotton or cotton-blend yarn is recommended for defined stitches and durable construction.
3. What crochet hook should I use?
A 3.0 mm hook is suitable for the main pieces, while a 2.5 mm hook can be used for smaller details.
4. Can I make the figures taller?
Yes. Increase the length of the crocheted posts and use appropriately sized internal supports.
5. Can I make the figures smaller?
Yes. Use thinner yarn and a smaller crochet hook.
6. Do the lanterns need to light up?
No. The figures can be made entirely as decorative crochet sculptures.
7. Can I add battery-operated lights?
Yes, but only with a suitable removable, cool-running LED system that remains accessible and does not heat the yarn.
8. How do I prevent the figures from falling over?
Use weighted bases and make sure the posts are securely attached.
9. Can I use different colors?
Absolutely. Black, bronze, ivory, navy blue, and pastel colors can all create beautiful variations.
10. How do I create the curved posts?
Use light stuffing and an appropriately enclosed flexible support, or shape the crocheted tubes gently.
11. Can I make only one street lamp?
Yes. Each figure can be displayed individually.
12. Can I add more decorative accessories?
Yes. Small crochet hats, scarves, flowers, and bows can personalize the figures.
13. How do I clean the finished decorations?
Dust gently with a soft brush. Avoid soaking pieces that contain weights, internal supports, or lighting components.
14. Are these decorations suitable for children?
They are intended as decorative items rather than toys. Small parts and internal supports may make them unsuitable for young children.
15. Can I sell handmade crochet street lamp decorations?
Handmade decorations created from your own work can generally be sold, subject to applicable pattern rights and product safety regulations.
Conclusion
The Crochet Decoration Pattern is a delightful handmade project that combines traditional amigurumi techniques with creative decorative design. Its charming street lamp figures, vintage-style lanterns, curved posts, and romantic accessories create a beautiful display inspired by the reference image.
One of the greatest advantages of this project is its versatility. You can customize the height, yarn colors, lantern shapes, and decorative accessories to create a unique pair of handmade figures.
The project also provides an enjoyable opportunity to practice circular crochet, cylindrical shaping, small decorative motifs, careful assembly, and creative finishing techniques.
For crocheters who enjoy unusual handmade decorations, this Romantic Amigurumi Street Lamp Couple offers a rewarding way to transform simple yarn into a charming miniature scene.
Whether you choose charcoal gray and warm ivory, antique bronze and champagne, or delicate pastel colors, the finished decorations can bring warmth, personality, and handmade beauty to your home.
With careful stitching, secure assembly, and thoughtful decorative details, your Handmade Crochet Street Lamp Decoration can become a treasured display piece that celebrates creativity, craftsmanship, and the special charm of crochet.