
The Santa Claus Toilet Paper Holder Pattern is a delightful Christmas crochet project that combines festive decoration with everyday practicality. Inspired by the adorable Santa Claus shown in the reference image, this handmade design features a cheerful Santa wearing his traditional red suit, fluffy white beard, classic Christmas hat, black boots, and a charming expression. His outstretched arms hold a toilet paper roll, transforming an ordinary bathroom essential into a creative holiday decoration.
One of the most appealing features of this Crochet Santa Claus Toilet Paper Holder is its playful three-dimensional design. Unlike traditional toilet paper covers that simply fit over a roll, this project creates a complete amigurumi Santa Claus figure. The finished decoration can sit on a bathroom countertop, shelf, or vanity while holding a standard toilet paper roll. The bright red clothing, white decorative trim, and textured crochet stitches create a festive appearance that instantly brings Christmas cheer to the room.
This project is especially enjoyable for crocheters who love making seasonal home accessories. The Santa figure is constructed from several crocheted pieces, including the body, head, hat, arms, legs, boots, beard, and small facial details. Each component is made separately before being carefully assembled. The finished figure can be customized with different expressions, decorative accessories, and yarn colors, making every Santa unique.
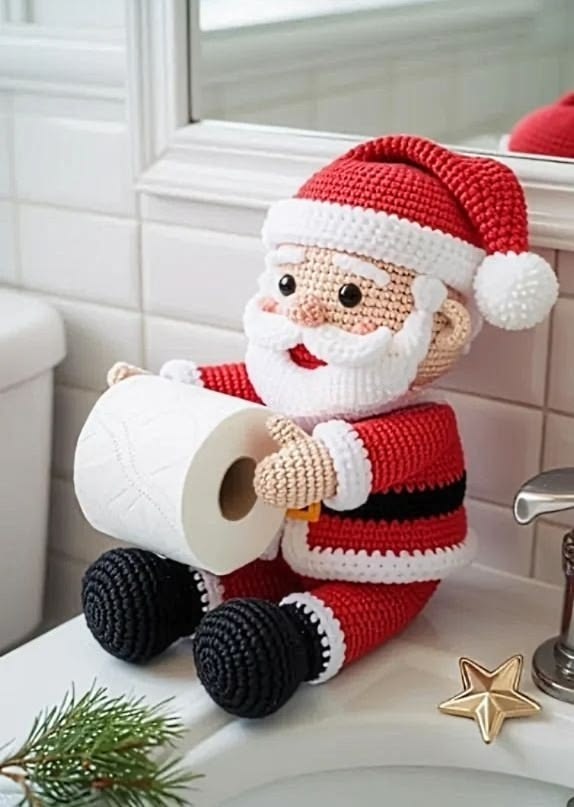
In this complete Santa Claus Toilet Paper Holder Crochet Tutorial, you will learn how to choose the right materials, crochet the individual amigurumi pieces, create Santa’s classic Christmas outfit, attach the arms securely, and assemble the figure into a charming bathroom decoration. The instructions use US crochet terminology and provide an original, simplified construction inspired by the reference image. With careful stitching and a little creativity, you can make a wonderful handmade Christmas accessory that is both decorative and practical.
DISCOVER MORE FREE PATTERNS HERE!
Materials, Measurements, and Crochet Stitches for the Santa Claus Toilet Paper Holder
Before beginning your Santa Claus Crochet Pattern, choosing the correct yarn is essential. Since the project includes a three-dimensional amigurumi figure, the stitches should be firm enough to hold the stuffing securely and maintain the shape of the individual pieces.
Medium-weight cotton yarn is an excellent choice because it provides good stitch definition and creates a sturdy fabric. Cotton-acrylic blends are also suitable, especially when you want a slightly softer finish. For a plush appearance, you can use soft acrylic yarn, although it may require additional support inside the body.
The traditional Christmas colors are red, white, black, and a soft skin-tone beige. Small amounts of pink can be used for the nose and cheeks, while burgundy or dark red yarn can be used to embroider Santa’s smiling mouth.
Materials needed
- Approximately 180–220 yards (165–201 meters) of red worsted-weight yarn.
- Approximately 100–140 yards (91–128 meters) of white yarn.
- Approximately 70–100 yards (64–91 meters) of skin-tone beige yarn.
- Approximately 60–80 yards (55–73 meters) of black yarn.
- Small amounts of pink and burgundy yarn.
- A 3.5 mm crochet hook.
- A 3.0 mm crochet hook for small details, optional.
- Polyester fiberfill.
- Yarn needle.
- Sharp scissors.
- Stitch markers.
- Two black safety eyes, approximately 10–12 mm, or black embroidery thread.
- Small pieces of plastic canvas for a stable base, optional.
- Flexible measuring tape.
- Sewing pins.
- A standard toilet paper roll for fitting.
- Optional removable support for holding the roll securely.
Suggested finished measurements
| Component | Approximate Measurement |
|---|---|
| Total Santa height, including hat | 12–14 in (30–35.5 cm) |
| Body height | 5–6 in (12.5–15 cm) |
| Head diameter | 3½–4 in (9–10 cm) |
| Hat length | 4–5 in (10–12.5 cm) |
| Arm length | 4–5 in (10–12.5 cm) |
| Leg length | 4–5 in (10–12.5 cm) |
| Boot length | 2½–3 in (6.5–7.5 cm) |
| Suitable toilet paper roll width | Approximately 4–4½ in (10–11.5 cm) |
The measurements may vary depending on your yarn, crochet hook, tension, and stuffing.
The design can be adjusted to accommodate different toilet paper roll sizes.
Crochet abbreviations – US terminology
| Abbreviation | Meaning |
|---|---|
| MR | Magic ring |
| ch | Chain |
| sc | Single crochet |
| hdc | Half double crochet |
| dc | Double crochet |
| sl st | Slip stitch |
| inc | Increase – 2 sc in the same stitch |
| dec | Decrease – sc2tog |
| BLO | Back loop only |
| FLO | Front loop only |
| st | Stitch |
| rnd | Round |
| FO | Fasten off |
Important crochet techniques
Magic Ring: An adjustable loop used to begin circular amigurumi pieces.
Invisible Decrease: A decrease worked through the front loops of two stitches to create a smooth surface.
Continuous Rounds: A method of crocheting in a spiral without joining each round.
Back Loop Only: A technique that creates a defined ridge or decorative edge.
Single Crochet Increase: Two single crochet stitches worked into the same stitch.
Surface Crochet: A decorative technique used to add details to completed crochet fabric.
Understanding the Santa Claus construction
The Crochet Santa Claus Toilet Paper Holder consists of several individual pieces.
The body is crocheted as a rounded cylinder.
The head is made separately and attached to the upper body.
The hat is created using gradually increasing rounds.
The arms are narrow crocheted tubes positioned to support a toilet paper roll.
The legs and boots form the seated position.
The beard, mustache, nose, and facial details complete Santa’s expression.
Finally, the pieces are assembled into a stable decorative figure.
Step-by-Step Santa Claus Crochet Pattern: Making the Body, Head, and Christmas Hat
The body and head form the foundation of the Amigurumi Santa Claus Toilet Paper Holder.
Working with firm, even stitches will help the finished figure maintain its shape.
Step 1: Crochet Santa’s body
Using red yarn and a 3.5 mm crochet hook, make a magic ring.
Round 1: Work 6 single crochet stitches into the ring. (6)
Round 2: Work 2 single crochet stitches into each stitch around. (12)
Round 3: Repeat 1 sc, 1 inc around. (18)
Round 4: Repeat 2 sc, 1 inc around. (24)
Round 5: Repeat 3 sc, 1 inc around. (30)
Round 6: Repeat 4 sc, 1 inc around. (36)
Round 7: Repeat 5 sc, 1 inc around. (42)
Round 8: Repeat 6 sc, 1 inc around. (48)
Rounds 9–18: Work one single crochet into each stitch around. (48)
This creates the main cylindrical body.
Step 2: Add Santa’s black belt
Change to black yarn.
Rounds 19–21: Work one single crochet into each stitch around. (48)
Change back to red yarn.
Rounds 22–26: Work one single crochet into each stitch around. (48)
This creates the appearance of Santa’s traditional black belt.
Step 3: Shape the upper body
Round 27: Repeat 6 sc, 1 dec around. (42)
Round 28: Repeat 5 sc, 1 dec around. (36)
Round 29: Repeat 4 sc, 1 dec around. (30)
Round 30: Repeat 3 sc, 1 dec around. (24)
Begin stuffing the body firmly.
Round 31: Repeat 2 sc, 1 dec around. (18)
Round 32: Repeat 1 sc, 1 dec around. (12)
Round 33: Work 6 decreases around. (6)
Fasten off.
Close the opening.
Step 4: Crochet Santa’s head
Using skin-tone beige yarn, make a magic ring.
Round 1: Work 6 single crochet stitches into the ring. (6)
Round 2: Work 2 single crochet stitches into each stitch around. (12)
Round 3: Repeat 1 sc, 1 inc around. (18)
Round 4: Repeat 2 sc, 1 inc around. (24)
Round 5: Repeat 3 sc, 1 inc around. (30)
Round 6: Repeat 4 sc, 1 inc around. (36)
Round 7: Repeat 5 sc, 1 inc around. (42)
Rounds 8–15: Work one single crochet into each stitch around. (42)
Step 5: Add the eyes
Position the eyes between Rounds 11 and 12.
Leave approximately 6–7 stitches between them.
Check that the eyes are symmetrical.
Attach the safety eyes before closing the head, if using them.
For a decoration that may be accessible to young children, embroidered eyes are a safer choice than detachable plastic components.
Step 6: Close the head
Round 16: Repeat 5 sc, 1 dec around. (36)
Round 17: Repeat 4 sc, 1 dec around. (30)
Round 18: Repeat 3 sc, 1 dec around. (24)
Begin stuffing the head.
Round 19: Repeat 2 sc, 1 dec around. (18)
Round 20: Repeat 1 sc, 1 dec around. (12)
Round 21: Work 6 decreases around. (6)
Fasten off.
Close the opening securely.
Step 7: Crochet Santa’s red hat
Using red yarn, make a magic ring.
Round 1: Work 6 single crochet stitches into the ring. (6)
Rounds 2–3: Work one single crochet into each stitch around. (6)
Round 4: Repeat 1 sc, 1 inc around. (9)
Rounds 5–6: Work one single crochet into each stitch around. (9)
Round 7: Repeat 2 sc, 1 inc around. (12)
Continue increasing gradually every few rounds.
The hat should widen from a narrow tip into a cone.
Continue until the opening fits comfortably around Santa’s head.
Step 8: Add the white hat brim
Change to white yarn.
Work three rounds of single crochet around the lower edge of the hat.
For a fuller brim, work one additional round of half double crochet.
Fasten off.
The white brim should create a soft decorative band.
Step 9: Crochet the white pom-pom
Using white yarn, make a magic ring.
Round 1: Work 6 single crochet stitches into the ring. (6)
Round 2: Work 2 single crochet stitches into each stitch around. (12)
Rounds 3–4: Work one single crochet into each stitch around. (12)
Round 5: Work 6 decreases around. (6)
Stuff lightly.
Fasten off.
Sew the pom-pom to the tip of the hat.
How to Crochet Santa’s Arms, Legs, Boots, Beard, and Facial Details
The arms and legs give the Santa Claus Toilet Paper Holder Pattern its charming seated appearance.
The reference image shows Santa holding a toilet paper roll in front of his body, with black boots extending forward.
The arms should be firm enough to support the roll without pulling the body out of shape.
Step 1: Crochet the hands
Using skin-tone beige yarn, make a magic ring.
Round 1: Work 6 single crochet stitches into the ring. (6)
Round 2: Work 2 single crochet stitches into each stitch around. (12)
Rounds 3–6: Work one single crochet into each stitch around. (12)
Stuff lightly.
Change to white yarn.
Step 2: Create the white cuffs
Rounds 7–8: Work one single crochet into each stitch around. (12)
Change to red yarn.
Rounds 9–18: Work one single crochet into each stitch around. (12)
Stuff lightly.
Fasten off, leaving a long yarn tail.
Make two arms.
Step 3: Crochet the legs
Using red yarn, make a magic ring.
Round 1: Work 6 single crochet stitches into the ring. (6)
Round 2: Work 2 single crochet stitches into each stitch around. (12)
Round 3: Repeat 1 sc, 1 inc around. (18)
Rounds 4–15: Work one single crochet into each stitch around. (18)
Stuff firmly.
Fasten off.
Make two legs.
Step 4: Crochet the black boots
Using black yarn, make a magic ring.
Round 1: Work 6 single crochet stitches into the ring. (6)
Round 2: Work 2 single crochet stitches into each stitch around. (12)
Round 3: Repeat 1 sc, 1 inc around. (18)
Round 4: Repeat 2 sc, 1 inc around. (24)
Rounds 5–8: Work one single crochet into each stitch around. (24)
Round 9: Repeat 2 sc, 1 dec around. (18)
Rounds 10–12: Work one single crochet into each stitch around. (18)
Stuff firmly.
Fasten off.
Make two boots.
Step 5: Attach the boots to the legs
Position one boot at the end of each red leg.
Align the openings.
Sew the pieces together using matching yarn.
Make several reinforced stitches.
The boots should point forward.
Step 6: Crochet Santa’s white beard
Using white yarn, chain 19.
Row 1: Work one single crochet into the second chain from the hook.
Continue across. (18)
Chain 1 and turn.
Row 2: Work one single crochet into each stitch across. (18)
Row 3: Work one single crochet into the first 16 stitches, then decrease over the final two stitches. (17)
Continue decreasing gradually on both sides over subsequent rows.
The beard should form a soft rounded triangular shape.
Fasten off.
Step 7: Add texture to the beard
Attach white yarn along the lower edge.
Work small groups of half double crochet stitches.
Use short chain loops to create a fluffy appearance.
Continue around the beard.
Fasten off.
The textured border creates the appearance of Santa’s soft white beard.
Step 8: Crochet the mustache
Using white yarn, chain 9.
Work one single crochet into the second chain from the hook.
Continue across.
Fasten off.
Make two matching pieces.
Curve each piece gently.
Position them beneath Santa’s nose.
Sew securely.
Step 9: Crochet the nose
Using soft pink yarn, make a magic ring.
Work 6 single crochet stitches into the ring.
Increase to 12 stitches.
Work one round without increasing.
Stuff lightly.
Fasten off.
Sew the nose between the eyes and mustache.
Step 10: Embroider Santa’s smile
Using burgundy yarn and a yarn needle, embroider a small curved smile.
Position the smile beneath the mustache.
Keep the stitches short and even.
For additional detail, add subtle pink cheeks.
Santa’s cheerful face is now complete.
Assembling the Santa Claus Toilet Paper Holder and Adding Christmas Finishing Touches
The final assembly transforms the individual crochet pieces into a charming Christmas Toilet Paper Holder.
Careful positioning is essential because the figure must sit securely while holding the toilet paper roll.
Step 1: Attach the head to the body
Position the head at the top center of the body.
Use sewing pins to hold it in place.
Check that Santa’s face points forward.
Sew around the attachment area using matching yarn.
Reinforce the connection.
Step 2: Attach the legs
Position the legs along the lower front of the body.
Angle them forward.
Sew the upper ends securely.
Check that both legs are symmetrical.
The black boots should rest naturally in front of Santa.
Step 3: Attach the arms
Position the arms on the upper sides of the body.
Angle them toward the front.
Pin temporarily.
Place a standard toilet paper roll between the hands.
Adjust the arm positions.
The hands should appear to hold the roll gently.
Step 4: Secure the arms
Sew the upper arms firmly to the body.
Reinforce the attachment points.
Check the spacing between the hands.
The roll should fit without excessive stretching.
For better support, add a removable lightweight plastic dowel through the cardboard center of the toilet paper roll, with its ends concealed in crocheted hand loops.
Avoid sharp or exposed supports.
Step 5: Add the white suit trim
Using white yarn, crochet a narrow decorative strip.
Sew it along the lower edge of Santa’s jacket.
Add a matching strip around the neckline if desired.
This creates the appearance of fluffy Christmas clothing.
Step 6: Add the belt buckle
Using yellow or gold yarn, chain 13.
Join to form a ring.
Work one round of single crochet.
Fasten off.
Shape the ring into a small square.
Sew it to the center of the black belt.
The buckle adds a traditional Santa Claus detail.
Step 7: Position the hat
Place the red hat on Santa’s head.
Tilt it slightly to one side.
Arrange the white brim.
Allow the pom-pom to hang naturally.
Sew the hat securely.
Step 8: Test the toilet paper holder
Place Santa on a flat countertop.
Insert a standard toilet paper roll between the hands.
Check the balance.
The figure should remain stable.
Adjust the stuffing or add a concealed weighted base if necessary.
For a bathroom display, keep the holder away from standing water and direct splashes.
Step 9: Finish the decoration
Weave in all remaining yarn tails.
Trim loose threads.
Adjust the beard.
Straighten the hat.
Check the boots and arms.
Your Santa Claus Toilet Paper Holder is now complete.
Beautiful Christmas Color Combinations
Traditional Red, White, and Black: The classic Santa Claus combination inspired by the reference image.
Burgundy and Cream: A sophisticated vintage Christmas palette.
Forest Green and White: A charming alternative inspired by Christmas elves.
Red and Champagne Gold: A festive combination with elegant decorative details.
Dusty Rose and Ivory: A soft pastel variation for romantic holiday decorations.
Navy Blue and Silver: A creative winter-inspired interpretation.
Emerald Green and Gold: A rich holiday palette suitable for elegant bathrooms.
Creative Ideas for Displaying the Santa Claus Toilet Paper Holder
Place Santa on a bathroom countertop near the sink.
Display him on a decorative shelf with small Christmas ornaments.
Use him as part of a festive guest bathroom arrangement.
Pair him with crocheted Christmas trees or miniature snowmen.
Create matching holiday hand towel decorations.
Make several Santa figures as handmade Christmas gifts.
The finished project can also be used as a decorative amigurumi figure without holding toilet paper.
Helpful Tips for a Perfect Santa Claus Crochet Decoration
Use tight stitches. Firm single crochet stitches help the figure maintain its shape.
Stuff the body evenly. Balanced stuffing prevents distortion.
Reinforce the arms. Strong attachments are important when supporting a toilet paper roll.
Use a stable base. A weighted or reinforced bottom improves balance.
Keep the facial details symmetrical. Carefully positioned eyes and nose create a cheerful expression.
Choose washable yarn. Cotton and suitable acrylic blends are practical for bathroom decorations.
Avoid direct moisture. Keep the figure away from wet surfaces.
Frequently Asked Questions About the Santa Claus Toilet Paper Holder Pattern
1. Is the Santa Claus Toilet Paper Holder Pattern suitable for beginners?
The project is best suited to confident beginners or intermediate crocheters familiar with amigurumi construction and sewing individual pieces together.
2. What yarn is best for this project?
Worsted-weight cotton or cotton-acrylic yarn is recommended for durable construction and defined stitches.
3. What crochet hook should I use?
A 3.5 mm crochet hook is suitable for the main pieces.
4. How tall is the finished Santa Claus?
The finished decoration measures approximately 12–14 inches, depending on yarn and tension.
5. Can I make Santa larger?
Yes. Use thicker yarn and a larger crochet hook.
6. Can I make Santa smaller?
Yes. Use thinner yarn and a smaller crochet hook.
7. Does Santa hold a standard toilet paper roll?
The design can be adjusted to accommodate most standard rolls. Measure the roll before attaching the arms.
8. How do I prevent Santa from tipping over?
Use firm stuffing, a stable base, and balanced arm positioning.
9. Can I use safety eyes?
Yes, for an adult decorative item. Embroidered eyes are preferable when small detachable components could be a concern.
10. Can I make the beard fluffier?
Yes. Add textured crochet edging or additional short chain loops.
11. Can I make Santa without the toilet paper holder function?
Absolutely. The figure can be displayed as a traditional Christmas amigurumi decoration.
12. Can I change Santa’s clothing colors?
Yes. Burgundy, forest green, ivory, and gold are beautiful alternatives.
13. How should I clean the finished Santa?
Follow the yarn manufacturer’s care instructions. Spot cleaning is often preferable for stuffed decorations with internal supports.
14. Is this project suitable for a guest bathroom?
Yes. It can be a charming decorative accessory when kept on a clean, dry, stable surface.
15. Can I sell handmade Santa Claus toilet paper holders?
Handmade decorations created from your own work can generally be sold, subject to applicable pattern rights and product safety regulations.
Conclusion
The Santa Claus Toilet Paper Holder Pattern is a delightful Christmas crochet project that combines festive charm, creative amigurumi construction, and practical home decoration. Its cheerful Santa Claus design, traditional red outfit, fluffy white beard, black boots, and outstretched arms create an adorable handmade accessory inspired by the reference image.
One of the greatest advantages of this project is its versatility. You can customize Santa’s size, facial expression, yarn colors, clothing details, and decorative accessories to create a unique Christmas figure.
The project also provides an enjoyable opportunity to practice circular crochet, amigurumi shaping, stuffing techniques, decorative embroidery, and careful assembly.
For crocheters who enjoy making seasonal home accessories, this Christmas Crochet Toilet Paper Holder offers a rewarding way to transform simple yarn into a charming holiday decoration.
Whether you choose traditional red and white, elegant burgundy and cream, or another festive color combination, the finished Santa can bring warmth, personality, and Christmas cheer to your home.
With careful stitching, secure assembly, and thoughtful finishing details, your Handmade Santa Claus Toilet Paper Holder can become a treasured part of your holiday decorations for many Christmas seasons.